# Linux

# Fog


# 01 - Description

## <span style="color: rgb(53, 152, 219);">**A - Description**</span>

<span style="color: rgb(0, 0, 0);">Serveur Fog : Vmware</span>

<span style="color: rgb(0, 0, 0);">Distribution : Ubuntu 20.04</span>

### <span style="color: rgb(35, 111, 161);">**1 Version**</span>

La version 1.5.9 de Fog est compatible avec Ubuntu 20.04 mais pas encore avec la version 22.04. Une erreur liée au paquet php-gettext s’affiche à l’installation car ce paquet est maintenant intégré dans le php-common.

Pour un déploiement sur un Ubuntu 22.04, il faut utiliser la branche DEV du projet FOG. Pour utiliser la branche officielle, il faut un déploiement sur un Ubuntu 20.04. Pour avoir accès aux différentes mises à jour la version de Ubuntu utilisé est la 20.04.

### <span style="color: rgb(35, 111, 161);">**2 Matériels**</span>

Pour l’installation d’un serveur FOG, il y aura besoin de trois machines :

-Machine 1 (Serveur FOG)

-Machine 2 (Master)

-Machine 3 (Client)

### <span style="color: rgb(35, 111, 161);">**3 Sources**</span>

[<span style="font-size: 11pt; font-family: Arial,sans-serif; color: #0000ff; background-color: transparent; font-weight: 400; font-style: normal; font-variant: normal; text-decoration: underline; -webkit-text-decoration-skip: none; text-decoration-skip-ink: none; vertical-align: baseline; white-space: pre-wrap;">https://chrtophe.developpez.com/tutoriels/deploiement-fogproject/</span>](https://chrtophe.developpez.com/tutoriels/deploiement-fogproject/)

<span style="font-size: 11pt; font-family: Arial,sans-serif; color: #000000; background-color: transparent; font-weight: 400; font-style: normal; font-variant: normal; text-decoration: none; vertical-align: baseline; white-space: pre-wrap;">https://docs.fogproject.org/en/latest/installation/install\_fog\_server.html</span>

[<span style="font-size: 11pt; font-family: Arial,sans-serif; color: #0000ff; background-color: transparent; font-weight: 400; font-style: normal; font-variant: normal; text-decoration: underline; -webkit-text-decoration-skip: none; text-decoration-skip-ink: none; vertical-align: baseline; white-space: pre-wrap;">https://enzo-lefort.fr/pdf/Stage1/Mise\_en\_place\_d\_un\_serveur\_FOG.pdf</span>](https://enzo-lefort.fr/pdf/Stage1/Mise_en_place_d_un_serveur_FOG.pdf)

[<span style="font-size: 11pt; font-family: Arial,sans-serif; color: #0000ff; background-color: transparent; font-weight: 400; font-style: normal; font-variant: normal; text-decoration: underline; -webkit-text-decoration-skip: none; text-decoration-skip-ink: none; vertical-align: baseline; white-space: pre-wrap;">https://doc.ubuntu-fr.org/fog</span>](https://doc.ubuntu-fr.org/fog)

[<span style="font-size: 11pt; font-family: Arial,sans-serif; color: #0000ff; background-color: transparent; font-weight: 400; font-style: normal; font-variant: normal; text-decoration: underline; -webkit-text-decoration-skip: none; text-decoration-skip-ink: none; vertical-align: baseline; white-space: pre-wrap;">https://learn.microsoft.com/fr-fr/windows-hardware/manufacture/desktop/sysprep--system-preparation--overview?view=windows-11</span>](https://learn.microsoft.com/fr-fr/windows-hardware/manufacture/desktop/sysprep--system-preparation--overview?view=windows-11)

<span id="bkmrk-https%3A%2F%2Fgeniorama.co" style="font-size: 11pt; font-family: Arial,sans-serif; color: #000000; background-color: transparent; font-weight: 400; font-style: normal; font-variant: normal; text-decoration: none; vertical-align: baseline; white-space: pre-wrap;">https://geniorama.com/quand-comment-utiliser-sysprep-outil-preparation-windows/#:~:text=1-%20Tapez%20«%20cd%sysprep%20»%20%3B%202-,5-%20Cochez%20la%20case%20«%20Généraliser%20»%20%3B</span>

# 02 - Installation

## <span style="color: rgb(53, 152, 219);">**A - Ubuntu 20.04** </span>

<span style="font-size: 11pt; font-family: Arial,sans-serif; color: #000000; background-color: transparent; font-weight: 400; font-style: normal; font-variant: normal; text-decoration: none; vertical-align: baseline; white-space: pre-wrap;">Toutes ces étapes sont à effectuer sur la Machine 1 (Serveur Fog).</span>

### <span style="color: rgb(53, 152, 219);">**<span style="color: rgb(35, 111, 161);">1 Langue</span>**</span>

<span style="color: rgb(53, 152, 219);">**<span id="bkmrk-param%C3%A9trage-de-la-la-1" style="font-size: 10.5pt; font-family: Calibri,sans-serif; color: #000000; background-color: transparent; font-weight: 400; font-style: normal; font-variant: normal; text-decoration: none; vertical-align: baseline; white-space: pre-wrap;">Paramétrage de la langue de l’os.</span>**</span>

<span style="color: rgb(53, 152, 219);">**<span style="font-size: 10.5pt; font-family: Calibri,sans-serif; color: #000000; background-color: transparent; font-weight: 400; font-style: normal; font-variant: normal; text-decoration: none; vertical-align: baseline; white-space: pre-wrap;"><span id="bkmrk--1" style="font-size: 11pt; font-family: Arial,sans-serif; color: #000000; background-color: transparent; font-weight: 400; font-style: normal; font-variant: normal; text-decoration: none; vertical-align: baseline; white-space: pre-wrap;"><span style="border: none; display: inline-block; overflow: hidden; width: 430px; height: 188px;">![](https://lh7-us.googleusercontent.com/docsz/AD_4nXcjioVT-6NrxfBdpv06GTSsV_FNsC6uWZDDr8pxL9UbQwJPHfAA0g_Fi-dZJmG6nKWYKzPIrOBTU1_MDUr9DVo3nQOu5UMYMM9qBBWqYuMT-UleqDVj5r7PGaBG91FnvPjBwKpi5fNnLxKD7ugfhChWoP2ODZYtyx-fVUJsq3pmJkVWqxd1qw?key=1ofmsasuPhleDgurqZ_yuQ)</span></span></span>**</span>

### <span style="color: rgb(53, 152, 219);">**<span style="color: rgb(35, 111, 161);">2 Clavier</span>**</span>

<span style="color: rgb(53, 152, 219);">**<span style="font-size: 10.5pt; font-family: Calibri,sans-serif; color: #000000; background-color: transparent; font-weight: 400; font-style: normal; font-variant: normal; text-decoration: none; vertical-align: baseline; white-space: pre-wrap;"><span id="bkmrk-param%C3%A9trage-de-la-la-3" style="font-size: 10.5pt; font-family: Calibri,sans-serif; color: #000000; background-color: transparent; font-weight: 400; font-style: normal; font-variant: normal; text-decoration: none; vertical-align: baseline; white-space: pre-wrap;">Paramétrage de la langue du clavier.</span></span>**</span>

<span style="color: rgb(53, 152, 219);">**<span style="font-size: 10.5pt; font-family: Calibri,sans-serif; color: #000000; background-color: transparent; font-weight: 400; font-style: normal; font-variant: normal; text-decoration: none; vertical-align: baseline; white-space: pre-wrap;"><span id="bkmrk--3" style="font-size: 11pt; font-family: Arial,sans-serif; color: #000000; background-color: transparent; font-weight: 400; font-style: normal; font-variant: normal; text-decoration: none; vertical-align: baseline; white-space: pre-wrap;"><span style="border: none; display: inline-block; overflow: hidden; width: 394px; height: 100px;">![](https://lh7-us.googleusercontent.com/docsz/AD_4nXeOhoacgHrzR7aUuOYfyIPK7WlDr16ZnCkNAV9bW6aIrn9NWnGbWKOEiRLWNz6FW-IWe23xKisQ1e-a5ErlE5h3_y7W-lrEkMOrrAxSSE0bM-UuNhHFRwjFIWbdslq5nKyjqKggxrwruZhi0asYfIJoEiqvdSABwA5DG12reVyJmpiO38PJHC0?key=1ofmsasuPhleDgurqZ_yuQ)</span></span></span>**</span>

### <span style="color: rgb(53, 152, 219);">**<span style="color: rgb(35, 111, 161);">3 Adresse IP  
</span>**</span>

<span style="color: rgb(53, 152, 219);">**<span style="font-size: 10.5pt; font-family: Calibri,sans-serif; color: #000000; background-color: transparent; font-weight: 400; font-style: normal; font-variant: normal; text-decoration: none; vertical-align: baseline; white-space: pre-wrap;"><span id="bkmrk-param%C3%A9trage-de-l%E2%80%99adr-1" style="font-size: 10.5pt; font-family: Calibri,sans-serif; color: #000000; background-color: transparent; font-weight: 400; font-style: normal; font-variant: normal; text-decoration: none; vertical-align: baseline; white-space: pre-wrap;">Paramétrage de l’adresse IP.</span></span>**</span>

<span style="color: rgb(53, 152, 219);">**<span style="font-size: 10.5pt; font-family: Calibri,sans-serif; color: #000000; background-color: transparent; font-weight: 400; font-style: normal; font-variant: normal; text-decoration: none; vertical-align: baseline; white-space: pre-wrap;"><span id="bkmrk--5" style="font-size: 11pt; font-family: Arial,sans-serif; color: #000000; background-color: transparent; font-weight: 400; font-style: normal; font-variant: normal; text-decoration: none; vertical-align: baseline; white-space: pre-wrap;"><span style="border: none; display: inline-block; overflow: hidden; width: 581px; height: 132px;">![](https://lh7-us.googleusercontent.com/docsz/AD_4nXdXoIlj9taXfb0yl6mRbGuIXh6r2J8b50TgOzpft99o0aWGq5lG00LZD0me54CJbQaLhN7_DcdjF0VtHsHVyTYUfWXHuHZPLnohQeO3Z4XDuVDffhfSHMxTA1M-yHRxWOR2EoMU8nBhqU2TiRtpY2XjdFfH8q4qjuJDVFV1d-fkUa6sdM17pj0?key=1ofmsasuPhleDgurqZ_yuQ)</span></span></span>**</span>

### <span style="color: rgb(53, 152, 219);">**<span style="color: rgb(35, 111, 161);">4 Proxy  
</span>**</span>

<span style="color: rgb(53, 152, 219);">**<span style="font-size: 10.5pt; font-family: Calibri,sans-serif; color: #000000; background-color: transparent; font-weight: 400; font-style: normal; font-variant: normal; text-decoration: none; vertical-align: baseline; white-space: pre-wrap;"><span id="bkmrk-configuration-du-pro-1" style="font-size: 10.5pt; font-family: Calibri,sans-serif; color: #000000; background-color: transparent; font-weight: 400; font-style: normal; font-variant: normal; text-decoration: none; vertical-align: baseline; white-space: pre-wrap;">Configuration du proxy si nécessaire.</span></span>**</span>

<span style="color: rgb(53, 152, 219);">**<span style="font-size: 10.5pt; font-family: Calibri,sans-serif; color: #000000; background-color: transparent; font-weight: 400; font-style: normal; font-variant: normal; text-decoration: none; vertical-align: baseline; white-space: pre-wrap;"><span id="bkmrk--7" style="font-size: 11pt; font-family: Arial,sans-serif; color: #000000; background-color: transparent; font-weight: 400; font-style: normal; font-variant: normal; text-decoration: none; vertical-align: baseline; white-space: pre-wrap;"><span style="border: none; display: inline-block; overflow: hidden; width: 643px; height: 216px;">![](https://lh7-us.googleusercontent.com/docsz/AD_4nXdUn2eufjDPfU5FP26IN0RIueCATwjIpLfIM0VlXgAmSmp4IrFHA7vfJP5rhknFMbXHXsX5THDuUGhcvE_N2qRv4XuRp-bf_4kbNBt-nxwRSKVk7yrwSBmJ0hXnuUPUEo9P1IsDrg-JwvNwA_nfnlxj8Hdg0yEvbMYAThn3yLuuqbusyik4yFQ?key=1ofmsasuPhleDgurqZ_yuQ)</span></span></span>**</span>

### <span style="color: rgb(53, 152, 219);">**<span style="color: rgb(35, 111, 161);">5 Stockage</span>**</span>

<span style="color: rgb(53, 152, 219);">**<span style="font-size: 10.5pt; font-family: Calibri,sans-serif; color: #000000; background-color: transparent; font-weight: 400; font-style: normal; font-variant: normal; text-decoration: none; vertical-align: baseline; white-space: pre-wrap;"><span id="bkmrk-configuration-du-sto-1" style="font-size: 10.5pt; font-family: Calibri,sans-serif; color: #000000; background-color: transparent; font-weight: 400; font-style: normal; font-variant: normal; text-decoration: none; vertical-align: baseline; white-space: pre-wrap;">Configuration du stockage.</span></span>**</span>

<span style="color: rgb(53, 152, 219);">**<span style="font-size: 10.5pt; font-family: Calibri,sans-serif; color: #000000; background-color: transparent; font-weight: 400; font-style: normal; font-variant: normal; text-decoration: none; vertical-align: baseline; white-space: pre-wrap;"><span id="bkmrk--9" style="font-size: 11pt; font-family: Arial,sans-serif; color: #000000; background-color: transparent; font-weight: 400; font-style: normal; font-variant: normal; text-decoration: none; vertical-align: baseline; white-space: pre-wrap;"><span style="border: none; display: inline-block; overflow: hidden; width: 643px; height: 172px;">![](https://lh7-us.googleusercontent.com/docsz/AD_4nXeuS0MtLTMWoT855Sdd0iLQK1qG4JnB7S7rGOiSnLpQCG726QH8OBGcoyuzS6OPRZG0Mf9-D3fet9RxC_qakVwm3-S3tEKJ_rY3dyXQsUkfICANAVMhDvrRSXxSKAaE7BvDOK8GnygNBrXOllz7Hsequ9LlOMwfTbKraxE3vWgJsjiph-_i-BI?key=1ofmsasuPhleDgurqZ_yuQ)</span></span></span>**</span>

### <span style="color: rgb(53, 152, 219);">**<span style="color: rgb(35, 111, 161);">6 Sommaire du système de fichiers</span>**</span>

<span style="font-size: 10.5pt; font-family: Calibri,sans-serif; color: #000000; background-color: transparent; font-weight: 400; font-style: normal; font-variant: normal; text-decoration: none; vertical-align: baseline; white-space: pre-wrap;">Configuration du sommaire du système de fichiers.</span>

<span style="font-size: 10.5pt; font-family: Calibri,sans-serif; color: #000000; background-color: transparent; font-weight: 400; font-style: normal; font-variant: normal; text-decoration: none; vertical-align: baseline; white-space: pre-wrap;"><span id="bkmrk--11" style="font-size: 11pt; font-family: Arial,sans-serif; color: #000000; background-color: transparent; font-weight: 400; font-style: normal; font-variant: normal; text-decoration: none; vertical-align: baseline; white-space: pre-wrap;"><span style="border: none; display: inline-block; overflow: hidden; width: 549px; height: 202px;">![](https://lh7-us.googleusercontent.com/docsz/AD_4nXd53hjFdlqOBKlz74a5FldtSN2bRLRMUnvkRGgzHUVJn4AMPgAzE0NQtXQ3wZAfzCVcyuW-2gM4rg6Wgrb5gCrwWaq1JXQGDSEyRUWIRfA2oayzDvs7FDkuKXx05K3EGkYltmaDu-mACSdRJERhcqm3F4sZtLgRLE0ZCBkk2yzaepfi3Lxwt4U?key=1ofmsasuPhleDgurqZ_yuQ)</span></span></span>

### <span style="color: rgb(53, 152, 219);">**<span style="color: rgb(35, 111, 161);">7 Nom</span>**</span>

<span style="font-size: 10.5pt; font-family: Calibri,sans-serif; color: #000000; background-color: transparent; font-weight: 400; font-style: normal; font-variant: normal; text-decoration: none; vertical-align: baseline; white-space: pre-wrap;"><span id="bkmrk-configuration-du-nom-1" style="font-size: 10.5pt; font-family: Calibri,sans-serif; color: #000000; background-color: transparent; font-weight: 400; font-style: normal; font-variant: normal; text-decoration: none; vertical-align: baseline; white-space: pre-wrap;">Configuration du nom, nom de machine ainsi que mot de passe. </span></span>

<span style="font-size: 10.5pt; font-family: Calibri,sans-serif; color: #000000; background-color: transparent; font-weight: 400; font-style: normal; font-variant: normal; text-decoration: none; vertical-align: baseline; white-space: pre-wrap;"><span id="bkmrk--13" style="font-size: 10.5pt; font-family: Calibri,sans-serif; color: #000000; background-color: transparent; font-weight: 400; font-style: normal; font-variant: normal; text-decoration: none; vertical-align: baseline; white-space: pre-wrap;"><span style="border: none; display: inline-block; overflow: hidden; width: 509px; height: 175px;">![](https://lh7-us.googleusercontent.com/docsz/AD_4nXfmIJmGEV_AR44vpmjJpT_6uOUQ5_JYENeRUGxEiwIFLAlE_XzqZml9DwGQrzci4ZdaF83ypc5q9WJx-k_IW3dht6Fby6eFJDhfS8fcVeEH4cqJ0oAmjqUU48v6z2Pck_Q8ruiTEuQ1IWDgmOUMCNa10fk2HQTWEdLuP22brNLX-ZjgE7wGoU0?key=1ofmsasuPhleDgurqZ_yuQ)</span></span></span>

### <span style="color: rgb(53, 152, 219);">**<span style="color: rgb(35, 111, 161);">8 OpenSSH</span>**</span>

<span style="font-size: 10.5pt; font-family: Calibri,sans-serif; color: #000000; background-color: transparent; font-weight: 400; font-style: normal; font-variant: normal; text-decoration: none; vertical-align: baseline; white-space: pre-wrap;"><span id="bkmrk-activation-de-opensh-1" style="font-size: 10.5pt; font-family: Calibri,sans-serif; color: #000000; background-color: transparent; font-weight: 400; font-style: normal; font-variant: normal; text-decoration: none; vertical-align: baseline; white-space: pre-wrap;">Activation de OpenSHH.</span></span>

<span style="font-size: 10.5pt; font-family: Calibri,sans-serif; color: #000000; background-color: transparent; font-weight: 400; font-style: normal; font-variant: normal; text-decoration: none; vertical-align: baseline; white-space: pre-wrap;"><span id="bkmrk--15" style="font-size: 11pt; font-family: Arial,sans-serif; color: #000000; background-color: transparent; font-weight: 400; font-style: normal; font-variant: normal; text-decoration: none; vertical-align: baseline; white-space: pre-wrap;"><span style="border: none; display: inline-block; overflow: hidden; width: 586px; height: 119px;">![](https://lh7-us.googleusercontent.com/docsz/AD_4nXcqxse0AkjW8HfCpmWojnWKP1TivshxvGjVyNvGBpJ2LsKmaXKqHvi9gK2fvvFM7Aribt01r0cFIVHeQ7tWviVsU05MrAOluk-EqD7q-B-WdSAblxmcyAPAO0HH4sAyczrxR84MeEc59RE0C7_PX3xdwJzGjjMLxbS9J02K_6g1ICKEMHbxyA?key=1ofmsasuPhleDgurqZ_yuQ)</span></span></span>

### <span style="color: rgb(53, 152, 219);">**<span style="color: rgb(35, 111, 161);">9 Installation de Ubuntu  
</span>**</span>

<span style="font-size: 10.5pt; font-family: Calibri,sans-serif; color: #000000; background-color: transparent; font-weight: 400; font-style: normal; font-variant: normal; text-decoration: none; vertical-align: baseline; white-space: pre-wrap;"><span id="bkmrk-installation-de-ubun-1" style="font-size: 10.5pt; font-family: Calibri,sans-serif; color: #000000; background-color: transparent; font-weight: 400; font-style: normal; font-variant: normal; text-decoration: none; vertical-align: baseline; white-space: pre-wrap;">Installation de Ubuntu 20.04</span></span>

<span style="font-size: 10.5pt; font-family: Calibri,sans-serif; color: #000000; background-color: transparent; font-weight: 400; font-style: normal; font-variant: normal; text-decoration: none; vertical-align: baseline; white-space: pre-wrap;"><span id="bkmrk--17" style="font-size: 11pt; font-family: Arial,sans-serif; color: #000000; background-color: transparent; font-weight: 400; font-style: normal; font-variant: normal; text-decoration: none; vertical-align: baseline; white-space: pre-wrap;"><span style="border: none; display: inline-block; overflow: hidden; width: 643px; height: 201px;">![](https://lh7-us.googleusercontent.com/docsz/AD_4nXftGUpgOCPaFznT_OcFTM8-c5XKrBQt4gR4wNVIIlJffNxOa8_vf3bp711ZzqZmiwNW694V8wueh5DqhxARTazUfqcOc5qhRusYi47QnlqOhTEvB5y0TgXu_lDXjO7NgO7y6cUm6e2vVHXUXQwaBqSLRCamwaTsXM8xFUSGhBEQBnLPw58CheQ?key=1ofmsasuPhleDgurqZ_yuQ)</span></span></span>

### <span style="color: rgb(53, 152, 219);">**<span style="color: rgb(35, 111, 161);">10 Environnement de Serveur  
</span>**</span>

<span style="font-size: 10.5pt; font-family: Calibri,sans-serif; color: #000000; background-color: transparent; font-weight: 400; font-style: normal; font-variant: normal; text-decoration: none; vertical-align: baseline; white-space: pre-wrap;"><span id="bkmrk--19" style="font-size: 11pt; font-family: Arial,sans-serif; color: #000000; background-color: transparent; font-weight: 400; font-style: normal; font-variant: normal; text-decoration: none; vertical-align: baseline; white-space: pre-wrap;"><span style="border: none; display: inline-block; overflow: hidden; width: 643px; height: 293px;">![](https://lh7-us.googleusercontent.com/docsz/AD_4nXcMdToK-GF5a1Zlb-eWz8P_KC33pYUhHkYsyd3IvG5cnE9g97KrzvCb83DTcTobTsrCe9Vvd_9Dx7A2JlLiGKBIPe_Rtrm0bHwurB7jgBJUbFBj-WXa5vuYCrqdJOYIa1CtRLjGyQvaYIhfoHLdKSXmrythQ6lp0p9aGS2LTj_wvY0o3agpDg?key=1ofmsasuPhleDgurqZ_yuQ)</span></span></span>

## <span style="color: rgb(53, 152, 219);">**B**</span><span style="color: rgb(53, 152, 219);"> **- Serveur Fog**</span>  


### <span style="color: rgb(53, 152, 219);"> **<span style="color: rgb(35, 111, 161);">1 Mise à jours</span>**</span>

Installation des différentes mises à jour en ligne de commande.

<span style="font-family: Calibri, serif;"><span style="font-size: small;">Commandes :</span></span>

```bash
sudo -i
apt-get update
```

[![image.png](https://wiki-matheo.kermorvant.fr/uploads/images/gallery/2023-12/scaled-1680-/image.png)](https://wiki-matheo.kermorvant.fr/uploads/images/gallery/2023-12/image.png)

### <span style="color: rgb(53, 152, 219);">**<span style="color: rgb(35, 111, 161);">2 Git</span>**</span>

<span style="font-family: Calibri, serif;"><span style="font-size: small;">Installation de git en ligne de commande.</span></span>

<span style="font-family: Calibri, serif;"><span style="font-size: small;">Commande : </span></span>

```bash
apt-get -y install git
```

### <span style="color: rgb(53, 152, 219);">**<span style="color: rgb(35, 111, 161);">3 Wget/Unzip</span>**</span>

<span style="font-family: Calibri, serif;"><span style="font-size: small;">Installation en ligne de commande de wget ainsi que unzip.</span></span>

<span style="font-family: Calibri, serif;"><span style="font-size: small;">Commande : </span></span>

```bash
apt-get install wget unzip
```

[![image.png](https://wiki-matheo.kermorvant.fr/uploads/images/gallery/2023-12/scaled-1680-/eN8image.png)](https://wiki-matheo.kermorvant.fr/uploads/images/gallery/2023-12/eN8image.png)

### <span style="color: rgb(53, 152, 219);">**<span style="color: rgb(35, 111, 161);">4 Git Fog</span>**</span>

<span style="font-family: Calibri, serif;"><span style="font-size: small;">Installation du git FOG en ligne de commande.</span></span>

<span style="font-family: Calibri, serif;"><span style="font-size: small;">Commande : </span></span>

```
wget https://github.com/FOGProject/fogproject/archive/refs/heads/master.zip
```

[![image.png](https://wiki-matheo.kermorvant.fr/uploads/images/gallery/2023-12/scaled-1680-/U4Iimage.png)](https://wiki-matheo.kermorvant.fr/uploads/images/gallery/2023-12/U4Iimage.png)

### <span style="color: rgb(53, 152, 219);">**<span style="color: rgb(35, 111, 161);">5 Git Fog</span>**</span>

<span style="font-family: Calibri, serif;"><span style="font-size: small;">Décompression du fichier master.zip.</span></span>

<span style="font-family: Calibri, serif;"><span style="font-size: small;">Commande : </span></span>

```bash
unzip master.zip
```

[![image.png](https://wiki-matheo.kermorvant.fr/uploads/images/gallery/2023-12/scaled-1680-/SQLimage.png)](https://wiki-matheo.kermorvant.fr/uploads/images/gallery/2023-12/SQLimage.png)

### <span style="color: rgb(53, 152, 219);">**<span style="color: rgb(35, 111, 161);">6 Exécution du programme</span>**</span>

<span style="font-family: Calibri, serif;"><span style="font-size: small;">Exécution du programme d’installation.</span></span>

<span style="font-family: Calibri, serif;"><span style="font-size: small;">Commandes : </span></span>

```bash
cd /root/fogproject-master/bin
./installfog.sh
```

[![image.png](https://wiki-matheo.kermorvant.fr/uploads/images/gallery/2023-12/scaled-1680-/WTGimage.png)](https://wiki-matheo.kermorvant.fr/uploads/images/gallery/2023-12/WTGimage.png)

### <span style="color: rgb(53, 152, 219);">**<span style="color: rgb(35, 111, 161);">7 Choix de type d'installation</span>**</span>

<span style="font-family: Calibri, serif;"><span style="font-size: small;">Un serveur de stockage, comme son nom l’indique, ne servira qu’au stockage des images de déploiement. Celui-ci nécessitera d’être connecté à un serveur normal. Un ou plusieurs servers de stockage permettront un meilleur équilibrage de charge en cas de déploiements conséquents. Un seul serveur normal est utilisable.</span></span>

<span style="font-family: Calibri, serif;"><span style="font-size: small;">Service installé sur un serveur normal :</span></span>

<span style="font-family: Calibri, serif;"><span style="font-size: small;">Serveur Web et base de sonnées ;</span></span>

<span style="font-family: Calibri, serif;"><span style="font-size: small;">Serveur DHCP ;</span></span>

<span style="font-family: Calibri, serif;"><span style="font-size: small;">Serveur PXE ;</span></span>

<span style="font-family: Calibri, serif;"><span style="font-size: small;">Serveur NFS et FTP pour le stockage.</span></span>

<span style="font-family: Calibri, serif;"><span style="font-size: small;">Sur un serveur de stockage, seuls les services NFS et FTP sont déployés.</span></span>

[![image.png](https://wiki-matheo.kermorvant.fr/uploads/images/gallery/2023-12/scaled-1680-/uLmimage.png)](https://wiki-matheo.kermorvant.fr/uploads/images/gallery/2023-12/uLmimage.png)

### <span style="color: rgb(53, 152, 219);">**<span style="color: rgb(35, 111, 161);">8 Réglage Réseau  
</span>**</span>

<span style="font-size: 11pt; font-family: Arial,sans-serif; color: #000000; background-color: transparent; font-weight: 400; font-style: normal; font-variant: normal; text-decoration: none; vertical-align: baseline; white-space: pre-wrap;">Paramétrage du réseau (à laisser par défaut en cas de présence d’une seul carte réseau).</span>

<span id="bkmrk--34" style="font-size: 11pt; font-family: Arial,sans-serif; color: #000000; background-color: transparent; font-weight: 400; font-style: normal; font-variant: normal; text-decoration: none; vertical-align: baseline; white-space: pre-wrap;"><span style="border: none; display: inline-block; overflow: hidden; width: 542px; height: 38px;">![](https://lh7-us.googleusercontent.com/docsz/AD_4nXdRIPMVInWt5aN_97aQVtUHfTg_e2PobM8_px7cJKnpPmh7qrQMsLnnlFmv9GWZ00crlcn68IrZnZNvK6ITaO_AWvjUIA5gLJ9VDsaQYYjjmv-54WIcchLXPtSrJaiBYzpvUffysj7t16M-CksqoE19wqgq5Ei6xngYJYutaKSLD6DecQ0XaA?key=1ofmsasuPhleDgurqZ_yuQ)</span></span>

### <span style="color: rgb(53, 152, 219);">**<span style="color: rgb(35, 111, 161);">9 Réseau et réglage du DHCP  
</span>**</span>

<span id="bkmrk-les-prochains-r%C3%A9glag" style="font-size: 11pt; font-family: Arial,sans-serif; color: #000000; background-color: transparent; font-weight: 400; font-style: normal; font-variant: normal; text-decoration: none; vertical-align: baseline; white-space: pre-wrap;">Les prochains réglages concernent le réseau avec les réglages du serveur DHCP fourni par Fog Project (ne pas activer le serveur DHCP de Fog Project empêche le boot PXE) :</span>

<span id="bkmrk--35" style="font-size: 11pt; font-family: Arial,sans-serif; color: #000000; background-color: transparent; font-weight: 400; font-style: normal; font-variant: normal; text-decoration: none; vertical-align: baseline; white-space: pre-wrap;"><span style="border: none; display: inline-block; overflow: hidden; width: 570px; height: 178px;">![](https://lh7-us.googleusercontent.com/docsz/AD_4nXeCT9-bQRAGSctbeAGqp-WbqHDG_HxkYANf_Uhsn1mrP-iqU_TcH7IcjQeUS79iyCl1BPq2SEH4oWvLbFBfOonq9K_71-lj_X-NWkW2ZLDzOrTQ3qFBPzba4u6BxJQy4AeT6xUYhpPcHCk7WJv4Zi9EjqD5xIylzltgxUc7_C-Ei5ugfYhvjJI?key=1ofmsasuPhleDgurqZ_yuQ)</span></span>

### <span style="color: rgb(53, 152, 219);">**<span style="color: rgb(35, 111, 161);">10 Réglage de l'internalisation  
</span>**</span>

<span style="font-size: 11pt; font-family: Arial,sans-serif; color: #000000; background-color: transparent; font-weight: 400; font-style: normal; font-variant: normal; text-decoration: none; vertical-align: baseline; white-space: pre-wrap;">Pour avoir la possibilité de passer l’interface en français, il faudra répondre « yes »</span>.

<span id="bkmrk--37" style="font-size: 11pt; font-family: Arial,sans-serif; color: #000000; background-color: transparent; font-weight: 400; font-style: normal; font-variant: normal; text-decoration: none; vertical-align: baseline; white-space: pre-wrap;"><span style="border: none; display: inline-block; overflow: hidden; width: 510px; height: 44px;">![](https://lh7-us.googleusercontent.com/docsz/AD_4nXdWpS-DR-EJlM1yt5pQhGhBzl_d-ulDEZU_OLPcEOcdpPzghB1JERsIIEj5W1UmTivMTRzI7QGa721vqqA0qCdHXQb2rNruIPo0kzfghmaMetSwB2KVWdo4AwAsy3MW2SkdN1m4oFPdBaxDCGtIDq7pMdOsLkTvIvXzS_6ehUXbfbcAr4vHO4g?key=1ofmsasuPhleDgurqZ_yuQ)</span></span>

### <span style="color: rgb(53, 152, 219);">**<span style="color: rgb(35, 111, 161);">11 Support HTTPS  
</span>**</span>

<span id="bkmrk--38" style="font-size: 11pt; font-family: Arial,sans-serif; color: #000000; background-color: transparent; font-weight: 400; font-style: normal; font-variant: normal; text-decoration: none; vertical-align: baseline; white-space: pre-wrap;"><span style="border: none; display: inline-block; overflow: hidden; width: 545px; height: 87px;">![](https://lh7-us.googleusercontent.com/docsz/AD_4nXfkpio32B-MY_jKH82zO-AYmqfW5boee10qTEbbvE5n7_aNmiWCuNdecqBWbgJhCJhhhDJ5OZ02DRCkEWF4W2rUC8011iKeJzY9eEigRuwZPg_eUpiSuQ6eDJUU33IubgwrhNLZJZLb6QF0mJbguc5j7Tb2IwohvGRrXQeC6WmK_Y1NNB023LE?key=1ofmsasuPhleDgurqZ_yuQ)</span></span>

### <span style="color: rgb(53, 152, 219);">**<span style="color: rgb(35, 111, 161);">12 Choisir le hostname  
</span>**</span>

<span id="bkmrk--40" style="font-size: 11pt; font-family: Arial,sans-serif; color: #000000; background-color: transparent; font-weight: 400; font-style: normal; font-variant: normal; text-decoration: none; vertical-align: baseline; white-space: pre-wrap;"><span style="border: none; display: inline-block; overflow: hidden; width: 560px; height: 81px;">![](https://lh7-us.googleusercontent.com/docsz/AD_4nXc9tK9kPA9qI2Zdw07sbLZJkKa41hN51Hf6J84Ny94Gowv9eqPqEm_L46gEgdSAxAlvPyVe_nx8qGqFHk-TO2dvBX0N-UUMvXLsagzMX18CGJM6J_M5hFIk4uLwGLSQufVdTsrYG1EkWDJ_Ye098SzbmvL1KQqPv_RwIeWBFtq-9Qinh-QjdQ?key=1ofmsasuPhleDgurqZ_yuQ)</span></span>

### <span style="color: rgb(53, 152, 219);">**<span style="color: rgb(35, 111, 161);">13 Envoie des informations  
</span>**</span>

<span id="bkmrk--42" style="font-size: 11pt; font-family: Arial,sans-serif; color: #000000; background-color: transparent; font-weight: 400; font-style: normal; font-variant: normal; text-decoration: none; vertical-align: baseline; white-space: pre-wrap;"><span style="border: none; display: inline-block; overflow: hidden; width: 420px; height: 364px;">![](https://lh7-us.googleusercontent.com/docsz/AD_4nXetCoit1s-ZWR9I4cmH2wVLGZCM16Ya_feiKq6Me8LpxpoQZvswIdQS42sxFhmpm_w9kunOMCP6vMmbvDT_YeynINkuzEPWVJPNy2CoqhFXH-FN5yKHokYoZzEQ3DkT3Ur6IpJtzldVTxRk4MVT7f3it97AnAjB3VlJ-78wI3ZHphai-c3TGg?key=1ofmsasuPhleDgurqZ_yuQ)</span></span>

### <span style="color: rgb(53, 152, 219);">**<span style="color: rgb(35, 111, 161);">14 Installation en cours  
</span>**</span>

<span id="bkmrk--44" style="font-size: 11pt; font-family: Arial,sans-serif; color: #000000; background-color: transparent; font-weight: 400; font-style: normal; font-variant: normal; text-decoration: none; vertical-align: baseline; white-space: pre-wrap;"><span style="border: none; display: inline-block; overflow: hidden; width: 404px; height: 394px;">![](https://lh7-us.googleusercontent.com/docsz/AD_4nXcVBkKstxW9GM3ztU_20V9XbKTLK1hu9EIcR-IrzInEanbRLov4GKqDj477GrwVcYDVuDR8C3k8fJXcdLWoU44t4LYUIOup2rzS0li1KEMf4uHu7MqSTEyt3hrw8QeK9lHPrmlwAG7qGkQLAF3xxuyjtxBxn09RJ4vT80fQnh0shzPikofknQ?key=1ofmsasuPhleDgurqZ_yuQ)</span></span>

# 03 - Configuration

## <span style="color: rgb(53, 152, 219);">**A - Interface graphique** </span>


### <span style="color: rgb(53, 152, 219);">**<span style="color: rgb(35, 111, 161);">1 Accès au site  
</span>**</span>

<span id="bkmrk-une-fois-l%E2%80%99installat-1" style="font-size: 11pt; font-family: Arial,sans-serif; color: #000000; background-color: transparent; font-weight: 400; font-style: normal; font-variant: normal; text-decoration: none; vertical-align: baseline; white-space: pre-wrap;">Une fois l’installation terminée, taper sur le navigateur le lien donné, ici « </span>[<span style="font-size: 11pt; font-family: Arial,sans-serif; color: #0000ff; background-color: transparent; font-weight: 400; font-style: normal; font-variant: normal; text-decoration: underline; -webkit-text-decoration-skip: none; text-decoration-skip-ink: none; vertical-align: baseline; white-space: pre-wrap;">http://192.168.197.134/fog/management</span>](http://192.168.197.134/fog/management)<span style="font-size: 11pt; font-family: Arial,sans-serif; color: #000000; background-color: transparent; font-weight: 400; font-style: normal; font-variant: normal; text-decoration: none; vertical-align: baseline; white-space: pre-wrap;"> ».</span>

### <span style="color: rgb(53, 152, 219);">**<span style="color: rgb(35, 111, 161);">2 Mot de passe  
</span>**</span>

<span style="font-size: 11pt; font-family: Arial,sans-serif; color: #000000; background-color: transparent; font-weight: 400; font-style: normal; font-variant: normal; text-decoration: none; vertical-align: baseline; white-space: pre-wrap;">Une fois sur le site, pour avoir le mot de passe appuyé sur la touche Entré sur le serveur FOG, celui-ci donnera le mot de passe pour se connecter.</span>

<span id="bkmrk--21" style="font-size: 11pt; font-family: Arial,sans-serif; color: #000000; background-color: transparent; font-weight: 400; font-style: normal; font-variant: normal; text-decoration: none; vertical-align: baseline; white-space: pre-wrap;"><span style="border: none; display: inline-block; overflow: hidden; width: 352px; height: 238px;">![](https://lh7-us.googleusercontent.com/docsz/AD_4nXfSWVtl3Prpdrv_RlF6gYoOfUCWlbBaNzwKogc2WLNz8iMQnoFwEKq12OHwsnYzW13tAow2B6mJRAuuiAyiEMtf3PMFzSFUhNC35kwpQJlz4ihH9uV9ldo7WTEgnqAgA3uDELIyzO1MB5iTRtaAF4V-FOHpEwxObW9YJaNQMzPqGlgb8BBTow?key=1ofmsasuPhleDgurqZ_yuQ)</span></span>

<span style="font-size: 11pt; font-family: Arial,sans-serif; color: #000000; background-color: transparent; font-weight: 400; font-style: normal; font-variant: normal; text-decoration: none; vertical-align: baseline; white-space: pre-wrap;"><span id="bkmrk-%C3%80-ce-stade%2C-choisir--1" style="font-size: 11pt; font-family: Arial,sans-serif; color: #000000; background-color: transparent; font-weight: 400; font-style: normal; font-variant: normal; text-decoration: none; vertical-align: baseline; white-space: pre-wrap;">À ce stade, choisir la langue française n’aura aucun effet.</span></span>

### <span style="color: rgb(53, 152, 219);">**<span style="color: rgb(35, 111, 161);">3 Dashboard</span>**</span>

<span id="bkmrk--23" style="font-size: 11pt; font-family: Arial,sans-serif; color: #000000; background-color: transparent; font-weight: 400; font-style: normal; font-variant: normal; text-decoration: none; vertical-align: baseline; white-space: pre-wrap;"><span style="border: none; display: inline-block; overflow: hidden; width: 643px; height: 289px;">![](https://lh7-us.googleusercontent.com/docsz/AD_4nXfdqlzzZgafNyiobJh0eQpm_icKqyHG8uLyTCMsIGkv-fI6qXWuehKvVy1Fv8HsU3DmJCC2JelyxLUUpPrZqBvHHR2XAaRVJ3R4eIjXvGRKsEcOPUb9m6tHGpdbWkMGkFwrOxp9rGpXAr2LTpItfxlr7uPHbtOJo_RM5IlzLKimNraPW5X_pzU?key=1ofmsasuPhleDgurqZ_yuQ)</span></span>

### <span style="color: rgb(53, 152, 219);">**<span style="color: rgb(35, 111, 161);">4</span>**</span><span style="color: rgb(53, 152, 219);">**<span style="color: rgb(35, 111, 161);"> Configuration du mot de passe  
</span>**</span>

<span id="bkmrk-une-fois-sur-l%E2%80%99inter-1" style="font-size: 11pt; font-family: Arial,sans-serif; color: #000000; background-color: transparent; font-weight: 400; font-style: normal; font-variant: normal; text-decoration: none; vertical-align: baseline; white-space: pre-wrap;">Une fois sur l’interface graphique, cliquer sur « Utilisateur » puis « Répertorier tous les utilisateurs ». Selon la langue sélectionner, cliquer sur « brouillard » (Français) ou « fog » (Anglais).</span>

<span id="bkmrk--25" style="font-size: 11pt; font-family: Arial,sans-serif; color: #000000; background-color: transparent; font-weight: 400; font-style: normal; font-variant: normal; text-decoration: none; vertical-align: baseline; white-space: pre-wrap;"><span style="border: none; display: inline-block; overflow: hidden; width: 643px; height: 291px;">![](https://lh7-us.googleusercontent.com/docsz/AD_4nXepDSpBSR9yRsoTf3T5-EkFkF6-_p6uCQGS-DQ1A-0VFwvp4yDZHzmae5MW5gxfTul5IiT1Yum_SothWHwwynrf8UUBDUNnf3p1S4aKOtjnh4cOCfrGDZc0-nuKxD2QnN8YbDh1hQ-OAbaYgC3CRNDApUJW4KWHRvwPoBA6OP5aWAPvdJHQS8U?key=1ofmsasuPhleDgurqZ_yuQ)</span></span>

<span id="bkmrk-apr%C3%A8s-avoir-cliqu%C3%A9-s-1" style="font-size: 11pt; font-family: Arial,sans-serif; color: #000000; background-color: transparent; font-weight: 400; font-style: normal; font-variant: normal; text-decoration: none; vertical-align: baseline; white-space: pre-wrap;">Après avoir cliqué sur « fog » sélectionner « Changer de mot de passe ».</span>

<span id="bkmrk--27" style="font-size: 11pt; font-family: Arial,sans-serif; color: #000000; background-color: transparent; font-weight: 400; font-style: normal; font-variant: normal; text-decoration: none; vertical-align: baseline; white-space: pre-wrap;"><span style="border: none; display: inline-block; overflow: hidden; width: 665px; height: 241px;">![](https://lh7-us.googleusercontent.com/docsz/AD_4nXc7By8l0MEhaX7tGIDkqrntpsZjiwWrX4u6Sc-pjGWlTyQiJE-5jQqHhNHHkbPGWLd1Djz_6k2xHXAdI6VHsEIfoeQCIZIIuBJ2yu2SrOfUNOu3fWhaHtZAAz2VAEb6n74tfxmqNJ2PHqXUtymVPbPfW_1GNDqs3dtCy4lmImntPpR-w5vAgw?key=1ofmsasuPhleDgurqZ_yuQ)</span></span>

<span id="bkmrk-une-fois-sur-cette-i-1" style="font-size: 11pt; font-family: Arial,sans-serif; color: #000000; background-color: transparent; font-weight: 400; font-style: normal; font-variant: normal; text-decoration: none; vertical-align: baseline; white-space: pre-wrap;">Une fois sur cette interface, sélectionnez le nouveau mot de passe.</span>

<span style="font-size: 11pt; font-family: Arial,sans-serif; color: #000000; background-color: transparent; font-weight: 400; font-style: normal; font-variant: normal; text-decoration: none; vertical-align: baseline; white-space: pre-wrap;"><span id="bkmrk--29" style="font-size: 11pt; font-family: Arial,sans-serif; color: #000000; background-color: transparent; font-weight: 400; font-style: normal; font-variant: normal; text-decoration: none; vertical-align: baseline; white-space: pre-wrap;"><span style="border: none; display: inline-block; overflow: hidden; width: 696px; height: 260px;">![](https://lh7-us.googleusercontent.com/docsz/AD_4nXf9JMvGS_gc5OVVFjwyDT61OZPOxi4LI7apBiVZ13fjS1lakXLqCym3oTZ2O3r1cTT_DRdGcf4x4q8PYN0XtXlBMUkUEDuTdqL637oKYDCcxxxGUmzmKZR2OkIxyhkU9ktwlmbi7ondrnuhRZmGLaRahMxsr3Xon2_friNABh100BKbLx-fpIs?key=1ofmsasuPhleDgurqZ_yuQ)</span></span></span>

<span id="bkmrk-toutes-les-fonctions-1" style="font-size: 9pt; font-family: Verdana,sans-serif; color: #212529; background-color: #ffffff; font-weight: 400; font-style: normal; font-variant: normal; text-decoration: none; vertical-align: baseline; white-space: pre-wrap;">Toutes les fonctions principales sont accessibles depuis la barre de menu :</span>

<span id="bkmrk--31" style="font-size: 11pt; font-family: Arial,sans-serif; color: #000000; background-color: transparent; font-weight: 400; font-style: normal; font-variant: normal; text-decoration: none; vertical-align: baseline; white-space: pre-wrap;"><span style="border: none; display: inline-block; overflow: hidden; width: 643px; height: 27px;">![](https://lh7-us.googleusercontent.com/docsz/AD_4nXeI0MwaEbC6flpjIaQl44xkplOn5NILeTWJOvqXYjq9umU3n18oWBFpKi9dAjqEdKACvF9b3lDvnf2gAXLtw6x6wnT75WHJRKpWKLMq-jCmI4T-RcBcSo-3apSfD2D4V0ma9DaLq7NZGPjncNpPpR-B2ZM5LN6qNs9BclmQEH9GcfsZJF9EiVA?key=1ofmsasuPhleDgurqZ_yuQ)</span></span>

- <span style="font-size: 9pt; font-family: Verdana,sans-serif; color: #212529; background-color: transparent; font-weight: 400; font-style: normal; font-variant: normal; text-decoration: none; vertical-align: baseline; white-space: pre-wrap;"><span style="border: none; display: inline-block; overflow: hidden; width: 21px; height: 21px;">![Image non disponible](https://lh7-us.googleusercontent.com/docsz/AD_4nXfa6NiDm5U-Im27hvHXGdXLl_E8PCrU4LjLciUWQtuJBMsMe-arNJwsVaeBLqE-YrCpHlXh1ayR6d-XvdvycB7riA6Ztsd4TW-TCPSvsu4Pyd6nngMbdfDFN-qXQlMjDRlGxg2icdc7TbkMabPQNPl2LGeBHjDnQv9r6aDgWBp1I2nlneJ15kY?key=1ofmsasuPhleDgurqZ_yuQ)</span></span><span style="font-size: 9pt; font-family: Verdana,sans-serif; color: #212529; background-color: transparent; font-weight: 400; font-style: normal; font-variant: normal; text-decoration: none; vertical-align: baseline; white-space: pre-wrap;"> Dashboard : affiché par défaut au démarrage ;</span>
- <span style="font-size: 9pt; font-family: Verdana,sans-serif; color: #212529; background-color: transparent; font-weight: 400; font-style: normal; font-variant: normal; text-decoration: none; vertical-align: baseline; white-space: pre-wrap;"><span style="border: none; display: inline-block; overflow: hidden; width: 21px; height: 21px;">![Image non disponible](https://lh7-us.googleusercontent.com/docsz/AD_4nXdgLYYjra40T-2UjhxGCYTmTIMLEcSc3zVfUXAJPgwhJSE9Pe8UHzPnm6wUGYQ7Z7i5MbJ4vx-2ikRQPtw9TDAsn60r4wmJHeaB-bHxoDMSTbK_xlH9yDioPsJz_kf0XP7AI3bkLR5shkEpZGv03VBsu_kN1Do5q2aoKntCJ1A1wA_a0WRTmmw?key=1ofmsasuPhleDgurqZ_yuQ)</span></span><span style="font-size: 9pt; font-family: Verdana,sans-serif; color: #212529; background-color: transparent; font-weight: 400; font-style: normal; font-variant: normal; text-decoration: none; vertical-align: baseline; white-space: pre-wrap;"> User : pour gérer les utilisateurs ;</span>
- <span style="font-size: 9pt; font-family: Verdana,sans-serif; color: #212529; background-color: transparent; font-weight: 400; font-style: normal; font-variant: normal; text-decoration: none; vertical-align: baseline; white-space: pre-wrap;"><span style="border: none; display: inline-block; overflow: hidden; width: 21px; height: 21px;">![Image non disponible](https://lh7-us.googleusercontent.com/docsz/AD_4nXcyBTjVjLLSJUP-bM4OUVGYTvz3c7nEC2uvx9RKk0dDIIyZMD6pfRrZ7FU0eqT8E2jwBwtAXrKU3WvwCVivr4dZsV16Fgby4r4puECbt2y4eHDXEeMH5DKCp1lQF20r88RJ2YiJPfbXPNDl1F6Q0LZ_FWzi9VTrVnm5B0QRP43qSx2WaW51qCw?key=1ofmsasuPhleDgurqZ_yuQ)</span></span><span style="font-size: 9pt; font-family: Verdana,sans-serif; color: #212529; background-color: transparent; font-weight: 400; font-style: normal; font-variant: normal; text-decoration: none; vertical-align: baseline; white-space: pre-wrap;"> Hosts : pour gérer les machines ;</span>
- <span style="font-size: 9pt; font-family: Verdana,sans-serif; color: #212529; background-color: transparent; font-weight: 400; font-style: normal; font-variant: normal; text-decoration: none; vertical-align: baseline; white-space: pre-wrap;"><span style="border: none; display: inline-block; overflow: hidden; width: 21px; height: 21px;">![Image non disponible](https://lh7-us.googleusercontent.com/docsz/AD_4nXeUOM6ofy9p2scubMAWhvErpXZley5MtJCjrK3m0ueT-AM7SgBZeh12DLaVIkN_dHonX85MLFse2rAueoR4dGjrfSeag4RuEO_2omWFN1vbUGoic5drMu6i1NWBiZdFU28zFvJcX8vFJBuyqhCysZxbVx5A8T_zzi3nagV4keasgBSQWK8daw?key=1ofmsasuPhleDgurqZ_yuQ)</span></span><span style="font-size: 9pt; font-family: Verdana,sans-serif; color: #212529; background-color: transparent; font-weight: 400; font-style: normal; font-variant: normal; text-decoration: none; vertical-align: baseline; white-space: pre-wrap;"> Groups : pour gérer les groupes de machines ;</span>
- <span style="font-size: 9pt; font-family: Verdana,sans-serif; color: #212529; background-color: transparent; font-weight: 400; font-style: normal; font-variant: normal; text-decoration: none; vertical-align: baseline; white-space: pre-wrap;"><span style="border: none; display: inline-block; overflow: hidden; width: 21px; height: 21px;">![Image non disponible](https://lh7-us.googleusercontent.com/docsz/AD_4nXevRsZXQaYcwkin9rs1gDaiCLLEftEvuL9E7aXCQVyDHzm-HRWAgXyEeaQoARc5XmCPkMc94BRkYnlhBhrbLHCK2F-MB-ltNK7Ae6cgXsU-SFEggk9K4QaMI953bXsZIzdsGJRgqfS4HoOWBsmY0cJGLYtvZluGY5m0QnyhSC7O8CkG8Sj1gA?key=1ofmsasuPhleDgurqZ_yuQ)</span></span><span style="font-size: 9pt; font-family: Verdana,sans-serif; color: #212529; background-color: transparent; font-weight: 400; font-style: normal; font-variant: normal; text-decoration: none; vertical-align: baseline; white-space: pre-wrap;"> Images : pour gérer les images de déploiements ;</span>
- <span style="font-size: 9pt; font-family: Verdana,sans-serif; color: #212529; background-color: transparent; font-weight: 400; font-style: normal; font-variant: normal; text-decoration: none; vertical-align: baseline; white-space: pre-wrap;"><span style="border: none; display: inline-block; overflow: hidden; width: 21px; height: 21px;">![Image non disponible](https://lh7-us.googleusercontent.com/docsz/AD_4nXeXTsSSGgpYpiApxbUGCFxOWAcV6s9WT7pGmVw9I9_iyX4_d3Q6aafLeiJi27sPx_gQVDQTu9xcJrBzTVx2IEoLUWasFV-7mNQ4h7-9utAky29WiTCX2TjK2AcGdjKU8Gv-xxsNyiHB-MLtTBrpOZBu9TTbpmUAzFD2IOmIT5rIvw_Qk3Pw50A?key=1ofmsasuPhleDgurqZ_yuQ)</span></span><span style="font-size: 9pt; font-family: Verdana,sans-serif; color: #212529; background-color: transparent; font-weight: 400; font-style: normal; font-variant: normal; text-decoration: none; vertical-align: baseline; white-space: pre-wrap;"> Storage : pour gérer les machines de stockage secondaires ;</span>
- <span style="font-size: 9pt; font-family: Verdana,sans-serif; color: #212529; background-color: transparent; font-weight: 400; font-style: normal; font-variant: normal; text-decoration: none; vertical-align: baseline; white-space: pre-wrap;"><span style="border: none; display: inline-block; overflow: hidden; width: 21px; height: 21px;">![Image non disponible](https://lh7-us.googleusercontent.com/docsz/AD_4nXeKBzPXMDKr4NIbUARS-oNa6XgCLKhiyZj23C7vU1U1lvcs54DnVcdBSVucz1-40uFr4BK5Q91zPncZBYVS2NlyhUwirbS6GjTBFCPjQCTrB7eXoCqwsPSAXc_jPesYnaoUZfL-8AvmLalFzVHaLdLHym_ssfn1NwcwFCXXSWgOIrj10fb_ug?key=1ofmsasuPhleDgurqZ_yuQ)</span></span><span style="font-size: 9pt; font-family: Verdana,sans-serif; color: #212529; background-color: transparent; font-weight: 400; font-style: normal; font-variant: normal; text-decoration: none; vertical-align: baseline; white-space: pre-wrap;"> Snapin : pour gérer les actions de déploiement ;</span>
- <span style="font-size: 9pt; font-family: Verdana,sans-serif; color: #212529; background-color: transparent; font-weight: 400; font-style: normal; font-variant: normal; text-decoration: none; vertical-align: baseline; white-space: pre-wrap;"><span style="border: none; display: inline-block; overflow: hidden; width: 21px; height: 21px;">![Image non disponible](https://lh7-us.googleusercontent.com/docsz/AD_4nXecRyUqOPWDEoT9CUozUnumqOG1cMs0iEW3gjWXICMJwdlKzEwrjtHFebBtYFPy5KR1q5CcAdhr61M_mFd8R-Q6hoMQ4pKJe2T1QAm3R4t56edQubivWG1gMdC6gqooYITw775wkYomEcxIdMhYs7nvX1f4pNBO9-2mX4dTDMicxC2EI0SC6O8?key=1ofmsasuPhleDgurqZ_yuQ)</span></span><span style="font-size: 9pt; font-family: Verdana,sans-serif; color: #212529; background-color: transparent; font-weight: 400; font-style: normal; font-variant: normal; text-decoration: none; vertical-align: baseline; white-space: pre-wrap;"> Printer : pour gérer un spooler d’impression depuis Fog ;</span>
- <span style="font-size: 9pt; font-family: Verdana,sans-serif; color: #212529; background-color: transparent; font-weight: 400; font-style: normal; font-variant: normal; text-decoration: none; vertical-align: baseline; white-space: pre-wrap;"><span style="border: none; display: inline-block; overflow: hidden; width: 21px; height: 21px;">![Image non disponible](https://lh7-us.googleusercontent.com/docsz/AD_4nXdB2BIsLTs4Ltoi212KcujUcZsvYOzrPn7iGncWyQzlnU--NSfhbFCBo5l8q2raeoIivafdSPZloqKxFcj3TlOklWVyTJezcx5oFoqV7Uh9xkRfxzUqA5_wkU5EOjFuV31KuxpON1FmuRn9N2FLJptW8TIchza16V702bkwMchYmnlfVBzI0wY?key=1ofmsasuPhleDgurqZ_yuQ)</span></span><span style="font-size: 9pt; font-family: Verdana,sans-serif; color: #212529; background-color: transparent; font-weight: 400; font-style: normal; font-variant: normal; text-decoration: none; vertical-align: baseline; white-space: pre-wrap;"> Client setting : pour gérer les fonctions du client installées sur les machines gérées (exemple : activer/désactiver la gestion des snapins (que nous verrons plus tard), activer/désactiver la possibilité de reboot distant) ;</span>
- <span style="font-size: 9pt; font-family: Verdana,sans-serif; color: #212529; background-color: transparent; font-weight: 400; font-style: normal; font-variant: normal; text-decoration: none; vertical-align: baseline; white-space: pre-wrap;"><span style="border: none; display: inline-block; overflow: hidden; width: 21px; height: 21px;">![Image non disponible](https://lh7-us.googleusercontent.com/docsz/AD_4nXf0PUXOfMrvF80l-m5RpjXtTuExE_R8bekf_fmMRIzNmrmahzULdiK0ald1GUnzBaOlP6ZQCqEoPhHW_uTalNZn6fxZ7AHLWltQTJOaHVPOQDiDU9L1GZA_DMIKsLSt40_nlYf4ikIgb15CEZor91xsHeTN_aIPF7KH-tYu00cPwXzT6M5LyA?key=1ofmsasuPhleDgurqZ_yuQ)</span></span><span style="font-size: 9pt; font-family: Verdana,sans-serif; color: #212529; background-color: transparent; font-weight: 400; font-style: normal; font-variant: normal; text-decoration: none; vertical-align: baseline; white-space: pre-wrap;"> Tasks : pour le suivi des tâches en cours ;</span>
- <span style="font-size: 9pt; font-family: Verdana,sans-serif; color: #212529; background-color: transparent; font-weight: 400; font-style: normal; font-variant: normal; text-decoration: none; vertical-align: baseline; white-space: pre-wrap;"><span style="border: none; display: inline-block; overflow: hidden; width: 21px; height: 21px;">![Image non disponible](https://lh7-us.googleusercontent.com/docsz/AD_4nXcyD1LPArh-nBGrqHOHkYSDqysDfqm6ZcPJ2Zt0wgy0OpLJ1xz_LxOIESYpKEcWR3tN4UcIjJ97rm4ZHhBpIzGH8bqWotZkMSzgJ3pXtnRqMeUKNeHK0gDWnYOp2hWnU0TcAoSBvEJHnisnzyqZurM636JtA1g-6D4yOFKduBxqkWlmu6o1aA?key=1ofmsasuPhleDgurqZ_yuQ)</span></span><span style="font-size: 9pt; font-family: Verdana,sans-serif; color: #212529; background-color: transparent; font-weight: 400; font-style: normal; font-variant: normal; text-decoration: none; vertical-align: baseline; white-space: pre-wrap;"> Reports : permet de générer des rapports en CSV ou PDF ;</span>
- <span style="font-size: 9pt; font-family: Verdana,sans-serif; color: #212529; background-color: transparent; font-weight: 400; font-style: normal; font-variant: normal; text-decoration: none; vertical-align: baseline; white-space: pre-wrap;"><span style="border: none; display: inline-block; overflow: hidden; width: 21px; height: 21px;">![Image non disponible](https://lh7-us.googleusercontent.com/docsz/AD_4nXdjYjWL9nclAAJ8h8LHwHZ92gkg7pIF2Egxzj1lX9XBmeE6WISFDqBNuKZr513ksGT3f9ZvK69M_7atYyc61qGzhGQyltpIylp18N1-tvsIHPW4zQNXd_Qg7Jd23Q53fKHL5x_MBWZrkCv_OT6xoNWOFMXroaK8eKviTqKeCNMmCRWwa179mpo?key=1ofmsasuPhleDgurqZ_yuQ)</span></span><span style="font-size: 9pt; font-family: Verdana,sans-serif; color: #212529; background-color: transparent; font-weight: 400; font-style: normal; font-variant: normal; text-decoration: none; vertical-align: baseline; white-space: pre-wrap;"> Configuration : pour effectuer des réglages de FOG Project.</span>

### <span style="color: rgb(53, 152, 219);">**<span style="color: rgb(35, 111, 161);">5</span>**</span><span style="color: rgb(53, 152, 219);">**<span style="color: rgb(35, 111, 161);"> Configuration de la langue  
</span>**</span>

<span id="bkmrk-pour-passer-l%E2%80%99interf-1" style="font-size: 11pt; font-family: Arial,sans-serif; color: #000000; background-color: transparent; font-weight: 400; font-style: normal; font-variant: normal; text-decoration: none; vertical-align: baseline; white-space: pre-wrap;">Pour passer l’interface en français, cliqué sur l’icône « Fog configuration » puis aller dans l’onglet « Fog Settings »</span>.

<span id="bkmrk--33" style="font-size: 11pt; font-family: Arial,sans-serif; color: #000000; background-color: transparent; font-weight: 400; font-style: normal; font-variant: normal; text-decoration: none; vertical-align: baseline; white-space: pre-wrap;"><span style="border: none; display: inline-block; overflow: hidden; width: 643px; height: 203px;">![](https://lh7-us.googleusercontent.com/docsz/AD_4nXdwrSmaeSZTMV_D1lLoQ9E3zOF_AnuA9iOlhrnCnTwsR_-4BwSTBr0WDyA-MIl6CHlw-J45kxjQnb-rDxt1_0gbV-uNc7g0dMhVdpo4WxHgMFZdOPF1eR0-IahIHxUudwRaHBr42abUvQv7VABD8PseT2B_IsZbBK5DN0eyB8KD9LffJI1mSYw?key=1ofmsasuPhleDgurqZ_yuQ)</span></span>

<span id="bkmrk-ensuite-descendre-da-1" style="font-size: 11pt; font-family: Arial,sans-serif; color: #000000; background-color: transparent; font-weight: 400; font-style: normal; font-variant: normal; text-decoration: none; vertical-align: baseline; white-space: pre-wrap;">Ensuite descendre dans la liste et cliquer sur « General Settings », sélectionner la langue en changeant la « default locale ».</span>

<span id="bkmrk--35" style="font-size: 11pt; font-family: Arial,sans-serif; color: #000000; background-color: transparent; font-weight: 400; font-style: normal; font-variant: normal; text-decoration: none; vertical-align: baseline; white-space: pre-wrap;"><span style="border: none; display: inline-block; overflow: hidden; width: 643px; height: 285px;">![](https://lh7-us.googleusercontent.com/docsz/AD_4nXdhU0cyc3-B8NHp-EPSKE-HseftrBD7703HXj0zf09n19QKT7m-jlLCOZCCL8AFQhNgRI6CA3I_Yleqan0joTEqBnisaPSpW1MpfHaLqebfPV4fX9tYtQZD5pliSrfY98sagHYgYdmNBtQoJX4zf3Sew_eBS3e5Qm1gjCfXCrXLSzhEmfEuxcU?key=1ofmsasuPhleDgurqZ_yuQ)</span></span>

<span id="bkmrk-apr%C3%A8s-avoir-valid%C3%A9-e-1" style="font-size: 9pt; font-family: Verdana,sans-serif; color: #212529; background-color: #ffffff; font-weight: 400; font-style: normal; font-variant: normal; text-decoration: none; vertical-align: baseline; white-space: pre-wrap;">Après avoir validé en cliquant sur « update » et rafraîchi l’écran en cliquant sur l’icône « Dashboard », vous verrez l’interface en français.</span>

## <span style="color: rgb(53, 152, 219);">**B - Sysprep** </span>

<span style="font-size: 11pt; font-family: Arial,sans-serif; color: #000000; background-color: transparent; font-weight: 400; font-style: normal; font-variant: normal; text-decoration: none; vertical-align: baseline; white-space: pre-wrap;">Ces étapes sont à effectuer sur la Machine 2 (Master)</span>.

### <span style="color: rgb(53, 152, 219);">**<span style="color: rgb(35, 111, 161);">1</span>**</span><span style="color: rgb(53, 152, 219);">**<span style="color: rgb(35, 111, 161);"> Enregistrement de la machine dans Fog  
</span>**</span>

<span style="font-size: 11pt; font-family: Arial,sans-serif; color: #000000; background-color: transparent; font-weight: 400; font-style: normal; font-variant: normal; text-decoration: none; vertical-align: baseline; white-space: pre-wrap;">Après avoir préparé le poste, accéder au BIOS pour activer le PXE afin de Boot dessus.</span>

<span id="bkmrk--37" style="font-size: 11pt; font-family: Arial,sans-serif; color: #000000; background-color: transparent; font-weight: 400; font-style: normal; font-variant: normal; text-decoration: none; vertical-align: baseline; white-space: pre-wrap;"><span style="border: none; display: inline-block; overflow: hidden; width: 505px; height: 277px;">![](https://lh7-us.googleusercontent.com/docsz/AD_4nXftGAvaJZegt_MORAc9mUEAHfmDxwUvC2R_pMv-dloGtVxVvcNNQ1wuFgN6TEDQsD4FK0oXb4Dcieyt3zNQoSZKFIcBJ1czmZAX91eZi6zHWgn_jiUxc1VDWysJE7FGVSbB_qr47AfQVrreymfn3nZvjiyJdGZWq_SmGeGBWDN0r8LVPzO9TNk?key=1ofmsasuPhleDgurqZ_yuQ)</span></span>

<span id="bkmrk-une-fois-dans-le-men-1" style="font-size: 11pt; font-family: Arial,sans-serif; color: #000000; background-color: transparent; font-weight: 400; font-style: normal; font-variant: normal; text-decoration: none; vertical-align: baseline; white-space: pre-wrap;">Une fois dans le menu suivant, cliquer sur « Quick regitration and inventory ».</span>

<span id="bkmrk--39" style="font-size: 11pt; font-family: Arial,sans-serif; color: #000000; background-color: transparent; font-weight: 400; font-style: normal; font-variant: normal; text-decoration: none; vertical-align: baseline; white-space: pre-wrap;"><span style="border: none; display: inline-block; overflow: hidden; width: 509px; height: 385px;">![](https://lh7-us.googleusercontent.com/docsz/AD_4nXfEz5mQT8BSwEpwdgDI3Gf1pdnobS0Pe4Tha-35MXVGjs-Ovnz8qbjhr_kCcAAXOXVx630VTDifi_nbKw3Dbjyo6J2kLxDvYlLvY0CSaw-yiIPds8z29xhzx7SlyXp__beq6QK8ypFg_p55IGN3jnrsuAf6co-Jlsogt_ao3YKReMk3YNsE2Q?key=1ofmsasuPhleDgurqZ_yuQ)</span></span>

### <span style="color: rgb(53, 152, 219);">**<span style="color: rgb(35, 111, 161);">2</span>**</span><span style="color: rgb(53, 152, 219);">**<span style="color: rgb(35, 111, 161);"> Nom de l'image  
</span>**</span>

<span id="bkmrk-une-fois-l%E2%80%99enregistr-1" style="font-size: 11pt; font-family: Arial,sans-serif; color: #212529; background-color: #ffffff; font-weight: 400; font-style: normal; font-variant: normal; text-decoration: none; vertical-align: baseline; white-space: pre-wrap;">Une fois l’enregistrement effectué, la machine apparaîtra dans la liste des hôtes avec comme nom son adresse MAC.</span>

<span id="bkmrk--41" style="font-size: 11pt; font-family: Arial,sans-serif; color: #000000; background-color: transparent; font-weight: 400; font-style: normal; font-variant: normal; text-decoration: none; vertical-align: baseline; white-space: pre-wrap;"><span style="border: none; display: inline-block; overflow: hidden; width: 643px; height: 285px;">![](https://lh7-us.googleusercontent.com/docsz/AD_4nXdeNYI8ViN-RLkb_xqFWelbkYvp1Ky1CUJUufIKoLx6EMQo0aG_ibB26s2mqnj5hyfhW-B5gs_U_gwB6JMHBinrpGEbM81TlefAwy4SWIylV34p07g4TI9rZDahzWmEh20JI9Mmh9A5wR3EYux3-gFA82VX7Ky7a466X9ChPp25CEH6FJ-3KQ?key=1ofmsasuPhleDgurqZ_yuQ)</span></span>

<span id="bkmrk-changer-le-nom-de-la-1" style="font-size: 11pt; font-family: Arial,sans-serif; color: #000000; background-color: transparent; font-weight: 400; font-style: normal; font-variant: normal; text-decoration: none; vertical-align: baseline; white-space: pre-wrap;">Changer le nom de la machine en cliquant sur l’adresse MAC.</span>

<span style="font-size: 11pt; font-family: Arial,sans-serif; color: #000000; background-color: transparent; font-weight: 400; font-style: normal; font-variant: normal; text-decoration: none; vertical-align: baseline; white-space: pre-wrap;"><span id="bkmrk--1" style="font-size: 11pt; font-family: Arial,sans-serif; color: #000000; background-color: transparent; font-weight: 400; font-style: normal; font-variant: normal; text-decoration: none; vertical-align: baseline; white-space: pre-wrap;"><span style="border: none; display: inline-block; overflow: hidden; width: 643px; height: 304px;">![](https://lh7-us.googleusercontent.com/docsz/AD_4nXfbj_Ie4j2Pc-ZGx3flbzjGPzeOMuXjGgIuza6Q0eny4EGG01qLV1o8yRxCgN8cyldzhcMXBTPxbFnH0TlxdaeNG-ca4WJOXsJHKqPMwU5t1EnPyJU6VL9AgIGngPE8dhJ27HHkI3WG-yfW5l63U7tOIC8R6S0lB-olNJIHVj1jfPu5OsiJLg?key=1ofmsasuPhleDgurqZ_yuQ)</span></span></span>

### <span style="color: rgb(53, 152, 219);">**<span style="color: rgb(35, 111, 161);">3</span>**</span><span style="color: rgb(53, 152, 219);">**<span style="color: rgb(35, 111, 161);"> Capture de l'image</span>**</span>

<span style="font-size: 11pt; font-family: Arial,sans-serif; color: #000000; background-color: transparent; font-weight: 400; font-style: normal; font-variant: normal; text-decoration: none; vertical-align: baseline; white-space: pre-wrap;"><span id="bkmrk-cr%C3%A9ation-de-l%E2%80%99image--1" style="font-size: 11pt; font-family: Arial,sans-serif; color: #000000; background-color: transparent; font-weight: 400; font-style: normal; font-variant: normal; text-decoration: none; vertical-align: baseline; white-space: pre-wrap;">Création de l’image d’une machine</span></span>

<span style="font-size: 11pt; font-family: Arial,sans-serif; color: #000000; background-color: transparent; font-weight: 400; font-style: normal; font-variant: normal; text-decoration: none; vertical-align: baseline; white-space: pre-wrap;"><span id="bkmrk--3" style="font-size: 11pt; font-family: Arial,sans-serif; color: #000000; background-color: transparent; font-weight: 400; font-style: normal; font-variant: normal; text-decoration: none; vertical-align: baseline; white-space: pre-wrap;"><span style="border: none; display: inline-block; overflow: hidden; width: 643px; height: 285px;">![](https://lh7-us.googleusercontent.com/docsz/AD_4nXfB4bRmyLQ6CCnniTgirlvfUbP_dYj7ySPm1iV8telf6wLoNC5E-B_q3vf8Barot48lM7MH5bm-NSxDI1KeykRQX1U6qNWPngozkphjwdVskIy2bV0Uz3q70CASTxPc_D_tKUw_niEZ_ryB5_M_AA0OQRUXe8qnpLuW3bxW2lOYMgIVdTCN_1E?key=1ofmsasuPhleDgurqZ_yuQ)</span></span></span>

### <span style="color: rgb(53, 152, 219);">**<span style="color: rgb(35, 111, 161);">4</span>**</span><span style="color: rgb(53, 152, 219);">**<span style="color: rgb(35, 111, 161);"> Liste d'hôte  
</span>**</span>

<span style="font-size: 11pt; font-family: Arial,sans-serif; color: #000000; background-color: transparent; font-weight: 400; font-style: normal; font-variant: normal; text-decoration: none; vertical-align: baseline; white-space: pre-wrap;"><span id="bkmrk--5" style="font-size: 11pt; font-family: Arial,sans-serif; color: #000000; background-color: transparent; font-weight: 400; font-style: normal; font-variant: normal; text-decoration: none; vertical-align: baseline; white-space: pre-wrap;"><span style="border: none; display: inline-block; overflow: hidden; width: 643px; height: 265px;">![](https://lh7-us.googleusercontent.com/docsz/AD_4nXe8Jo0xb-eJSAF-DLaaTubqzS3YDEFsVRfKeURVIy_netuBr28Pgd2GYEF5VCv08wpxTTbhetR_Sv2K-ndh9pW3o8qjD4d_t-rUhTdRVA_sw9hbRSwTL7U9xPk0IEt3c3Cyfpwyq5hSRC5c6sQ86sAtAVrayxr2jq4n0jURResJEBE_NYcTBFU?key=1ofmsasuPhleDgurqZ_yuQ)</span></span></span>

<span style="font-size: 11pt; font-family: Arial,sans-serif; color: #000000; background-color: transparent; font-weight: 400; font-style: normal; font-variant: normal; text-decoration: none; vertical-align: baseline; white-space: pre-wrap;">Cliquer sûr </span><span style="font-size: 11pt; font-family: Arial,sans-serif; color: #000000; background-color: transparent; font-weight: 400; font-style: normal; font-variant: normal; text-decoration: none; vertical-align: baseline; white-space: pre-wrap;"><span style="border: none; display: inline-block; overflow: hidden; width: 18px; height: 14px;">![](https://lh7-us.googleusercontent.com/docsz/AD_4nXfTjIMZMbegXlWixBktLsl9AEbm9_L7jIXvUXj1wVWS-SJyMpfjZE7wNVxdvMutCDeOadn4Vt-938awT9oy_6A8gR3igQOy1toOi0VOyVWJ21Pb72_uH0N9OJMUBe_2mhPEFAaZsu781zUOWCrCBfyBm7OMHWJq5ZKlrLy-h9i4wc-f_wkk_rw?key=1ofmsasuPhleDgurqZ_yuQ)</span></span><span style="font-size: 9pt; font-family: Verdana,sans-serif; color: #212529; background-color: #ffffff; font-weight: 400; font-style: normal; font-variant: normal; text-decoration: none; vertical-align: baseline; white-space: pre-wrap;"> </span><span style="font-size: 11pt; font-family: Arial,sans-serif; color: #212529; background-color: #ffffff; font-weight: 400; font-style: normal; font-variant: normal; text-decoration: none; vertical-align: baseline; white-space: pre-wrap;">pour choisir l’image. Ceci déclenchera l’ouverture des paramètres de la machine, l’image créée précédemment :</span>

<span style="font-size: 11pt; font-family: Arial,sans-serif; color: #000000; background-color: transparent; font-weight: 400; font-style: normal; font-variant: normal; text-decoration: none; vertical-align: baseline; white-space: pre-wrap;"><span id="bkmrk--7" style="font-size: 11pt; font-family: Arial,sans-serif; color: #000000; background-color: transparent; font-weight: 400; font-style: normal; font-variant: normal; text-decoration: none; vertical-align: baseline; white-space: pre-wrap;"><span style="border: none; display: inline-block; overflow: hidden; width: 593px; height: 255px;">![](https://lh7-us.googleusercontent.com/docsz/AD_4nXd2IMbuWmx3wkZBLb6VskX0GD1L_VGID0EPojejwSeoW1MgibM0YiicrHy9pf3GLpIUDlgGIiKDOBabzqyNWE9DIdmMrYbcDvxp45uBeUD-tfOZTpVwDWta21j13j77tdvu5WraH3an8GRmLR3fvDGxDMEtqgG7lsBLCw3aZSxFdLhiRFXUTA?key=1ofmsasuPhleDgurqZ_yuQ)</span></span></span>

<span style="font-size: 11pt; font-family: Arial,sans-serif; color: #212529; background-color: #ffffff; font-weight: 400; font-style: normal; font-variant: normal; text-decoration: none; vertical-align: baseline; white-space: pre-wrap;">Une fois l’image créée, le nom de celle-ci apparaîtra à côté de l’icône permettant de déclencher la capture :</span>

<span style="font-size: 11pt; font-family: Arial,sans-serif; color: #000000; background-color: transparent; font-weight: 400; font-style: normal; font-variant: normal; text-decoration: none; vertical-align: baseline; white-space: pre-wrap;"><span id="bkmrk--9" style="font-size: 11pt; font-family: Arial,sans-serif; color: #000000; background-color: transparent; font-weight: 400; font-style: normal; font-variant: normal; text-decoration: none; vertical-align: baseline; white-space: pre-wrap;"><span style="border: none; display: inline-block; overflow: hidden; width: 643px; height: 136px;">![](https://lh7-us.googleusercontent.com/docsz/AD_4nXcYidOrnVNvbSpjIBy11CGnSLR4kuqJ1_f3iVWr31NnTNVpxAlhW75TMD9WTBXF1M3UnWOCWUu0h2Vs03g-srjAdvCTDwfGig-ZleDov015quzVs6T3ZQ830fjOxjjBO2aGj_-XhsoBgJPQuHXd6mSSHm9X3K9hpQzjLrTPMWfVhsF02m9HkTQ?key=1ofmsasuPhleDgurqZ_yuQ)</span></span></span>

###  

### <span style="color: rgb(53, 152, 219);">**<span style="color: rgb(35, 111, 161);">5</span>**</span><span style="color: rgb(53, 152, 219);">**<span style="color: rgb(35, 111, 161);"> Création de la tâche  
</span>**</span>

<span style="font-size: 11pt; font-family: Arial,sans-serif; color: #000000; background-color: transparent; font-weight: 400; font-style: normal; font-variant: normal; text-decoration: none; vertical-align: baseline; white-space: pre-wrap;"><span id="bkmrk-cr%C3%A9ation-d%E2%80%99une-t%C3%A2che-1" style="font-size: 11pt; font-family: Arial,sans-serif; color: #000000; background-color: transparent; font-weight: 400; font-style: normal; font-variant: normal; text-decoration: none; vertical-align: baseline; white-space: pre-wrap;">Création d’une tâche de capture, sélectionner </span><span style="font-size: 11pt; font-family: Arial,sans-serif; color: #000000; background-color: transparent; font-weight: 400; font-style: normal; font-variant: normal; text-decoration: none; vertical-align: baseline; white-space: pre-wrap;"><span style="border: none; display: inline-block; overflow: hidden; width: 18px; height: 14px;">![](https://lh7-us.googleusercontent.com/docsz/AD_4nXfTjIMZMbegXlWixBktLsl9AEbm9_L7jIXvUXj1wVWS-SJyMpfjZE7wNVxdvMutCDeOadn4Vt-938awT9oy_6A8gR3igQOy1toOi0VOyVWJ21Pb72_uH0N9OJMUBe_2mhPEFAaZsu781zUOWCrCBfyBm7OMHWJq5ZKlrLy-h9i4wc-f_wkk_rw?key=1ofmsasuPhleDgurqZ_yuQ)</span></span><span style="font-size: 11pt; font-family: Arial,sans-serif; color: #000000; background-color: transparent; font-weight: 400; font-style: normal; font-variant: normal; text-decoration: none; vertical-align: baseline; white-space: pre-wrap;"> et créer la tâche.</span></span>

<span style="font-size: 11pt; font-family: Arial,sans-serif; color: #000000; background-color: transparent; font-weight: 400; font-style: normal; font-variant: normal; text-decoration: none; vertical-align: baseline; white-space: pre-wrap;"><span id="bkmrk--11" style="font-size: 11pt; font-family: Arial,sans-serif; color: #000000; background-color: transparent; font-weight: 400; font-style: normal; font-variant: normal; text-decoration: none; vertical-align: baseline; white-space: pre-wrap;"><span style="border: none; display: inline-block; overflow: hidden; width: 561px; height: 260px;">![](https://lh7-us.googleusercontent.com/docsz/AD_4nXdHw2FPM6Mk3SmjQinllt0tRtKaSq_9I7OYhfz7b4Dzzm14wAJQSW5JCifNNNgRTKjzF12YAzTtGS-r3ptB277vPeO-flDGOPLn4IXo21D_dpGuOPImUiHy0MobFCXmE5_FDiJtJbrLACgNHEa_plKWXFG5hNsv-ymfNxz_se9kn98BNj3YB2E?key=1ofmsasuPhleDgurqZ_yuQ)</span></span></span>

### <span style="color: rgb(53, 152, 219);">**<span style="color: rgb(35, 111, 161);">6</span>**</span><span style="color: rgb(53, 152, 219);">**<span style="color: rgb(35, 111, 161);"> Création de la tâche</span>**</span>

<span style="font-size: 11pt; font-family: Arial,sans-serif; color: #000000; background-color: transparent; font-weight: 400; font-style: normal; font-variant: normal; text-decoration: none; vertical-align: baseline; white-space: pre-wrap;"><span id="bkmrk-dans-l%E2%80%99explorateur-d-1" style="font-size: 11pt; font-family: Arial,sans-serif; color: #000000; background-color: transparent; font-weight: 400; font-style: normal; font-variant: normal; text-decoration: none; vertical-align: baseline; white-space: pre-wrap;">Dans l’explorateur de fichiers, aller dans « C:\\Windows\\System32\\Sysprep » et exécuter « sysprep.exe ».</span></span>

<span style="font-size: 11pt; font-family: Arial,sans-serif; color: #000000; background-color: transparent; font-weight: 400; font-style: normal; font-variant: normal; text-decoration: none; vertical-align: baseline; white-space: pre-wrap;"><span id="bkmrk--13" style="font-size: 11pt; font-family: Arial,sans-serif; color: #000000; background-color: transparent; font-weight: 400; font-style: normal; font-variant: normal; text-decoration: none; vertical-align: baseline; white-space: pre-wrap;"><span style="border: none; display: inline-block; overflow: hidden; width: 627px; height: 287px;">![](https://lh7-us.googleusercontent.com/docsz/AD_4nXdgLS3KcDFkug-CU9cNaVkKdjbDxcdWSsMqdZZMLuN5JfQJ-qSVxOENLs8i25fahYXVeV_m_tq4Z06ggklJVsZ2H4ISTTcT91JwOIeSuhAZ4baK6SusL7NPBl3klkA2tgUTP3omLtnUFdqpl_mq-38fyO20oT1st1-35EWjcCtHeuyRicVImkw?key=1ofmsasuPhleDgurqZ_yuQ)</span></span></span>

### <span style="color: rgb(53, 152, 219);">**<span style="color: rgb(35, 111, 161);">7</span>**</span><span style="color: rgb(53, 152, 219);">**<span style="color: rgb(35, 111, 161);"> Exécution sysprep.exe  
</span>**</span>

<span style="font-size: 11pt; font-family: Arial,sans-serif; color: #000000; background-color: transparent; font-weight: 400; font-style: normal; font-variant: normal; text-decoration: none; vertical-align: baseline; white-space: pre-wrap;"><span id="bkmrk-apr%C3%A8s-avoir-ex%C3%A9cut%C3%A9--1" style="font-size: 11pt; font-family: Arial,sans-serif; color: #000000; background-color: transparent; font-weight: 400; font-style: normal; font-variant: normal; text-decoration: none; vertical-align: baseline; white-space: pre-wrap;">Après avoir exécuté sysprep.exe, sélectionner « Entrer de mode OOBE », cliquer sur « Généraliser » puis appuyer sur « OK ».</span></span>

<span style="font-size: 11pt; font-family: Arial,sans-serif; color: #000000; background-color: transparent; font-weight: 400; font-style: normal; font-variant: normal; text-decoration: none; vertical-align: baseline; white-space: pre-wrap;"><span id="bkmrk--15" style="font-size: 11pt; font-family: Arial,sans-serif; color: #000000; background-color: transparent; font-weight: 400; font-style: normal; font-variant: normal; text-decoration: none; vertical-align: baseline; white-space: pre-wrap;"><span style="border: none; display: inline-block; overflow: hidden; width: 375px; height: 272px;">![](https://lh7-us.googleusercontent.com/docsz/AD_4nXeNWaQGazaXlrT2jqVsjk1jz8WsuGPm8QIuvJxfrAopARqvRz_oenDw8p-17nXv2MJy473l-_gC_-TvqWdeDgNnOoq6yKcgfA8v4gT3cqyrkr8nmA91uRKqcx1cYPF_8bEJeYWneDGaeyW4TwhX4R66xzhBg1Q6YGs8wwuG292B_A8V2xq9aw?key=1ofmsasuPhleDgurqZ_yuQ)</span></span></span>

### <span style="color: rgb(53, 152, 219);">**<span style="color: rgb(35, 111, 161);">8</span>**</span><span style="color: rgb(53, 152, 219);">**<span style="color: rgb(35, 111, 161);"> Boot PXE  
</span>**</span>

<span style="font-size: 11pt; font-family: Arial,sans-serif; color: #000000; background-color: transparent; font-weight: 400; font-style: normal; font-variant: normal; text-decoration: none; vertical-align: baseline; white-space: pre-wrap;">Après avoir redémarré le poste, Booter en PXE.</span>

<span style="font-size: 11pt; font-family: Arial,sans-serif; color: #000000; background-color: transparent; font-weight: 400; font-style: normal; font-variant: normal; text-decoration: none; vertical-align: baseline; white-space: pre-wrap;"><span id="bkmrk--17" style="font-size: 11pt; font-family: Arial,sans-serif; color: #000000; background-color: transparent; font-weight: 400; font-style: normal; font-variant: normal; text-decoration: none; vertical-align: baseline; white-space: pre-wrap;"><span style="border: none; display: inline-block; overflow: hidden; width: 506px; height: 277px;">![](https://lh7-us.googleusercontent.com/docsz/AD_4nXftGAvaJZegt_MORAc9mUEAHfmDxwUvC2R_pMv-dloGtVxVvcNNQ1wuFgN6TEDQsD4FK0oXb4Dcieyt3zNQoSZKFIcBJ1czmZAX91eZi6zHWgn_jiUxc1VDWysJE7FGVSbB_qr47AfQVrreymfn3nZvjiyJdGZWq_SmGeGBWDN0r8LVPzO9TNk?key=1ofmsasuPhleDgurqZ_yuQ)</span></span></span>

###  

### <span style="color: rgb(53, 152, 219);">**<span style="color: rgb(35, 111, 161);">9</span>**</span><span style="color: rgb(53, 152, 219);">**<span style="color: rgb(35, 111, 161);"> Enregistrement de l'image  
</span>**</span>

<span style="font-size: 11pt; font-family: Arial,sans-serif; color: #000000; background-color: transparent; font-weight: 400; font-style: normal; font-variant: normal; text-decoration: none; vertical-align: baseline; white-space: pre-wrap;"><span id="bkmrk--42" style="font-size: 11pt; font-family: Arial,sans-serif; color: #000000; background-color: transparent; font-weight: 400; font-style: normal; font-variant: normal; text-decoration: none; vertical-align: baseline; white-space: pre-wrap;"><span style="border: none; display: inline-block; overflow: hidden; width: 615px; height: 401px;">![](https://lh7-us.googleusercontent.com/docsz/AD_4nXfJuBswafZskDanmtL4LYpUZzEFiu-8kLQXet0BHLI24WbXEjEeWDFpK1GoH63WS9mInitwskInLxIYvge1ad_E9CSHGCJhT3vIBUW3CRstCAhYu0DzIwlJfRcZD-y_6ow04JWASY2zFs0KllZ3vgDOAlg27sAfOLq4otVARqilRuMjPbQXZa8?key=1ofmsasuPhleDgurqZ_yuQ)</span></span></span>

<span style="font-size: 11pt; font-family: Arial,sans-serif; color: #000000; background-color: transparent; font-weight: 400; font-style: normal; font-variant: normal; text-decoration: none; vertical-align: baseline; white-space: pre-wrap;">Ci-dessous, sauvegarde en cours avec PartClone, utilisé par Fog Project </span><span style="font-size: 9pt; font-family: Verdana,sans-serif; color: #212529; background-color: transparent; font-weight: 400; font-style: normal; font-variant: normal; text-decoration: none; vertical-align: baseline; white-space: pre-wrap;">:</span>

<span style="font-size: 11pt; font-family: Arial,sans-serif; color: #000000; background-color: transparent; font-weight: 400; font-style: normal; font-variant: normal; text-decoration: none; vertical-align: baseline; white-space: pre-wrap;"><span id="bkmrk--44" style="font-size: 9pt; font-family: Verdana,sans-serif; color: #0056b3; background-color: transparent; font-weight: 400; font-style: normal; font-variant: normal; text-decoration: none; vertical-align: baseline; white-space: pre-wrap;"><span style="border: none; display: inline-block; overflow: hidden; width: 630px; height: 353px;">![Image non disponible](https://lh7-us.googleusercontent.com/docsz/AD_4nXfpFW8-9f6fBgbvps4Z4i79seo_UHLU6YLPLUU99aJ6f3t5MDF4I8mBoO75lfBDY3k6sGIKeePTe9NQixt-ZHJYovGXS9dThGkVQBaHJ-a8ekQ_MVOpAzc-JinzHeq7JdRc1SCwCIe4pGaK-YE_xeiC-TTFRCSUEdj4kNnJTu4F4wvneWZuxSM?key=1ofmsasuPhleDgurqZ_yuQ)</span></span></span>

<span style="font-size: 11pt; font-family: Arial,sans-serif; color: #000000; background-color: transparent; font-weight: 400; font-style: normal; font-variant: normal; text-decoration: none; vertical-align: baseline; white-space: pre-wrap;"><span id="bkmrk-%C3%89tat-de-capture-en-c-1" style="font-size: 11pt; font-family: Arial,sans-serif; color: #212529; background-color: transparent; font-weight: 400; font-style: normal; font-variant: normal; text-decoration: none; vertical-align: baseline; white-space: pre-wrap;">État de capture en cours depuis l’interface :</span></span>

<span style="font-size: 11pt; font-family: Arial,sans-serif; color: #000000; background-color: transparent; font-weight: 400; font-style: normal; font-variant: normal; text-decoration: none; vertical-align: baseline; white-space: pre-wrap;"><span id="bkmrk--46" style="font-size: 9pt; font-family: Verdana,sans-serif; color: #0056b3; background-color: transparent; font-weight: 400; font-style: normal; font-variant: normal; text-decoration: none; vertical-align: baseline; white-space: pre-wrap;"><span style="border: none; display: inline-block; overflow: hidden; width: 674px; height: 307px;">![Image non disponible](https://lh7-us.googleusercontent.com/docsz/AD_4nXeV6aHGqCYR_Z-NDfSHF9FUHRbmEWKf-OsKt9shI4jBFbLEqHcOv_yyXEi90mCXIrjZAgTjy-Ut-rDCaRri0KZcwQVwhwfw23czAmXn2wPXrtqBsU_x9u1PiayDj2LRnptMUB5whKGyHp7JxOYjf2xfU06ZWYXSy0esgp6E4HF6yJHek8vhUWs?key=1ofmsasuPhleDgurqZ_yuQ)</span></span></span>

<span style="font-size: 11pt; font-family: Arial,sans-serif; color: #000000; background-color: transparent; font-weight: 400; font-style: normal; font-variant: normal; text-decoration: none; vertical-align: baseline; white-space: pre-wrap;"><span id="bkmrk-une-fois-la-capture--1" style="font-size: 11pt; font-family: Arial,sans-serif; color: #212529; background-color: transparent; font-weight: 400; font-style: normal; font-variant: normal; text-decoration: none; vertical-align: baseline; white-space: pre-wrap;">Une fois la capture effectuée, vous pourrez voir les informations afférentes (comme la taille, la date de capture) depuis la liste des images :</span></span>

<span style="font-size: 11pt; font-family: Arial,sans-serif; color: #000000; background-color: transparent; font-weight: 400; font-style: normal; font-variant: normal; text-decoration: none; vertical-align: baseline; white-space: pre-wrap;"><span id="bkmrk--48" style="font-size: 9pt; font-family: Verdana,sans-serif; color: #0056b3; background-color: transparent; font-weight: 400; font-style: normal; font-variant: normal; text-decoration: none; vertical-align: baseline; white-space: pre-wrap;"><span style="border: none; display: inline-block; overflow: hidden; width: 695px; height: 319px;">![Image non disponible](https://lh7-us.googleusercontent.com/docsz/AD_4nXdGJ-p9od4DqDSPfogRiLGlQxllHaqSUAzAUPRxfAr69GF10qL9VztTJ_FtNngAssmiqtlEMQmFnX3WUNBSs3TTgOrDlz5AEqzM8oWBh41qod66cLq1ZV16n78fJ-XAtTDji54gsL5afBFamXrnsFnPQLjEBUuwSNotRQd3PSStfULwgLVleho?key=1ofmsasuPhleDgurqZ_yuQ)</span></span></span>

## <span style="color: rgb(53, 152, 219);">**C - Déploiement**</span>

<span style="font-size: 11pt; font-family: Arial,sans-serif; color: #000000; background-color: transparent; font-weight: 400; font-style: normal; font-variant: normal; text-decoration: none; vertical-align: baseline; white-space: pre-wrap;">Ces étapes sont à effectuer sur la Machine 3 (Client)</span>

### <span style="color: rgb(53, 152, 219);">**<span style="color: rgb(35, 111, 161);">1</span>**</span><span style="color: rgb(53, 152, 219);">**<span style="color: rgb(35, 111, 161);"> Boot PXE  
</span>**</span>

<span style="font-size: 11pt; font-family: Arial,sans-serif; color: #000000; background-color: transparent; font-weight: 400; font-style: normal; font-variant: normal; text-decoration: none; vertical-align: baseline; white-space: pre-wrap;">Après avoir redémarré le poste, accéder au BIOS afin de Boot en PXE.</span>

<span style="font-size: 11pt; font-family: Arial,sans-serif; color: #000000; background-color: transparent; font-weight: 400; font-style: normal; font-variant: normal; text-decoration: none; vertical-align: baseline; white-space: pre-wrap;"><span id="bkmrk--50" style="font-size: 11pt; font-family: Arial,sans-serif; color: #000000; background-color: transparent; font-weight: 400; font-style: normal; font-variant: normal; text-decoration: none; vertical-align: baseline; white-space: pre-wrap;"><span style="border: none; display: inline-block; overflow: hidden; width: 458px; height: 251px;">![](https://lh7-us.googleusercontent.com/docsz/AD_4nXftGAvaJZegt_MORAc9mUEAHfmDxwUvC2R_pMv-dloGtVxVvcNNQ1wuFgN6TEDQsD4FK0oXb4Dcieyt3zNQoSZKFIcBJ1czmZAX91eZi6zHWgn_jiUxc1VDWysJE7FGVSbB_qr47AfQVrreymfn3nZvjiyJdGZWq_SmGeGBWDN0r8LVPzO9TNk?key=1ofmsasuPhleDgurqZ_yuQ)</span></span></span>

### <span style="color: rgb(53, 152, 219);">**<span style="color: rgb(35, 111, 161);">2</span>**</span><span style="color: rgb(53, 152, 219);">**<span style="color: rgb(35, 111, 161);"> Deploy image  
</span>**</span>

<span style="font-size: 11pt; font-family: Arial,sans-serif; color: #000000; background-color: transparent; font-weight: 400; font-style: normal; font-variant: normal; text-decoration: none; vertical-align: baseline; white-space: pre-wrap;"><span id="bkmrk-au-d%C3%A9marrage-de-la-m-1" style="font-size: 11pt; font-family: Arial,sans-serif; color: #000000; background-color: transparent; font-weight: 400; font-style: normal; font-variant: normal; text-decoration: none; vertical-align: baseline; white-space: pre-wrap;">Au démarrage de la machine, BOOTER en PXE et sélectionner « Deploy image »</span></span>

<span style="font-size: 11pt; font-family: Arial,sans-serif; color: #000000; background-color: transparent; font-weight: 400; font-style: normal; font-variant: normal; text-decoration: none; vertical-align: baseline; white-space: pre-wrap;"><span id="bkmrk--52" style="font-size: 11pt; font-family: Arial,sans-serif; color: #000000; background-color: transparent; font-weight: 400; font-style: normal; font-variant: normal; text-decoration: none; vertical-align: baseline; white-space: pre-wrap;"><span style="border: none; display: inline-block; overflow: hidden; width: 430px; height: 321px;">![](https://lh7-us.googleusercontent.com/docsz/AD_4nXfgz1yil0UCpV_AL-NvQjZCxwlf4uafXT1U4vgH4gERaEaWwabUJUjFPcjUY_T6QDlND6m7zfTaE17blbh7-cKWApIWJvjPhSaI3nRlQUr0rhPPtY8QhOLPNLg5FFlozkk9wD2rJqSR2jJq1CsWG6_v31YKyimb8X1TyBU7X2H0MJSd97QOMg?key=1ofmsasuPhleDgurqZ_yuQ)</span></span></span>

<span style="font-size: 11pt; font-family: Arial,sans-serif; color: #000000; background-color: transparent; font-weight: 400; font-style: normal; font-variant: normal; text-decoration: none; vertical-align: baseline; white-space: pre-wrap;">Sauvegarde en cours avec Partclone, utilisé par Fog Project</span>.

<span style="font-size: 11pt; font-family: Arial,sans-serif; color: #000000; background-color: transparent; font-weight: 400; font-style: normal; font-variant: normal; text-decoration: none; vertical-align: baseline; white-space: pre-wrap;"><span id="bkmrk--54" style="font-size: 11pt; font-family: Arial,sans-serif; color: #000000; background-color: transparent; font-weight: 400; font-style: normal; font-variant: normal; text-decoration: none; vertical-align: baseline; white-space: pre-wrap;"><span style="border: none; display: inline-block; overflow: hidden; width: 643px; height: 357px;">![](https://lh7-us.googleusercontent.com/docsz/AD_4nXc1S2ojPDCrx4HCcsXqhp3edUTGmnIQyVSZ6tU6-0o-UZKptMC173VI78mlYwC54Oh76X6sfOpuvbUOPWKrhZ6auSPPrWkl5MRT-Tdz8WAa61JGFaOtio1IclnROHoTAyDh4jKrI2FPp6-ZO2ScjbeO7Hrs91RSxFtQtSJHUOLJmQF86rBVy94?key=1ofmsasuPhleDgurqZ_yuQ)</span></span></span>

### <span style="color: rgb(53, 152, 219);">**<span style="color: rgb(35, 111, 161);">3</span>**</span><span style="color: rgb(53, 152, 219);">**<span style="color: rgb(35, 111, 161);"> État du déploiement  
</span>**</span>

<span style="font-size: 11pt; font-family: Arial,sans-serif; color: #000000; background-color: transparent; font-weight: 400; font-style: normal; font-variant: normal; text-decoration: none; vertical-align: baseline; white-space: pre-wrap;"><span id="bkmrk-pour-avoir-l%E2%80%99%C3%A9tat-du-1" style="font-size: 11pt; font-family: Arial,sans-serif; color: #000000; background-color: #ffffff; font-weight: 400; font-style: normal; font-variant: normal; text-decoration: none; vertical-align: baseline; white-space: pre-wrap;">Pour avoir l’état du déploiement sur le serveur Web, il faut créer une tâche en cliquant sûr</span><span style="font-size: 11pt; font-family: Arial,sans-serif; color: #000000; background-color: transparent; font-weight: 400; font-style: normal; font-variant: normal; text-decoration: none; vertical-align: baseline; white-space: pre-wrap;"> </span><span style="font-size: 11pt; font-family: Arial,sans-serif; color: #000000; background-color: #ffffff; font-weight: 400; font-style: normal; font-variant: normal; text-decoration: none; vertical-align: baseline; white-space: pre-wrap;"><span style="border: none; display: inline-block; overflow: hidden; width: 14px; height: 21px;">![](https://lh7-us.googleusercontent.com/docsz/AD_4nXf2wjIaUY9IZXrCE76aH3NvncoGXk8cFkvjLgSyq0kA9uzFLUHiwHnUv4DoI1ev368xBIbyO4uELcNP5RFow22BUiXDfZwY5ykaT-6f1l2ENM5j-jQb5__66hjhTVbp0eCyngJdKHbog-Q6uPzWzrvh9TJKiZrHN9ZSNDjtUw9ZQBXJJDXlsCI?key=1ofmsasuPhleDgurqZ_yuQ)</span></span><span style="font-size: 11pt; font-family: Arial,sans-serif; color: #000000; background-color: #ffffff; font-weight: 400; font-style: normal; font-variant: normal; text-decoration: none; vertical-align: baseline; white-space: pre-wrap;">. Quand une tâche est créée, au moment du déploiement le serveur FOG </span><span style="font-size: 11pt; font-family: Arial,sans-serif; color: #000000; background-color: #ffffff; font-weight: 400; font-style: normal; font-variant: normal; text-decoration: none; vertical-align: baseline; white-space: pre-wrap;">ne passe pas par l’image ci-dessus, il lance directement l’installation avec Partclone.</span><span style="font-size: 11pt; font-family: Arial,sans-serif; color: #000000; background-color: transparent; font-weight: 400; font-style: normal; font-variant: normal; text-decoration: none; vertical-align: baseline; white-space: pre-wrap;">  
</span><span style="font-size: 11pt; font-family: Arial,sans-serif; color: #000000; background-color: #ffffff; font-weight: 400; font-style: normal; font-variant: normal; text-decoration: none; vertical-align: baseline; white-space: pre-wrap;">Malheureusement, FOG ne peut créer qu’une seule tâche à la fois donc si plusieurs machines sont déployées en même temps, seules une n’aura pas besoin de sélectionner « Deploy Image ».</span></span>

# SaltProject


# Nouvelle page


# 01-Description

## <span style="text-decoration: underline; color: rgb(45, 194, 107);">**A - Description :**</span>

VM en remplacement du serveur physique installé le 30/07/2013 (Dell R610)  
Type : VMware

Distrib : Ubuntu 22.04  
Nom DNS : admin-l.v.sdem.fr  
Adresse IP : 192.168.1.15

# 02-01-Installation SaltSlack Orchestration

## <span style="text-decoration: underline; color: rgb(45, 194, 107);">**A - Description :**</span>


Le système Salt est un framework d'exécution à distance open source basé sur Python pour la gestion de la configuration, l'automatisation, le provisionnement et l'orchestration.

SaltStack est un logiciel de gestion de configuration et d'automatisation gratuit, open source et basé sur Python. Il s'agit d'un outil de ligne de commande qui vous aide à gérer votre infrastructure à partir d'un emplacement central. SaltStack est composé de quatre composants. Une brève explication de chaque composant est présentée ci-dessous :

- Salt Master agit comme un contrôleur de ligne de commande pour ses sbires. Il est utilisé pour contrôler et gérer un certain nombre de serviteurs.
- Les Salt Minions sont des démons esclaves qui reçoivent des configurations et des commandes du maître.
- La formule est constituée de fichiers de gestion de configuration.
- L'exécution est un nombre de commandes et de modules qui sont exécutés sur les minions.

*Salt* se distingue de ses homologues car son auteur a eu la bonne idée de ne pas construire un monstre s'appuyant sur des solutions de messagerie à la complexité douteuse mais a plutôt misé sur la librairie *ZeroMQ*\[2\], s'assurant ainsi vélocité et simplicité. Ce choix est loin d'être anodin car, sans aucun effort supplémentaire, *Salt* offre d'emblée des fonctionnalités de gestion de configuration **et** d'orchestration. Et nous allons voir que mettre le pied à l'étrier du cheval *Salt* n'a rien de l'insurmontable. Enfin, mais c'est évidemment très personnel, je n'ai aucune affinité avec le langage *Ruby* et au contraire des solutions sus-citées, *Salt* est écrit en python, plus doux à mes yeux. Cela peut paraître dérisoire à première vue, mais devant la forte probabilité de tentation d'écriture de modules, le langage de la solution **a** son importance.

Bien que jeune (Mai 2011), le projet a d'ores et déjà le soutien de noms prestigieux tels que HP, LinkedIn ou encore PayPal, se décline déjà en version commerciale et sait adresser la quasi totalité des *Clouds* publics et privés.

Enfin, la liste des services Libres que *Salt* est en mesure de gérer est impressionnante et ne cesse de grossir, tant le développement de modules est simple avec un strict minimum de connaissances en *python*\[4\].

### <span style="color: rgb(53, 152, 219);">**1. Documentations :**</span>

[https://connect.ed-diamond.com/GNU-Linux-Magazine/glmf-166/salt-l-autre-chef-d-orchestre](https://connect.ed-diamond.com/GNU-Linux-Magazine/glmf-166/salt-l-autre-chef-d-orchestre)

[https://docs.saltproject.io/salt/install-guide/en/latest/topics/overview.html](https://docs.saltproject.io/salt/install-guide/en/latest/topics/overview.html)

[https://fr.linux-console.net/?p=3335](https://fr.linux-console.net/?p=3335)

[https://fr.linux-console.net/?p=3486](https://fr.linux-console.net/?p=3486)

[https://docs.saltproject.io/salt/user-guide/en/latest/topics/overview.html](https://docs.saltproject.io/salt/user-guide/en/latest/topics/overview.html)

## <span style="text-decoration: underline; color: rgb(45, 194, 107);">**B - Installation du master :**</span>


### <span style="color: rgb(53, 152, 219);">**1. Documentation d'installation en fonction de la distrib :**</span>

Documentation d'installation en fonction de la distrib/OS (Même Windows) :

[https://docs.saltproject.io/salt/install-guide/en/latest/topics/install-by-operating-system/index.html](https://docs.saltproject.io/salt/install-guide/en/latest/topics/install-by-operating-system/index.html)

### <span style="color: rgb(53, 152, 219);">**2. Installation de Salt Master :**</span>

```bash
# # Installation sur Ubuntu 22.04 :
sudo curl -fsSL -o /etc/apt/keyrings/salt-archive-keyring-2023.gpg https://repo.saltproject.io/salt/py3/ubuntu/22.04/amd64/SALT-PROJECT-GPG-PUBKEY- 2023.gpg 
echo "deb [signed-by=/etc/apt/keyrings/salt-archive-keyring-2023.gpg arch=amd64] https://repo.saltproject.io/salt/py3/ubuntu/22.04/amd64 /dernier plat principal confit" | sudo tee /etc/apt/sources.list.d/salt.list

# Mise à jour des dépôts :
sudo apt-get update

# Installation de salt :
sudo apt-get install salt-master salt-minion salt-ssh salt-syndic salt-cloud salt-api

# Activer et démarrer les services :
sudo systemctl enable salt-master && sudo systemctl start salt-master
sudo systemctl enable salt-minion && sudo systemctl start salt-minion
sudo systemctl enable salt-syndic && sudo systemctl start salt-syndic
sudo systemctl enable salt-api && sudo systemctl start salt-api
```

### <span style="color: rgb(53, 152, 219);">**3. Configurer le Salt Master :**</span>

#### <span style="color: rgb(35, 111, 161);">***Documentation :***</span>

https://docs.saltproject.io/salt/install-guide/en/latest/topics/configure-master-minion.html

#### <span style="color: rgb(35, 111, 161);">***Fichier de configuration :***</span>

<span class="VIpgJd-yAWNEb-VIpgJd-fmcmS-sn54Q">Pour une configuration de base de Salt, il vous suffit de modifier le fichier de configuration du minion Salt pour ajouter l'adresse IP du maître Salt auquel il se connectera. </span>Voir [Configuration de base des minions](https://docs.saltproject.io/salt/install-guide/en/latest/topics/configure-master-minion.html#basic-minion-configuration) pour plus d'informations.

- Le `<span class="pre">salt-master</span>`service est livré avec des configurations de serveur par défaut.
- La configuration YAML principale par défaut `<span class="pre">/etc/salt/master</span>`contient tous les paramètres commentés.
- <span class="">Recommandé : vous pouvez ajouter des paramètres personnalisés dans YAML sous </span>`<span class="pre">/etc/salt/master.d/</span>`<span class="">forme </span>`<span class="pre">.conf</span>`<span class=""> de fichiers sur Salt master.</span>
- Utilisez le fichier maître par défaut comme référence pour divers paramètres selon vos besoins.

Bien que le `<span class="pre">/etc/salt/master</span>`fichier puisse accepter les paramètres de configuration, la meilleure pratique consiste à utiliser le `<span class="pre">/etc/salt/master.d/</span>`répertoire de configuration. L'utilisation de ce répertoire vous permet de placer les options de configuration dans des séparations logiques.

Par exemple, si vous souhaitez configurer un nombre différent de `<span class="pre">worker_threads</span>`, vous pouvez stocker ces configurations dans le `<span class="pre">/etc/salt/master.d/tuning.conf</span>` répertoire et conserver toutes les configurations liées au réglage dans ce fichier.

##### **Paramètre du réseau<span style="color: #444444;"> :</span>**

```bash
# Editer le fichier (A créer) :
/etc/salt/master.d/network.conf

# Contenu : 
# The network interface to bind to
interface: 192.168.1.14

# The Request/Reply port
ret_port: 4506

# The port minions bind to for commands, aka the publish port
publish_port: 4505
```

##### **<span style="color: #444444;">Gestion des processus Salt Master </span><span style="color: #444444;">:</span>**

Si votre cluster contient des milliers de serviteurs et que vos rapports sur les serviteurs sont bloqués, le maître peut retarder les réponses des serviteurs de la tâche. Cela peut signifier que les serviteurs ont échoué dans leur travail, mais cela pourrait plutôt signifier que le maître ne dispose pas de suffisamment de threads de travail pour traiter tous les rapports.

Pour gérer les `<span class="pre">salt-minion</span>`appels de retour, le maître enchaîne les processus de travail avec le `<span class="pre">worker_threads</span>`paramètre. La limite par défaut pour les processus est de cinq travailleurs. La limite minimale est de trois travailleurs.

Exemple de paramètre dans un fichier de configuration principal :

```bash
# Editer le fichier :
vi /etc/salt/master.d/thread_options.conf

# Contenu :
worker_threads: 5
```

Normes pour les environnements très fréquentés :

- Utilisez un thread de travail pour 200 serviteurs.
- La valeur de `<span class="pre">worker_threads</span>`ne doit pas dépasser 1½ fois les cœurs de processeur disponibles.

## <span style="text-decoration: underline; color: rgb(45, 194, 107);">**C - Installation des Minions :**</span>

### <span style="color: rgb(53, 152, 219);">**1. Installation des Minions :**</span>

#### <span style="color: rgb(35, 111, 161);">***Documentation :***</span>

https://docs.saltproject.io/en/latest/py-modindex.html  
https://salt-zh.readthedocs.io/en/latest/ref/modules/all/salt.modules.cp.html

#### <span style="color: rgb(35, 111, 161);">***Description :***</span>

- Le `<span class="pre">salt-minion</span>`service est livré par défaut avec une configuration de configuration DNS/nom d'hôte.
- La configuration YAML du minion par défaut `<span class="pre">/etc/salt/minion</span>`contient tous les paramètres commentés.
- Recommandé : vous pouvez ajouter des paramètres personnalisés dans YAML sous `<span class="pre">/etc/salt/minion.d/</span>` forme `<span class="pre">.conf</span>`de fichiers sur le serviteur.
- Utilisez le fichier minion par défaut comme référence pour divers paramètres selon vos besoins.

#### <span style="color: rgb(35, 111, 161);">***REPO - CentOS 7 :***</span>

```bash
sudo yum install https://repo.saltstack.com/yum/redhat/salt-repo-latest.el7.noarch.rpm
sudo yum clean expire-cache 
sudo yum install salt-minion
sudo yum update
```

#### <span style="color: rgb(35, 111, 161);">***REPO - Ubuntu 18.04 :***</span>

```bash
sudo mkdir /etc/apt/keyrings
sudo curl -fsSL -o /etc/apt/keyrings/salt-archive-keyring.gpg https://repo.saltproject.io/salt/py3/ubuntu/18.04/amd64/latest/salt-archive-keyring.gpg
echo "deb [signed-by=/etc/apt/keyrings/salt-archive-keyring.gpg arch=amd64] https://repo.saltproject.io/salt/py3/ubuntu/18.04/amd64/latest bionic main" | sudo tee /etc/apt/sources.list.d/salt.list

apt update
sudo apt-get install salt-minion
```

#### <span style="color: rgb(35, 111, 161);">***REPO -***</span>***Ubuntu 20.04*** <span style="color: rgb(35, 111, 161);">***:***</span>

```bash
mkdir /etc/apt/keyrings
sudo curl -fsSL -o /etc/apt/keyrings/salt-archive-keyring.gpg https://repo.saltproject.io/py3/ubuntu/20.04/amd64/3004/salt-archive-keyring.gpg
echo "deb [signed-by=/etc/apt/keyrings/salt-archive-keyring.gpg arch=amd64] https://repo.saltproject.io/py3/ubuntu/20.04/amd64/3004 focal main" | sudo tee /etc/apt/sources.list.d/salt.list

apt update
sudo apt-get install salt-minion
```

#### <span style="color: rgb(35, 111, 161);">***REPO -***</span>***Ubuntu 22.04*** <span style="color: rgb(35, 111, 161);">***:***</span>

```
apt update
sudo apt-get install salt-minion
```

### <span style="color: rgb(53, 152, 219);">**2. Configurer le Salt Minion :**</span>

#### <span style="color: rgb(35, 111, 161);">***Documentation :***</span>

https://docs.saltproject.io/salt/install-guide/en/latest/topics/configure-master-minion.html

#### <span style="color: rgb(35, 111, 161);">***Bonnes pratiques :***</span>

Bien que `<span class="pre">/etc/salt/minion</span>`le fichier puisse accepter les paramètres de configuration, la meilleure pratique consiste à utiliser le `<span class="pre">/etc/salt/minion.d/</span>`répertoire de configuration. L'utilisation de ce répertoire vous permet de placer les options de configuration dans des séparations logiques.

<p class="callout warning">**Avertissement :**  
Lorsque vous utilisez plusieurs .conffichiers, veillez à ne pas utiliser de paramètres de configuration en double. (Par exemple, définir le nombre de threads de travail dans plusieurs fichiers de configuration.)  
Salt applique les paramètres du dernier .conffichier qu'il évalue et évalue les fichiers par ordre alphabétique. Si vous utilisez des paramètres de configuration en double, vous pourriez accidentellement remplacer le paramètre que vous vouliez appliquer.</p>

#### <span style="color: rgb(35, 111, 161);">***Configuration du Minion :***</span>

Se connecter sur l'hôte esclave (le minion)

```bash
# Configuration de la connexion au Salt Master :
vi /etc/salt/minion.d/master.conf

# Contenu :
master: admin-l.v.sdem.fr
```

Le `<span class="pre">salt-minion</span>`s'identifiera auprès du maître par le nom d'hôte du système, sauf indication contraire :

La plupart des chaînes sont autorisées. Si vous décidez de personnaliser vos identifiants de serviteur, essayez de garder l'identifiant bref mais descriptif de son rôle. Par exemple, vous pouvez utiliser `<span class="pre">apache-server-1</span>`pour nommer l'un de vos serveurs Web ou utiliser le nom `<span class="pre">datacenter-3-rack-2</span>`de son emplacement dans un centre de données. L’objectif est de rendre les noms descriptifs et utiles pour référence future.

```bash
# Configguration de l'identifiant du Minion :
vi /etc/salt/minion.d/id.conf

# Contenu
id: FQDN
```

Redémarrer le Minion :

```
service salt-minion restart
```

## <span style="text-decoration: underline; color: rgb(45, 194, 107);">**D - Gestion des clés des Minions :**</span>


### <span style="color: rgb(53, 152, 219);">**1. Documentations :**</span>

[https://docs.saltproject.io/salt/install-guide/en/latest/topics/accept-keys.html#accept-keys](https://docs.saltproject.io/salt/install-guide/en/latest/topics/accept-keys.html#accept-keys)

### <span style="color: rgb(53, 152, 219);">**2. Description :**</span>

La dernière étape du processus d'installation consiste pour le maître Salt à accepter les clés de minion Salt. Une fois les clés acceptées, le maître Salt peut émettre des commandes au serviteur et recevoir des messages entrants du serviteur. Les serviteurs Salt ne reçoivent pas de données du maître Salt tant que la clé n'est pas acceptée.

Pour des raisons de sécurité, Salt utilise une authentification par clé.

Deux types de clés sont utilisés dans Salt :

- RSA
- AES

Les clés RSA constituent l'épine dorsale du modèle d'authentification et de chiffrement utilisé par Salt. Tous les démons Salt fonctionnent avec des clés RSA uniques. Les serviteurs et le maître génèrent des clés RSA lors de leur premier démarrage, puis les utilisent pour l'authentification basée sur PKI.

Ces clés sont utilisées pour authentifier la clé AES auprès du maître Salt, fournissant ainsi une communication sécurisée en cryptant les données. Chaque serviteur présente une clé publique au maître Salt. La clé est ensuite examinée, comparée et explicitement acceptée par un administrateur.

Le maître envoie également une clé AES tournante qui est utilisée pour chiffrer et déchiffrer les messages envoyés par le maître Salt. La clé AES renvoyée est chiffrée à l'aide de la clé publique initialement envoyée par le minion Salt et ne peut donc être déchiffrée que par le même minion Salt.

[![image.png](https://wiki.morbihan-energies.fr/uploads/images/gallery/2023-10/scaled-1680-/image.png)](https://wiki.morbihan-energies.fr/uploads/images/gallery/2023-10/image.png)

<span class="">La clé AES subit une rotation dans l'une ou l'autre de ces conditions :</span>

- Toutes les 24 heures sur le master
- Lorsque le maître est redémarré
- Lorsqu'une clé de serviteur est supprimée.

La rotation des clés permet au maître de verrouiller les serviteurs qui ne sont pas authentifiés et permet le chiffrement des communications à l'échelle du système.

### <span style="color: rgb(53, 152, 219);">**3. Gestion des clés :**</span>

La plupart des gestions des minions sont gérées via un client appelé `<span class="pre">salt-key</span>`qui s'exécute sur le maître Salt. Ce client est utilisé pour gérer les serviteurs disponibles pour un maître.

Vous pouvez utiliser la `<span class="pre">salt-key</span>`commande pour vous connecter au système d'authentification afin d'accepter, de rejeter et de gérer les clés.


#### <span style="color: rgb(35, 111, 161);">***Accepter les clés :***</span>

Lorsqu'un nouveau serviteur s'enregistre, la clé attendra jusqu'à ce qu'elle soit acceptée.`<span class="pre">Unaccepted</span> <span class="pre">keys</span>`

Appelez `<span class="pre">salt-key</span>`pour voir l’état actuel de la gestion des clés :

```bash
# Appelez salt-keypour voir l’état actuel de la gestion des clés :
salt-key

# Exemple de réponse :
oot@admin-l:/etc/salt/master.d# salt-key
Accepted Keys:
nextcloud.v.sdem.fr
Denied Keys:
Unaccepted Keys:
web01.v.sdem.fr
Rejected Keys:
```

#### <span style="color: rgb(35, 111, 161);">***Commande de gestion des clés :***</span>

```bash
# Accepter une clé :
salt-key -a FQDN

# Accepter toutes les clés :
salt-key -A

# Supprimer une clé :
salt-key -d FQDN

# Supprimer toutes les clés :
salt-key -D

# Supprimer des clés à l'aide d'un filtre :
salt-key -d 'web*'
```

Il est possible d'accepter ou rejeter automatiquement les clés.

# 02-Installation

## <span style="text-decoration: underline; color: rgb(45, 194, 107);">**A - Installation**</span>  


### <span style="color: rgb(53, 152, 219);">**1. Installation des outils de base :**</span>  


```bash
apt-get install curl wget git swaks
```

## <span style="text-decoration: underline; color: rgb(45, 194, 107);">**B - Cacti**</span>

<p class="callout info"><span style="color: rgb(0, 0, 0);">TODO</span></p>

## <span style="text-decoration: underline; color: rgb(45, 194, 107);">**C - Postfix**</span>  


### <span style="color: rgb(53, 152, 219);">**1. Installation de postfix :**</span>

Postfix est utilisé pour l'envoi de mail des scripts.

## <span style="text-decoration: underline; color: rgb(45, 194, 107);">**D - Rancid**</span>

<p class="callout info"><span style="color: rgb(0, 0, 0);">TODO</span></p>

## <span style="text-decoration: underline; color: rgb(45, 194, 107);">**E - Samba**</span>  


### <span style="color: rgb(53, 152, 219);">**1. Description :**</span>

Le serveur Samba est utilisé pour la sauvegarde des données du SI provenant de l'AD vers le serveur d'admin. Un script Powershell se lance tous les jours pour transfert les données.  
En cas de problème d'accès à l'AD, les données (Zim et Keepass) restent accessible afin de réparer l'infra.

### <span style="color: rgb(53, 152, 219);">**2. Documentation :**</span>

<p class="callout info">[https://computingforgeeks.com/install-and-configure-samba-server-share-on-debian-ubuntu/](https://computingforgeeks.com/install-and-configure-samba-server-share-on-debian-ubuntu/)</p>

### <span style="color: rgb(53, 152, 219);">**3. Installation :**</span>

```bash
sudo apt -y install samba
```

### <span style="color: rgb(53, 152, 219);">**4. Configuration :**</span>  


##### **Configurer le partage sécurisé de Samba :**

```bash
# Création du répertoire à partager dans Samba :
sudo mkdir -p /home/share

# Définir la propriété de groupe du répertoire de partage Samba sur le groupe sambashare
sudo chgrp sambashare /home/share

# Création des utilisateurs de partage de samba :
sudo useradd -M -d /home/share/backup-si -s /usr/sbin/nologin -G sambashare backup-si
sudo mkdir /home/share/backup-si
sudo chown backup-si:sambashare /home/share/backup-si
sudo chmod 2770 /home/share/backup-si

# Définir le mot de passe utilisateur et confirmez :
sudo smbpasswd -a backup-si

# Activer le compte samba après avoir défini le mot de passe :
sudo smbpasswd -e backup-si
```

##### **Configurer le fichier de paramétrage Samba :**

Editer le fichier de paramétrage de Samba "/etc/samba/smb.conf"  
Contenu des paramètres :

```
[backup-si]
    path = /home/share/backup-si
    read only = no
    browseable = no
    force create mode = 0660
    force directory mode = 2770
    valid users = @backup-si @adminme @sambashare
    # Tunning :
    case sensitive = true
    default case = lower
    preserve case = no
    short preserve case = no

```

Redémarrez le démon samba après avoir effectué les modifications.

```bash
sudo systemctl restart smbd nmbd
```

Ajout du compte adminme au dossier backup-si :

```bash
vi /etc/group
# Modifier la ligne ci-dessous :
sambashare:x:122:backup-si,adminme
```

## <span style="text-decoration: underline; color: rgb(45, 194, 107);">**F - Smokeping**</span>  


### <span style="color: rgb(53, 152, 219);">**1. Description :**</span>

Les problèmes réseaux et de qualités sont souvent difficiles à comprendre et à analyser …encore faut il les trouver. Chercher la source des perturbations chez votre client peut être un longue traversée du désert.

Smokeping peut vous y aider, cet article vous servira pour savoir comment installer et configurer ce logiciel de supervision.

SmokePing est un logiciel qui vous permet de conserver un historique de la latence de votre réseau.

Il est conçu par Tobi Oetiker, le créateur de MRTG et RRDtool. SmokePing est prévu pour calculer le RTT (Real Trip Time) entre les différents composants de votre réseau et peut le faire aussi bien avec un basique ping ICMP qu’avec des pings plus spécifiquement adaptés aux protocoles HTTP, SMTP, LDAP, DNS…

### <span style="color: rgb(53, 152, 219);">**2. Documentation :**</span>

https://blog.wildix.com/fr/installation-configuration-de-smokeping/  
https://oss.oetiker.ch/smokeping/doc/index.en.html

##### **Installation :**

```bash
apt install smokeping
```

##### **Configuration :**

```bash
cd /etc/smokeping/config.d/
```

<p class="callout info">URL d'accès : http://admin-l.v.sdem.fr/cgi-bin/smokeping.cgi  
</p>

## <span style="text-decoration: underline; color: rgb(45, 194, 107);">**G- Syslog**</span>

<p class="callout info">TODO</p>

# 03-Exploitation

## <span style="text-decoration: underline; color: rgb(45, 194, 107);">**B - Backup-SI**</span>  


### <span style="color: rgb(53, 152, 219);">**1. Description :**</span>

Le serveur d'admin est accessible en SSH soit avec le clé SSH ou bien avec le login "adminme" et son mot de passe (Identique au Keepass Informatique afin que le service informatique puisse le connaître).

Le service Samba est installé permettant de transférer depuis l'AD01 les informatique du SI (Keepass et Zim) vers un espace local sur le serveur admin.v.sdem.fr:/home/share/backup-si/  
Un lien symbolique est créé sur le compte adminme dans "/home/adminme"

```bash
lrwxrwxrwx 1 adminme adminme   22 Aug 18 08:59 backup-si -> /home/share/backup-si//
```

### <span style="color: rgb(53, 152, 219);">**2. Emplacement du backup :**</span>

Le "Zim" et le "Keepass" du service informatique sont copiés dans "adminme@admin.v.sdem.fr:/home/share/backup-si/%YYYYMMDD%".

Le backup est géré par un script Powershell sur le serveur AD01 qui va se connecter en SSH sur le serveur admin.v.sdem.fr avec le compte samba "backup-si".

## <span style="text-decoration: underline; color: rgb(45, 194, 107);">**C - Procédure-récupération-données-SI**</span>  


Copie des données de l'infrastructure du SI de Morbihan Energies vers le serveur physique d'administration local avec une rétention de 30 jours.

\# Sources copiées :  
\- Dossier Keepass  
\- Dossier Zim  
   
\# Destination :  
 admin.v.sdem.fr:/home/share/backup-si/%YYYYMMDD% (AnnéeMoisJour)  
   
\# Accès aux données :  
En cas de besoin d'accès aux données, suivre la procédure ci-dessous :  
\- Se connecter avec un client FTP (Filezilla) sur adminme@admin.v.sdem.fr (Password identique au Keepass Informatique)  
\- Cliquer sur le lien symbolique backup-si  
\- Sélectionner le dossier correspondant à la date souhaitez et le transférer localement sur le poste

## <span style="text-decoration: underline; color: rgb(45, 194, 107);">**D - crontab**</span>  


```bash
# Example of job definition:
# .---------------- minute (0 - 59)
# |  .------------- hour (0 - 23)
# |  |  .---------- day of month (1 - 31)
# |  |  |  .------- month (1 - 12) OR jan,feb,mar,apr ...
# |  |  |  |  .---- day of week (0 - 6) (Sunday=0 or 7) OR sun,mon,tue,wed,thu,fri,sat
# |  |  |  |  |
# *  *  *  *  *  user command to be executed
#
# Archive - mailreboot :
#20 12 * * 1,3 cd /root && ./mailreboot.sh
#

# ssl-cert-check :
00 01 * * * cd /usr/local/bin/ssl-cert-check/ && ./ssl-cert-check.sh -a -f ssldomains -q -x 60 -e hostmaster@morbihan-energies.fr

## url-check :
# Demarrage script url-check.sh - Intervale 5mn :
*/05 * * * * cd /usr/local/bin/url-check/ && ./url-check.sh >/dev/null 2>&1

# Purge dossier de cache URL toutes les heures :
* */01 * * * rm -f /usr/local/bin/url-check/cache/*

# Purge dossier /home/share/backup-si des dossiers de plus de 30 jours :
00 01 * * * cd /usr/local/bin/ && ./purge-backup-si.sh 2>&1
```

## <span style="text-decoration: underline; color: rgb(45, 194, 107);">**E - Racktables - ARCHIVE**</span>

### <span style="color: rgb(53, 152, 219);">**1. Création d'un accès en lecture seul pour script de Cable-ID :**</span>  


```pl/sql
# Création du compte :
CREATE USER 'readonly'@'localhost' IDENTIFIED BY 'PASSWORD';

# Attribue des accès en lecture seule :
GRANT SELECT ON *.* TO 'readonly'@'localhost';

# Application des changements :
FLUSH PRIVILEGES;
```

Cette procédure est à transférer sur le serveur racktables lors de la migration de Racktables en CT LXC.

## <span style="text-decoration: underline; color: rgb(45, 194, 107);">**F - Scripts**</span>

Ce serveur permet d'orchestrer un ensemble de script prévu pour l'administration du système dr'information de Morbihan Energies.

```
Emplacement des scripts : 
/usr/local/bin/
```

### <span style="color: rgb(53, 152, 219);">**1. purge-si-backup.sh**</span>  


##### **Description :**

Purger le dossier "/home/share/backup-si" de tous les dossiers dont la date de création est supérieur à 30 jours.

Emplacement du script : /usr/local/bin/purge-backup-si.sh

```bash
#!/bin/bash
  
# Author : jkermorvant
# Version : 1.0
# Description : Purge du dossier /home/share/backup-si de tous les dossiers dont la date de création est suppérieur à 30 jours.
find /home/share/backup-si/* -ctime +30 -exec rm -rf {} \;
```

### <span style="color: rgb(53, 152, 219);">**2. ssl-cert-check-master**</span>  


##### **Description :**

Ce script permet d'alerter quand l'expiration des certificats approche des 60 jours.

##### **Source :**

<p class="callout info">https://github.com/Matty9191/ssl-cert-check  
https://prefetch.net/articles/checkcertificate.html</p>

##### **Fonctionnement :**

Le fichier "/usr/local/bin/ssl-cert-check-master/ssldomains" contient la liste des sites en SSL à scanner

```
morbihan-energies.fr 443
sdem.fr 443
```

  
Le fichier "/usr/local/bin/ssl-cert-check-master/ssl-cert-check" est le script qui permettra de vérifier l'état des certificats des sites web déclarés dans ssldomains.  
La ligne 388 du script a été modifié pour configurer le FROM :

```bash
#   FROM="${1}"
    FROM="hostmaster@morbihan-energies.fr"
```

##### **Exemple d'utilisation :**

```bash
# Vérifier l'expiration des certificats listés dans le fichier ssldomains
./ssl-cert-check -f ssldomains

# Vérifier 
./ssl-cert-check -a -f ssldomains -q -x 60 -e hostmaster@morbihan-energies.fr
```

##### **Crontab :**

Une tâche planifiée est créé pour analyser tous les jours à 1h00 l'état des certificats.

```bash
# Editer la crontab
crontab -e

# Crontab pour le ssl-cert-check :
00 01 * * * cd /usr/local/bin/ssl-cert-check-master/ && ./ssl-cert-check -a -f ssldomains -q -x 60 -e hostmaster@morbihan-energies.fr
```

### <span style="color: rgb(53, 152, 219);">**3. testssl.sh**</span>  


##### **Description :**

La mise en place du chiffrement sur un serveur Web peut être parfois assez complexe en fonction du niveau de sécurité que vous souhaitez atteindre tout en prenant en compte la compatibilité avec les différents navigateurs et terminaux du marché.  
Pour tester que votre serveur possède une configuration correcte, deux options s'offrent à vous :  
\- Dans le cas le plus simple, votre serveur possède déjà une entrée DNS publique, vous pourrez tout simplement utiliser le site SSLLabs pour vérifier la configuration de celui-ci. Une note de A est assez facilement atteignable en suivant les recommandations de safeciphers.  
\- Dans le cas contraire, si le DNS de votre serveur n'est pas encore exposé sur Internet, il faudra utiliser une autre solution : Testssl.sh  
Testssl.sh est un script Unix permettant de vérifier la sécurité de votre configuration HTTPS. Il permettra de vous confirmer la compatibilité de votre site avec une exhaustivité de systèmes : Android, IE, Safari, Java ...

##### **Documentation :**

<p class="callout info">https://www.geeek.org/testssl-test-tls-ssl-serveur/</p>

##### **Installation :**

```bash
cd /usr/local/bin/
git clone https://github.com/drwetter/testssl.sh
mv testssl.sh testssl
cd testssl
chmod +x testssl.sh
```

##### **Exploitation :**

./testssl.sh site.morbihan-energies.fr

[![testssl.png](https://wiki.morbihan-energies.fr/uploads/images/gallery/2023-04/scaled-1680-/wDBpasted-image.png)](https://wiki.morbihan-energies.fr/uploads/images/gallery/2023-04/wDBpasted-image.png)

### <span style="color: rgb(53, 152, 219);">**4. url-check**</span>  

# 03-01 - Exploitation de SaltProject

## <span style="text-decoration: underline; color: rgb(45, 194, 107);">**A - Commandes de base :**</span>

### <span style="color: rgb(53, 152, 219);">**1. Commande de base :**</span>

```bash
salt '*' grains.ls
salt '*' grains.items
    locale_info:
        ----------
        defaultencoding:
            UTF-8
        defaultlanguage:
            fr_FR
        detectedencoding:
            utf-8
        timezone:
            UTC
    lsb_distrib_description:
        Ubuntu 22.04.3 LTS
    mem_total:
        1963
    num_cpus:
        2

salt '*' sys.doc
```

### <span style="color: rgb(53, 152, 219);">**2. Gestion des grains :**</span>

Source : https://docs.saltproject.io/en/latest/ref/modules/all/salt.modules.grains.html

```bash
salt -G 'os:CentOS' test.version
salt -G 'cpuarch:x86_64' grains.item num_cpus
salt -G 'ec2_tags:environment:*production*'

salt '*' grains.item os osrelease oscodename
salt '*' grains.item host sanitize=True
salt '*' grains.items
salt '*' grains.items sanitize=True

# Renvoie une liste de tous les grains disponibles
salt '*' grains.ls
```

### <span style="color: rgb(53, 152, 219);">**1. Gestion des groupes de minions :**</span>

#### <span style="color: rgb(35, 111, 161);">***Sources***</span>

https://salt-zh.readthedocs.io/en/latest/topics/targeting/nodegroups.html  
https://docs.saltproject.io/en/master/topics/targeting/compound.html#targeting-compound  
[https://docs.saltproject.io/en/master/topics/targeting/nodegroups.html#defining-nodegroups-as-lists-of-minion-ids](https://docs.saltproject.io/en/master/topics/targeting/nodegroups.html#defining-nodegroups-as-lists-of-minion-ids)

#### <span style="color: rgb(35, 111, 161);">***Gestion des groupes***</span>

Créer un fichier .conf dans le dossier **/etc/salt/master.d** contenant les informations de groupe :

```bash
# Création d'un groupe dans un fichier dédié :
nodegroups:
  grp-srv-authorized_keys-dev-apside:
    - 'proto-novo.v.sdem.fr'

# Test du groupe :
salt -N grp-srv-authorized_keys-dev test.version
```

### <span style="color: rgb(53, 152, 219);">**3. Commandes simples :**</span>

```bash
# Effectuer un test de ping sur les minions
salt nextcloud.v.sdem.fr test.ping
salt '*' test.ping
salt '*.v.sdem.fr' test.ping

# Vérifier la version de Salt sur les minions :
salt '*' test.version

# Afficher la version des Distrib des minions :
salt '*' cmd.run 'uname -a'
salt '*' cmd.run 'lsb_release -a'
salt '*' grains.item os osrelease oscodename

# Afficher l'uptime des minions :
salt '*' cmd.run 'uptime'

# Afficher la configuration réseau :
salt '*' network.interfaces

# Lancer des commandes à distance :
salt '*' cmd.run 'ls -l /etc'
salt '*' cmd.run 'du -sh /*'
salt '*' cmd.run 'find /home/share/backup-si/* -ctime +1 -exec rm -rf {} \;'
salt '*' cmd.run 'shutdown -r now'

# Afficher les informations des disques des minions :
salt '*' disk.usage

# Afficher la conso de la RAM sur les minions :
salt '*' cmd.run 'free -m'

# Vérifiez le package bash à l'aide de la commande salt ci-dessous.
salt '*' pkg.show bash

# Installez un package sur tous les serveurs minion.
salt '*' pkg.install swaks
salt '*' pkg.install tree
salt '*' pkg.install postfix

# Afficher les référentiels disponibles sur tous les serveurs Minion.
salt '*' pkg.refresh_db

# Vérifiez la liste des référentiels sur tous les serviteurs du serveur.
salt '*' pkg.list_repos

# Consultez la liste des mises à jour de packages disponibles sur tous les serveurs Minion.
salt '*' pkg.list_upgrades

#### Un autre excellent exemple ici est le module de service qui vous permet de gérer des services sur plusieurs distributions Linux, y compris la distribution avec systemd.
# Vérifiez si le service apache2 est disponible ou non.
salt '*' service.available apache2

# Activez le service apache2 pour qu'il démarre au démarrage du système sur tous les serveurs minion.
salt '*' service.enabled apache2

# Vérification de la liste des services en cours d'exécution sur tous les serveurs.
salt '*' service.get_running

# Vérifiez la commande ExecStart= pour chaque service disponible sur tous les serveurs.
salt '*' service.execs

# Afficher le stockage BTRFS des Serveurs LXC :
salt -N grp-srv-lxc cmd.run 'btrfs filesystem show'

```

### <span style="color: rgb(53, 152, 219);">**4. Copie d'un fichier vers un minion :**</span>

```bash
# Copier récursivement un répertoire depuis le salt master 
salt '*' cp.get_dir salt://path/to/dir/ /minion/dest

# Copier un fichier vers les minions :
salt '*' cp.get_file salt://path/to/file /minion/dest
salt '*' cp.get_file "salt://{{grains.os}}/vimrc" /etc/vimrc template=jinja
salt 'nextcloud*' cp.get_file salt:/srv/salt/files/test.txt /home/adminme/test.txt

salt 'nextcloud.v.sdem.fr' cp.get_file salt://files/ssh-key-pub-listing-infra.txt /home/adminme/.ssh/authorized_keys
```

### <span style="color: rgb(53, 152, 219);">**5. Déploiement des clés SSH :**</span>

```bash
############# Préparation des fichiers de conf :

# Création du dossier sshd_config.d s'il n'existe pas, le fichier sshd_config utilise l'include du dossier sshd_config.d
salt '*' cmd.run "mkdir /etc/ssh/sshd_config.d"

# Déploiement du fichier de gestion des clés SSH :
salt '*' cmd.run "rm -rf /etc/ssh/sshd_config.d/authorizedKeysFile.conf"
salt '*' cmd.run "echo "#AuthorizedKeysFile\nAuthorizedKeysFile     .ssh/authorized_keys-infra .ssh/authorized_keys-dev .ssh/authorized_keys-dev-apside\n " >> /etc/ssh/sshd_config.d/authorizedKeysFile.conf"

# Pour les Ubuntu 18.04, le Include du dossier sshd_config.d ne fonctionne pas :
vi /etc/ssh/sshd_config
# JKT - Ajout AuthorizedKeys :
AuthorizedKeysFile     .ssh/authorized_keys-infra .ssh/authorized_keys-dev .ssh/authorized_keys-dev-apside 

# Déploiement du fichier de configuration dédié guacamole uniquement sur les Ubuntu 22.04 'Jammy' :
salt -G 'oscodename:jammy' cmd.run 'echo "# JKT-20220517 - Connexion Guacamole :\nHostkeyAlgorithms +ssh-rsa\nPubkeyAcceptedAlgorithms +ssh-rsa\n " >> /etc/ssh/sshd_config.d/guacamole-auth-ssh.conf'

# Redémarrer le deamon SSHD :
salt '*' cmd.run 'service sshd restart'

--------------------------------------------------------------------------------------------------------------------------------------------
############# Déploiement des clés SSH :
# Options 1 - Accès service INFRA uniquement - Fichier -> .ssh/authorized_keys-infra :
salt '*' cp.get_file salt://files/authorized_keys-infra /home/adminme/.ssh/authorized_keys-infra
salt '*' cmd.run 'chown adminme:adminme /home/adminme/.ssh/*'

# Options 2 - Accès service DEV - Fichier -> .ssh/authorized_keys-dev :
# Utilisation du groupe de minion grp-srv-authorized_keys-dev
salt -N grp-srv-authorized_keys-dev cp.get_file salt://files/authorized_keys-dev /home/adminme/.ssh/authorized_keys-dev
salt -N grp-srv-authorized_keys-dev cmd.run 'chown adminme:adminme /home/adminme/.ssh/*'

# Options 3 - Accès service Prestataire DEV-APSIDE - Fichier -> .ssh/authorized_keys-dev-apside :
# Utilisation du groupe de minion grp-srv-authorized_keys-dev-apisde
salt -N grp-srv-authorized_keys-dev-apside cp.get_file salt://files/authorized_keys-dev-apside /home/adminme/.ssh/authorized_keys-dev-apside
salt -N grp-srv-authorized_keys-dev-apside cmd.run 'chown adminme:adminme /home/adminme/.ssh/*'

# Suppression de l'ancien fichier de configuration après déploiement des clés spécifiques :
salt '*' cmd.run 'rm /home/adminme/.ssh/authorized_keys'
```

### <span style="color: rgb(53, 152, 219);">**6. Salt avec VMware :**</span>

#### <span style="color: rgb(35, 111, 161);">***Source***</span>

https://docs.vmware.com/fr/VMware-vRealize-Automation-SaltStack-Config/8.6/use-manage-saltstack-config-guide.pdf  
https://docs.saltproject.io/salt/extensions/salt-ext-modules-vmware/en/latest/ref/modules/saltext.vmware.modules.vm.html

## <span style="text-decoration: underline; color: rgb(45, 194, 107);">**B - Gestion par script :**</span>

### <span style="color: rgb(53, 152, 219);">**1. Description :**</span>

L'ensemble des scripts sont installés sur le serveur admin-l.v.sdem.fr dans /srv/salt/scripts/

Les scripts sont disponible dans git

### <span style="color: rgb(53, 152, 219);">**1. Script de déploiement de Lynis :**</span>

Lynis est un outil de scan de vulnérabilité. Il est déployé automatiquement avec Salt sur l'ensemble du parc.

Emplacement du script : /srv/salt/scripts/

Nom du script : salt-deploy-lynis.sh

```bash
##############################################################
# Auteur : jkermorvant
# Date de modification : 20231115
#
# Description : Script de déploiement de l'outil de sca de vulnérabilité Lynis
#
##############################################################
#! /bin/bash
#
##############################################################
# Variables :

###################################
# Déploiement de l'outil de scan de vulnérabiloté Lynis :
salt '*' cp.get_file salt://files/lynis-3.0.9/lynis-3.0.9.tar.gz /tmp
salt '*' cmd.run 'tar -xzf /tmp/lynis-3.0.9.tar.gz -C /usr/local'
salt '*' cmd.run 'chmod +x /usr/local/lynis/lynis'
salt '*' cmd.run 'ln -s /usr/local/lynis/lynis /usr/local/bin'

# Démarrage du scan de vulnérabilité :
salt '*' cmd.run 'sudo lynis audit system'

# Récupération des logs vers le dossier /var/cache/salt/master/minions/minion-id/files :
# Prérequis :
# Source : https://docs.saltproject.io/en/latest/ref/modules/all/salt.modules.cp.html#salt.modules.cp.push
# Allow minions to push files to the master. This is disabled by default, for security purposes.
# file_recv: False -> True
# Restart Salt-Master
salt '*' cp.push /var/log/lynis.log
salt '*' cp.push /var/log/lynis-report.dat
```

### <span style="color: rgb(53, 152, 219);">**1. Script de déploiement de la supervision :**</span>

Ce script permet de déployer la supervision sur une machine spécifique Linux.

Emplacement du script : /srv/salt/scripts/

Nom du script : salt-deploy-supervision.sh

```bash
#############################################################
# Auteur : jkermorvant
# Date de modification : 20231115
#
# Description : Script de déploiement de la supervision NAGIOS
#
##############################################################
#! /bin/bash
#
##############################################################
# Variables :
ARG=N
DEST=grp-srv-deploy-labs

# Déclaration du serveur
SERVER=web01
DOMAIN=.v.sdem.fr

# Déclaration de l'adresse IP du serveur
IP1=192
IP2=168
IP3=1
IP4=219

# Déclaration du serveur de supervision
SUPERVISION=supervision.v.sdem.fr

###################################
# Installation et configuration de l'agent NRPE sur le serveur cible

# Installation du paquet NRPE :
salt ${SERVER}${DOMAIN} pkg.install nagios-nrpe-server nagios-plugins

# Déploiement des fichiers de configuration sur le serveur à superviser :
salt ${SERVER}${DOMAIN} cp.get_file salt://files/supervision/nrpe.cfg /etc/nagios
salt ${SERVER}${DOMAIN} cp.get_file salt://files/supervision/check_mem /usr/lib/nagios/plugins/

# Redémarrage du service nagios-nrpe :
salt ${SERVER}${DOMAIN} cmd.run 'service nagios-nrpe-server restart'

###################################
# Déployer le fichier de configuration Nagios sur le serveur de supervision

# Déploiement du fichier de configuration sur le serveur de supervision :
cp /srv/salt/files/supervision/template.v.sdem.fr.cfg /srv/salt/files/supervision/files-config/${SERVER}${DOMAIN}.cfg

# Paramétrage du fichier de configuration Nagios - Remplacement du nom :
for file in /srv/salt/files/supervision/files-config/${SERVER}${DOMAIN}.cfg
do
  echo "Traitement de ${file} ..."
  sed -i -e "s/template\.v\.sdem\.fr/${SERVER}\.v\.sdem\.fr/g" "${file}"
done

# Paramétrage du fichier de configuration Nagios - Remplacement de l'adresse IP :
for file in /srv/salt/files/supervision/files-config/${SERVER}${DOMAIN}.cfg
do
  echo "Traitement de $file ..."
  sed -i -e "s/192\.168\.1\.XXX/${IP1}\.${IP2}\.${IP3}\.${IP4}/g" "${file}"
done

# Déploiement du fichier de configuration sur le serveur de supervision :
salt ${SUPERVISION} cp.get_file salt://files/supervision/files-config/${SERVER}${DOMAIN}.cfg /usr/local/nagios/etc/objects/sdem/

# Application des droits sur le fichier :
salt ${SUPERVISION} cmd.run "chown sdem:sdem /usr/local/nagios/etc/objects/sdem/${SERVER}${DOMAIN}.cfg"

# Redémarrage du service nagios-nrpe :
salt ${SUPERVISION} cmd.run "sudo systemctl restart nagios.service"
```

### <span style="color: rgb(53, 152, 219);">**1. Script de mise à jour de Metabase sur Dataviz :**</span>

Ce script permet de déployer la mise à jour de Metabase sur les serveurs

Emplacement du script : /srv/salt/scripts/

Nom du script : salt-deploy-supervision.sh

```bash
##############################################################
# Auteur : jkermorvant
# Date de modification : 20231215
#
# Description : Script de mise à jour de Metabase
#
##############################################################
#! /bin/bash
#
##############################################################
# Variables :
SERVER=dataviz-dev.v.sdem.fr
VERSION=0.47.9

##############################################################
# 1 - Executer le script de dump postgresql
salt ${SERVER} cmd.run "sudo -u postgres pg_dump upciti_db > /backup/postgresql/upciti_db_bck"

# 2 - Stopper le service
salt ${SERVER} cmd.run "sudo systemctl stop metabase.service"

# 3 - Télécharger metabase.jar dans le répertoire d'installation (VERSION = 0.47.8 actuellement)
salt ${SERVER} cmd.run "sudo rm /data/metabase_data/metabase.jar"
salt ${SERVER} cmd.run "sudo wget -P /data/metabase_data https://downloads.metabase.com/v${VERSION}/metabase.jar"
salt ${SERVER} cmd.run "chown -R metabase_usr:metabase_grp /data/metabase_data/metabase.jar"

# 4 - Démarrer Metabase
salt ${SERVER} cmd.run "systemctl start metabase.service"
salt ${SERVER} cmd.run "systemctl status metabase.service"

```

# telechargement - lufi

### <span style="text-decoration: underline; color: rgb(45, 194, 107);">**A - Création du conteneur LXC**</span>

### <span style="color: rgb(53, 152, 219);">**1. Configuration du serveur :**</span>

Nom LXC : TELECHARGEMENT  
Adresse IP (réseau non rroté LXC) : 192.168.25.160  
Nom DNS Interne : telechargement.v.sdem.fr  
Nom DNS Externe : telechargement.morbihan-energies.fr  
URL : telechargement.morbihan-energies.fr  
Reverse Proxy : telechargement.morbihan-energies.fr  
OS : Ubuntu 22.04

##### **Rôle :**

Serveur de transfert de fichiers volumineux

### <span style="color: rgb(53, 152, 219);">**1.** </span><span style="color: rgb(53, 152, 219);">**Création d'un CT :**</span>

<span style="color: rgb(0, 0, 0);">Le container est installé sur le serveur LXC01.v.sdem.fr</span>

```bash
# Déclarer la variable :
CTNAME=TELECHARGEMENT
# Création du conteneur :
lxc launch ubuntu:22.04 $CTNAME

# Configurer l'autostart d'un CT :
lxc config set $CTNAME boot.autostart true
```

### <span style="color: rgb(53, 152, 219);">**2. Paramétrage :**</span>

<span style="color: rgb(0, 0, 0); background-color: rgb(255, 255, 255);">Editer le fichier de configuration afin de paramétrer une adresse IP fixe et le forward de port.</span>

#### <span style="color: rgb(35, 111, 161);">***Configuration réseau et forward de port :***</span>

<span style="color: rgb(0, 0, 0);">Il est nécessaire de bien renseigner le fichier de zone DNZ "lxc.morbihan-energies.fr" afin d'attribuer une adresse IP sur le réseau LXC (non routé).</span>

```bash
# Editer le fichier de configuration :
lxc config edit $CTNAME
```

Ajouter les lignes suivantes :

```bash
  devices:
    eth0:
      ipv4.address: 192.168.25.160
      name: eth0
      network: lxdbr0
      type: nic
  port53087:
      connect: tcp:0.0.0.0:80
      listen: tcp:192.168.1.31:53087
      type: proxy
```

## <span style="text-decoration: underline; color: rgb(45, 194, 107);">**B - Paramétrage :**</span>

### <span style="color: rgb(53, 152, 219);">**1. Gestion date et heure :**</span>

```bash
# Changer la date :
date -s "02/18/2017 12:34:00"

# Changer le fuseau horaire :
rm /etc/localtime
ln -s /usr/share/zoneinfo/Europe/Paris /etc/localtime
# Pour que le changement de fuseau survive au redémarrage de la machine, il faut aussi le mettre dans le bon fichier.
vi /etc/timezone
ZONE="Europe/Paris"
```

### <span style="color: rgb(53, 152, 219);">**2. Documentations :**</span>

<p class="callout info">https://framacloud.org/fr/cultiver-son-jardin/lufi  
https://framagit.org/fiat-tux/hat-softwares/lufi/-/wikis/installation</p>

### <span style="color: rgb(53, 152, 219);">**3. Prérequis :**</span>

##### **Prérequis :**

Lufi est codé en Perl, pour le faire fonctionner il est nécessaire d’installer Carton, un gestionnaire de modules Perl.

```bash
apt-get install build-essential libpq-dev
cpan Carton
```

carton est un outil en ligne de commande pour suivre les dépendances du module Perl pour votre application Perl.   
Les dépendances requises sont gérées via un fichier nommé cpanfile et suivies via le fichier carton.lock.   
Cela facilite les déploiements et permet aux autres développeurs de votre application d'avoir exactement les mêmes versions des modules.


## <span style="text-decoration: underline; color: rgb(45, 194, 107);">**C - Installation des prérequis** </span>  


##### **Configuration réseau :**

Nom DNS : telechargement.morbihan-energies.fr

Type de serveur : CT LXC

Adresse IP : 192.168.25.160  
DNS : 192.168.1.50  
Distrib : Ubuntu 22.04

##### **Documentations :**

L'ensemble de l'installation se fait en root.

## <span style="text-decoration: underline; color: rgb(45, 194, 107);">**D - Installation**</span>

### <span style="color: rgb(53, 152, 219);">**2. Installation de LUFI :**</span>

Tout d’abord, connectez-vous en tant que root sur votre serveur et créez un compte utilisateur lufi ainsi que le dossier /var/www/html/lufi dans lequel seront copiés les fichiers avec les droits d’accès correspondants.

```bash
useradd lufi
mkdir /home/lufi
chown -R lufi:lufi /home/lufi

mkdir /var/www/lufi
# chown -R www-data: /var/www/lufi
chown -R www-data:www-data /var/www/lufi

```

Téléchargez les fichiers de la dernière version sur le dépôt officiel (« Download zip » en bas à droite ou bien en ligne de commande avec git).  
Copiez son contenu dans le dossier /var/www/html/lufi et attribuez les droits des fichiers à l’utilisateur lufi

```bash
cd /var/www
git clone https://framagit.org/fiat-tux/hat-softwares/lufi.git
chown lufi:lufi -R /var/www/lufi
```

Connectez-vous avec l’utilisateur lufi : su lufi -s /bin/bash et lancez la commande d’installation des dépendances depuis le dossier

```bash
su lufi -s /bin/bash
cd /var/www/lufi
carton install
exit
```

Maintenant que tout est prêt, modifiez le fichier de configuration de Lufi lufi.conf avec votre éditeur de texte préféré sur le modèle du fichier lufi.conf.template.  
Par défaut le logiciel est configuré pour écouter sur le port 8080 de l'adresse 127.0.0.1 (localhost).

```bash
cp lufi.conf.template lufi.conf
vi lufi.conf
```

L’ensemble des paramètres sont facultatifs à l'exception du paramètre contact (pensez bien à le configurer et à le décommenter).   
Si vous utilisez Lufi derrière un serveur web comme Nginx (comme dans ce tutoriel), pensez bien à décommenter le paramètre proxy =&gt; 1,.

A ce stade de l'installation, il n'est plus nécessaire de se connecter avec l'utilisateur spécifiquement créé lufi. Afin d'améliorer la sécurité, on empêchera à présent la possibilité de se connecter à celui-ci avec la commande.

```bash
usermod -s /bin/false lufi
```

Lufi en tant que service  
À présent, le serveur tournera lorsque qu’on lancera cette commande :

```bash
carton exec hypnotoad script/lufi
```

Pour éviter de devoir relancer le serveur à la main à chaque redémarrage du serveur, on va donc lancer Lufi sous forme de service. Deux possibilités s'offrent alors :

### <span style="color: rgb(53, 152, 219);">**3. Démarrage auto pour InitV :**</span>

##### **Démarrage auto pour Systemd :**

```bash
cp utilities/lufi.service /etc/systemd/system
```

Modifiez ce fichier pour qu'il corresponde à votre installation (User=lufi, WorkingDirectory=/var/www/lufi, …)

```bash
vi /etc/systemd/system/lufi.service
```

Faites en sorte que Systemd le prenne en compte

```bash
systemctl daemon-reload
```

Et qu'il le lance à chaque démarrage

```bash
systemctl enable lufi.service
```

### <span style="color: rgb(53, 152, 219);">**4. Paramétrage :**</span>

À ce stade, si tout s’est bien passé, lorsque vous exécutez la commande service lufi start, Lufi est pleinement fonctionnel. Vous n’avez qu’à vous rendre sur l’URL http://127.0.0.1:8080 pour pouvoir l’utiliser.  
Nous allons maintenant configurer Lufi pour le rendre accessible depuis un nom de domaine avec Nginx (vous pouvez également utiliser Apache ou Varnish puisque seule la fonctionnalité de proxy inverse nous intéresse).

##### **Nginx :**

Installez le paquet :

```bash
apt-get install nginx
```

Créez le fichier de configuration de votre domaine /etc/nginx/sites-available/votre-nom-de-domaine pour y mettre ceci (en remplaçant « votre-nom-de-domaine ») et le port 8080 si vous l’avez changé dans la configuration de Lufi :

```bash
vi /etc/nginx/sites-available/telechargement.morbihan-energies.fr.conf
```

```bash
server { listen 80;

    server_name telechargement.morbihan-energies.fr;

    access_log /var/log/nginx/telechargement.success.log;
    error_log /var/log/nginx/telechargement.error.log;

    location / {
        # Add cache for static files
        if ($request_uri ~* ^/(img|css|font|js)/) {
            add_header Expires "Thu, 31 Dec 2037 23:55:55 GMT";
            add_header Cache-Control "public, max-age=315360000";
        }
        # HTTPS only header, improves security
        #add_header Strict-Transport-Security "max-age=15768000";

        # Adapt this to your configuration
        proxy_pass  http://127.0.0.1:8082;

        # Really important! Lufi uses WebSocket, it won't work without this
        proxy_set_header Upgrade $http_upgrade;
        proxy_set_header Connection "upgrade";

        proxy_http_version 1.1;
        proxy_set_header Host $host;
        proxy_set_header X-Real-IP $remote_addr;
        proxy_set_header X-Forwarded-For $proxy_add_x_forwarded_for;

        # If you want to log the remote port of the file senders, you'll need that
        proxy_set_header X-Remote-Port $remote_port;

        proxy_set_header X-Forwarded-Proto $scheme;

        # We expect the downstream servers to redirect to the right hostname, so don't do any rewrites here.
        proxy_redirect     off;
    }
}
```

Activez votre fichier :

```bash
ln -s /etc/nginx/sites-available/telechargement.morbihan-energies.fr.conf /etc/nginx/sites-enabled/telechargement.morbihan-energies.fr.conf
```

Enfin, relancez nginx :

```bash
/etc/init.d/nginx restart
```

## <span style="text-decoration: underline; color: rgb(45, 194, 107);">**B - Personnalisation :**</span>  


### <span style="color: rgb(53, 152, 219);">**1. Gestion des Logos :**</span>

Emplacement des logos : /var/www/lufi/themes/default/public/img  
Liste des logos à configurer en 24x24 Pixels :

```
    - favicon.png
    - lufi-min.png
    - lufi_favicon.png
```

### <span style="color: rgb(53, 152, 219);">**2. Gestion des thèmes :**</span>

Pour personnaliser votre instance de Lufi, il faut lancer la commande carton :

```bash
exec script/lufi theme morbihan-energies
```

Ce qui créera un nouveau dossier "themes/votre-theme".   
Il contiendra un fichier "Makefile", un fichier "lib/Lufi/I18N.pm" ainsi que des dossiers vides pour vous montrer le « squelette » d'un thème.   
Ensuite il ne vous reste plus qu'à copier les fichiers du thème default dans votre dossier de thème et à les adapter à votre gré. Vous pouvez ainsi modifier les fichiers css, images, javascript (dossier public), les modèles de pages (dossier templates) et même la traduction en conservant un thème propre sur lequel basculer en cas de problème.

### <span style="color: rgb(53, 152, 219);">**3. Modification de la traduction :**</span>

Le cas de la modification des traductions est un peu particulier :

Si vous souhaitez ajouter des chaînes de caractères traduites dans votre thème, ajoutez-les dans les fichiers du dossier "templates" en prenant exemple sur le thème par défaut (&lt;%= l('Ceci est une chaîne traduite') %&gt;) puis exécutez "make locales" depuis votre dossier de thème (themes/votre-theme, pas depuis le dossier d'installation de Lufi).   
Il vous restera alors à ajouter la traduction dans les fichiers présents dans "themes/votre-theme/lib/Lufi/I18N/".  
si vous souhaitez modifier une traduction, repérez la chaîne dans les fichiers de "themes/default/lib/Lufi/I18N/", puis recopiez les lignes commençant par msgid et msgstr qui s'y rapportent (ne copiez surtout pas les commentaires qui s'y rapportent). Enfin, modifiez la traduction (le contenu de msgstr) dans vos fichiers.  
Modifiez ensuite le fichier "lufi.conf" pour préciser quel thème vous utilisez. Pour pouvoir personnaliser et observer vos modifications en direct, il vous faudra stopper temporairement le service service lufi stop et le démarrer avec la commande :

```bash
carton exec morbo script/lufi --listen=http://127.0.0.1:8080
```

## <span style="text-decoration: underline; color: rgb(45, 194, 107);">**C - lufi.conf**</span>

##### **Contenu du fichier lufi.conf :**  
**Emplacement :**

```bash
# vim:set sw=4 ts=4 sts=4 ft=perl expandtab:
{ 
    ####################
    # Hypnotoad settings
    ####################
    # see http://mojolicio.us/perldoc/Mojo/Server/Hypnotoad for a full list of settings
    hypnotoad => {
        # array of IP addresses and ports you want to listen to
        # you can specify a unix socket too, like 'http+unix://%2Ftmp%2Flufi.sock'
        listen => ['http://127.0.0.1:8082'],
        # if you use Lufi behind a reverse proxy like Nginx, you want to set proxy to 1
        # if you use Lufi directly, let it commented
        proxy  => 1,

        # Please read http://mojolicious.org/perldoc/Mojo/Server/Hypnotoad#workers
        # to adjust this to your server
        workers => 30,
        clients => 1,
    },

    # Put a way to contact you here and uncomment it
    # You can put some HTML in it
    # MANDATORY
    contact       => '<a href="https://morbihan-energies.fr/contact/">Contact page</a>',

    # Put an URL or an email address to receive file reports and uncomment it
    # It's for make reporting illegal files easy for users
    # MANDATORY
    report => 'telechargement@morbihan-energies.fr',

    # Array of random strings used to encrypt cookies
    # optional, default is ['fdjsofjoihrei'], PLEASE, CHANGE IT
    #secrets        => ['fdjsofjoihrei'],

    # Name of the instance, displayed next to the logo
    # optional, default is Lufi
    instance_name => 'Telechargement.morbihan-energies.fr',

    # Choose a theme. See the available themes in `themes` directory
    # Optional, default is 'default'
    #theme         => 'default',

    # Length of the random URL
    # optional, default is 8
    #length            => 8,

    # How many URLs will be provisioned in a batch ?
    # optional, default is 5
    #provis_step       => 5,

    # Max number of URLs to be provisioned
    # optional, default is 100
    #provisioning      => 100,

    # Length of the modify/delete token
    # optional, default is 32
    #token_length      => 32,

    # Max file size, in octets
    # You can write it 100*1024*1024
    # optional, no default
    #max_file_size     => 104857600,
    # JKT - Config 4Go
    max_file_size      => 4294967296,
    # If you want to have piwik statistics, provide a piwik image tracker
    # Only the image tracker is allowed, no javascript
    # optional, no default
    #piwik_img         => 'https://piwik.example.org/piwik.php?idsite=1&amp;rec=1',

    # Broadcast_message which will displayed on the index page
    # optional, no default
    #broadcast_message => 'Maintenance',

    # Default time limit for files
    # Valid values are 0, 1, 7, 30 and 365
    # optional, default is 0 (no limit)
    #default_delay     => 0,

    # Number of days after which the files will be deleted, even if they were uploaded with "no delay" (or value superior to max_delay)
    # A warning message will be displayed on homepage
    # optional, default is 0 (no limit)
    max_delay         => 30,

    # Size thresholds: if you want to define max delays for different sizes of file
    # The keys are size in Bytes, you can't have 10*1000*10000 as key
    # If a file is smaller than the smallest configured size, it will have a expiration delay of max_delay (see above)
    # optional, default is using max_delay (see above) for all sizes
    #delay_for_size  => {
    #    10000000   => 90, # between 10MB and 50MB => max is 90 days, less than 10MB => max is max_delay (see above)
    #    50000000   => 60, # between 50MB ans 1GB  => max is 60 days
    #    1000000000 => 2,  # more than 1GB         => max is 2 days
    #},

    # URL sub-directory in which you want Lufi to be accessible
    # example: you want to have Lufi under https://example.org/lufi/
    # => set prefix to '/lufi' or to '/lufi/', it doesn't matter
    # optional, defaut is /
    #prefix        => '/',

    # Array of authorized domains for API calls.
    # If you want to authorize everyone to use the API: ['*']
    # optional, no domains allowed by default
    #allowed_domains => ['http://1.example.com', 'http://2.example.com'],

    # String of the URL to be redirected to when accessing /logout
    # optional, default is no redirection after logging out
    #logout_custom => 'https://sso.example.com/logout?redirect_uri=https%3A%2F%2Fexample.com',

    # Define a path to the upload directory, where the uploaded files will be stored
    # You can define it relative to lufi directory or set an absolute path
    # Remember that it has to be in a directory writable by Lufi user
    # optional, default is 'files'
    #upload_dir => 'files',

    #!!!!!!!!!!!!!!!
    # EXPERIMENTAL !
    #!!!!!!!!!!!!!!!
    # You can store files on Swift object storage (https://en.wikipedia.org/wiki/OpenStack#Swift) instead of filesystem
    # Please read https://metacpan.org/pod/Net::OpenStack::Swift#SYNOPSIS to know how to configure this setting
    # IMPORTANT: add a `container` key in it, to let Lufi know which container to use. This is not a regular Net::OpenStack::Swift setting, but Lufi need it.
    # EXPERIMENTAL: if the upload or download of files are stucked, reload Lufi and create a cron task to reload Lufi once a day
    # You can copy Lufi files to Swift object storage by launching the command `carton exec script/lufi copyFilesToSwift` (can take a long time)
    # optional, no default
    #swift => {
    #  auth_url    => 'https://auth-endpoint-url/v2.0',
    #  user        => 'userid',
    #  password    => 'password',
    #  tenant_name => 'project_id',
    #  container   => 'lufi'
    #},

    # Allow to add a password on files, asked before allowing to download files
    # optional, default is 0
    #allow_pwd_on_files => 0,

    # Force all files to be in "Burn after reading mode"
    # optional, default is 0
    #force_burn_after_reading => 0,

    # If set, the files' URLs will always use this domain
    # optional, no default
    #fixed_domain => 'example.org',

    # Abuse reasons
    # Set an integer in the abuse field of a file in the database and it will not be downloadable anymore
    # The reason will be displayed to the downloader, according to the reasons you will configure here.
    # optional, no default
    #abuse => {
    #   0 => 'Copyright infringment',
    #   1 => 'Illegal content',
    #},

    ###############
    # Mail settings
    ###############

    # Mail configuration
    # See https://metacpan.org/pod/Mojolicious::Plugin::Mail#EXAMPLES
    # optional, default to sendmail method with no arguments
    mail => {
    #    # Valid values are 'sendmail' and 'smtp'
        how => 'smtp',
        howargs => ['relais.v.sdem.fr']
    },

    # Email sender address
    # optional, default to no-reply@lufi.io
    mail_sender => 'hostmaster@morbihan-energies.fr',

    #############
    # DB settings
    #############

    # Choose what database you want to use
    # Valid choices are sqlite, postgresql and mysql (all lowercase)
    # optional, default is sqlite
    #dbtype => 'sqlite',

    # SQLite ONLY - only used if dbtype is set to sqlite
    # Define a path to the SQLite database
    # You can define it relative to lufi directory or set an absolute path
    # Remember that it has to be in a directory writable by Lufi user
    # optional, default is lufi.db
    #db_path           => 'lufi.db',

    # PostgreSQL ONLY - only used if dbtype is set to postgresql
    # These are the credentials to access the PostgreSQL database
    # mandatory if you choosed postgresql as dbtype
    #pgdb => {
    #    database => 'lufi',
    #    host     => 'localhost',
    #    # optional, default is 5432
    #    #port     => 5432,
    #    user     => 'DBUSER',
    #    pwd      => 'DBPASSWORD',
    #    # https://mojolicious.org/perldoc/Mojo/Pg#max_connections
    #    # optional, default is 1
    #    #max_connections => 1,
    #},

    # MySQL ONLY - only used if dbtype is set to mysql
    # These are the credentials to access the MySQL database
    # mandatory if you choosed mysql as dbtype
    #mysqldb => {
    #    database => 'lufi',
    #    host     => 'localhost',
    #    # optional, default is 3306
    #    #port     => 3306,
    #    user     => 'DBUSER',
    #    pwd      => 'DBPASSWORD',
    #    # https://metacpan.org/pod/Mojo::mysql#max_connections
    #    # optional, default is 5 (set to 0 to disable persistent connections)
    #    #max_connections => 5,
    #},

    #############################################
    # LDAP settings (authentication and features)
    #############################################

    # Set `ldap` if you want that only authenticated users can upload files
    # Please note that everybody can still download files
    # optional, no default
    #ldap => {
    #    uri         => 'ldaps://ldap.example.org',                 # server URI
    #    user_tree   => 'ou=users,dc=example,dc=org',               # search base DN
    #    bind_dn     => 'uid=ldap_user,ou=users,dc=example,dc=org', # search bind DN
    #    bind_pwd    => 'secr3t',                                   # search bind password
    #    user_attr   => 'uid',                                      # user attribute (uid, mail, sAMAccountName, etc.)
    #    user_filter => '(!(uid=ldap_user))',                       # user filter (to exclude some users, etc.)
    #    # optional start_tls configuration. See https://metacpan.org/pod/distribution/perl-ldap/lib/Net/LDAP.pod#start_tls
    #    # don't set or uncomment if you don't want to configure it
    #    start_tls => {
    #       verify     => 'optional',
    #       clientcert => '/etc/ssl/certs/ca-bundle.pem'
    #    }
    #},

    # If you've set ldap above, the session will last `session_duration` seconds before
    # the user needs to reauthenticate
    # optional, default is 3600
    #session_duration => 3600,

    # If you use `ldap` for authentication, you can map some attributes from LDAP to be able to access them in Lufi
    # Those attributes will be accessible with:
    #   $c->current_user->{lufi_attribute_name} in Lufi backend files (all that is in `lib` directory)
    #   <%= $self->current_user->{lufi_attribute_name} %> in templates files (in `themes` directory)
    #
    # Define the attributes like this: `lufi_attribute_name => 'LDAP_attribute_name'`
    # Note that you can’t use `username` as a Lufi attribute name: this name is reserved and will contain the login of the user
    # optional, no default
    #ldap_map_attr => {
    #    displayname => 'cn',
    #    mail        => 'mail'
    #},

    # When using LDAP authentication, LDAP users can invite people (by mail) to use Lufi to send them files without
    # being authenticated.
    # This is where you configure the behavior of the invitations.
    # You may need to fetch some attributes from LDAP to use some invitations settings. See `ldap_map_attr` above.
    # optional, no default
    #invitations => {
    #   # The name of the key set in `ldap_map_attr` (above) that corresponds to the mail of the LDAP user
    #   # optional, default is `mail`
    #   mail_attr => 'mail',
    #   # The `From` header of invitation mail can be the mail of the LDAP user
    #   # Be sure to have a mail system that will correctly send the mail from your users! (DKIM, SPF…)
    #   # To enable this feature, set it to 1
    #   # optional, disabled by default
    #   send_invitation_with_ldap_user_mail => 1,
    #   # The user is able to set an expiration delay for the invitation.
    #   # This expiration delay can’t be more than this setting (in days).
    #   # optional, default is 30 days
    #   max_invitation_expiration_delay => 30,
    #   # Once the guest has submitted his files, he has an additional period of time to submit forgotten files.
    #   # You can set that additional period of time in minutes here.
    #   # To disable that feature, set it to 0 or less
    #   # optional, default is 10 minutes
    #   max_additional_period => 10,
    #   # Lufi follows privacy-by-design, so, by default, no files URLs (with the decode secret) are stored in database.
    #   # However, the concern is different for this case. Storing files URLs makes users able to retrieve the guests’ sent files
    #   # from their `invitations` page.
    #   # Set to 1 to store guests’ files URLs in database
    #   # optional, default is 0 (disabled)
    #   save_files_url_in_db => 0,
    #   # Users can resend the invitation to their guest. This does not extend the invitation’s expiration delay unless you
    #   # set this option to 1.
    #   # optional, default is 0 (disabled)
    #   extend_invitation_expiration_on_resend => 0,
    #},

    #########################
    # Htpasswd authentication
    #########################

    # Set `htpasswd` if you want to use an htpasswd file instead of ldap
    # See 'man htpasswd' to know how to create such file
    #htpasswd => 'lufi.passwd',

    #######################
    # HTTP Headers settings
    #######################

    # Content-Security-Policy header that will be sent by Lufi
    # Set to '' to disable CSP header
    # https://content-security-policy.com/ provides a good documentation about CSP.
    # https://report-uri.com/home/generate provides a tool to generate a CSP header.
    # optional, default is "base-uri 'self'; connect-src 'self' ws://YOUR_HOST; default-src 'none'; font-src 'self'; form-action 'self'; frame-ancestors 'none'; img-src 'self' blob:; media-src blob:; script-src 'self' 'unsafe-inline' 'unsafe-eval'; style-src 'self' 'unsafe-inline'"
    #csp => "",

    # X-Frame-Options header that will be sent by Lufi
    # Valid values are: 'DENY', 'SAMEORIGIN', 'ALLOW-FROM https://example.com/'
    # Set to '' to disable X-Frame-Options header
    # See https://developer.mozilla.org/en-US/docs/Web/HTTP/Headers/X-Frame-Options
    # Please note that this will add a "frame-ancestors" directive to the CSP header (see above) accordingly
    # to the chosen setting (See https://developer.mozilla.org/en-US/docs/Web/HTTP/Headers/Content-Security-Policy/frame-ancestors)
    # optional, default is 'DENY'
    #x_frame_options => 'DENY',

    # X-Content-Type-Options that will be sent by Lufi
    # See https://developer.mozilla.org/en-US/docs/Web/HTTP/Headers/X-Content-Type-Options
    # Set to '' to disable X-Content-Type-Options header
    # optional, default is 'nosniff'
    #x_content_type_options => 'nosniff',

    # X-XSS-Protection that will be sent by Lufi
    # See https://developer.mozilla.org/en-US/docs/Web/HTTP/Headers/X-XSS-Protection
    # Set to '' to disable X-XSS-Protection header
    # optional, default is '1; mode=block'
    #x_xss_protection => '1; mode=block',

    #########################
    # Lufi cron jobs settings
    #########################

    # Expired files will be kept for 2 additional days after the expiration time has passed!
    # The reasoning behind this is to allow downloads to complete and avoid deleting them while
    # they are still being tranfered.

    # Number of days senders' IP addresses are kept in database
    # After that delay, they will be deleted from database (used with script/lufi cron cleanbdd)
    # optional, default is 365
    #keep_ip_during    => 365,

    # Max size of the files directory, in octets
    # Used by script/lufi cron watch to trigger an action
    # optional, no default
    #max_total_size    => 10*1024*1024*1024,

    # Default action when files directory is over max_total_size (used with script/lufi cron watch)
    # Valid values are 'warn', 'stop-upload' and 'delete'
    # Please, see README.md
    # optional, default is 'warn'
    #policy_when_full  => 'warn',

    # Files which are not viewed since delete_no_longer_viewed_files days will be deleted by the cron cleanfiles task
    # If delete_no_longer_viewed_files is not set, the no longer viewed files will NOT be deleted
    # optional, no default
    #delete_no_longer_viewed_files => 90,
};
```

## <span style="text-decoration: underline; color: rgb(45, 194, 107);">**E - ProFTPd**</span>  


##### **Serveur FTP :**

Un serveur FTP est configuré pour répondre à plusieurs besoins interne nottamment par le servie Energies.  
Nom de connexion : ftp.morbihan-energies.fr  
Port : 21

# MK-Keepass


# 01 - Description

## <span style="text-decoration: underline; color: rgb(45, 194, 107);">**A - Description :**</span>

### <span style="color: rgb(53, 152, 219);">**1. Sources :**</span>

> [https://ssd.eff.org/fr/module/guide-pratique-utiliser-keepassxc](https://ssd.eff.org/fr/module/guide-pratique-utiliser-keepassxc)
> 
> [https://atelier-mediatheque.rlv.eu/blog/gerez-vos-mots-de-passe-avec-keepassxc/KeePassXC%20sous%20Windows.pdf](https://atelier-mediatheque.rlv.eu/blog/gerez-vos-mots-de-passe-avec-keepassxc/KeePassXC%20sous%20Windows.pdf)
> 
> [https://www.it-connect.fr/comment-gerer-ses-mots-de-passe-avec-keepass-ou-keepassxc/#F\_Les\_plugins\_KeePass](https://www.it-connect.fr/comment-gerer-ses-mots-de-passe-avec-keepass-ou-keepassxc/#F_Les_plugins_KeePass)


OS : Windows 7 ou ultérieur, Linux, macOS 10.7 ou ultérieur

### <span style="color: rgb(53, 152, 219);">**2. Rôle :**</span>

##### KeePassXC est un gestionnaire de mot de passe multiplateforme qui vous permet d’enregistrer tous vos mots de passe au même endroit. Un gestionnaire de mots de passe est un outil qui crée et enregistre des mots de passe pour vous. Vous pouvez ainsi utiliser de nombreux mots de passe différents sur des sites et services différents sans avoir à les mémoriser. Vous n’avez qu’à mémoriser un mot de passe maître qui vous permet d’accéder à la base de données chiffrée du gestionnaire de mots de passe contenant tous vos mots de passe.

# 02 - Installation

<div id="bkmrk-"></div>## **A - Préparation :**

### **1. Téléchargement :**

Le programme d'installation Windows MSI est signé par un certificat sécurisé appartenant à DroidMonkey Apps, LLC. Si vous ne voyez pas cette boîte de dialogue lors de l'installation de l'application, cliquez sur **NON** et téléchargez le programme d'installation depuis [https://keepassxc.org](https://keepassxc.org/) .

[![image.png](https://wiki.morbihan-energies.fr/uploads/images/gallery/2023-11/scaled-1680-/47timage.png)](https://wiki.morbihan-energies.fr/uploads/images/gallery/2023-11/47timage.png)

## **B - Déroulement :**

### **1. Installation :**

Double-cliquez sur le fichier KeePassXC-YYY-WinZZ.msi. Ici, YYY représente la version du logiciel et ZZ représente la version 32 bits/64 bits du système d'exploitation Microsoft Windows.

[![image.png](https://wiki.morbihan-energies.fr/uploads/images/gallery/2023-11/scaled-1680-/gjSimage.png)](https://wiki.morbihan-energies.fr/uploads/images/gallery/2023-11/gjSimage.png)

Cliquez sur Suivant et suivez les instructions simples de l'assistant d'installation KeepPassXC pour terminer l'installation. Vous aurez la possibilité de choisir votre emplacement d'installation, d'ajouter un raccourci sur le bureau et de lancer au démarrage.

[![image.png](https://wiki.morbihan-energies.fr/uploads/images/gallery/2023-11/scaled-1680-/EbNimage.png)](https://wiki.morbihan-energies.fr/uploads/images/gallery/2023-11/EbNimage.png)

### **2. Création d'une base de donnée :**

Ouvrez votre application KeePassXC. Cliquez sur le bouton Créer une nouvelle base de données **(A)** :

[![image.png](https://wiki.morbihan-energies.fr/uploads/images/gallery/2023-11/scaled-1680-/G0Jimage.png)](https://wiki.morbihan-energies.fr/uploads/images/gallery/2023-11/G0Jimage.png)

L'assistant de création de base de données apparaît. Saisissez le nom de la base de données souhaitée et une brève description (facultatif) :

[![image.png](https://wiki.morbihan-energies.fr/uploads/images/gallery/2023-11/scaled-1680-/Tktimage.png)](https://wiki.morbihan-energies.fr/uploads/images/gallery/2023-11/Tktimage.png)

Cliquez sur Continuer. L'écran Paramètres de cryptage apparaît. Nous vous déconseillons d'apporter des modifications autres que l'augmentation ou la diminution du temps de décryptage à l'aide du curseur. Régler le curseur "Temps de décryptage" sur des valeurs plus élevées signifie que la base de données bénéficiera d'un niveau de protection plus élevé, mais que le temps nécessaire à l'ouverture de la base de données augmentera.

[![image.png](https://wiki.morbihan-energies.fr/uploads/images/gallery/2023-11/scaled-1680-/go3image.png)](https://wiki.morbihan-energies.fr/uploads/images/gallery/2023-11/go3image.png)

Cliquez sur le bouton Continuer. L'écran Informations d'identification de la base de données apparaît, entrez le mot de passe de la base de données souhaité. Nous vous recommandons d'utiliser un mot de passe long et aléatoire.

[![image.png](https://wiki.morbihan-energies.fr/uploads/images/gallery/2023-11/scaled-1680-/88Eimage.png)](https://wiki.morbihan-energies.fr/uploads/images/gallery/2023-11/88Eimage.png)

**(A)** Ouvrez le générateur de mot de passe  
**(B)** Basculez la visibilité du mot de passe

### **3. Ouverture d'une base de données existante :**

Ouvrez votre application KeePassXC. Cliquez sur le bouton Ouvrir une base de données existante (A) ou sélectionnez une base de données récente dans la liste Bases de données récentes (B) .

[![image.png](https://wiki.morbihan-energies.fr/uploads/images/gallery/2023-11/scaled-1680-/UjIimage.png)](https://wiki.morbihan-energies.fr/uploads/images/gallery/2023-11/UjIimage.png)

Accédez à l'emplacement de la base de données sur votre ordinateur et ouvrez le fichier de base de données. L'écran de déverrouillage de la base de données apparaîtra : il ne reste plus cas entré votre mot de passe de base de données.

[![image.png](https://wiki.morbihan-energies.fr/uploads/images/gallery/2023-11/scaled-1680-/Hl4image.png)](https://wiki.morbihan-energies.fr/uploads/images/gallery/2023-11/Hl4image.png)

# 03 -Exploitation

## <span style="text-decoration: underline; color: rgb(45, 194, 107);">**A - Interface :**</span>

### <span style="color: rgb(53, 152, 219);">**1. Disposition de l'application :**</span>

L'interface KeePassXC est conçue pour la simplicité et un accès facile à vos informations. La vue principale de la base de données est divisée en quatre partitions principales détaillées ci-dessous. Vous pouvez ouvrir plusieurs bases de données en même temps, elles apparaîtront dans des onglets.

[![image.png](https://wiki.morbihan-energies.fr/uploads/images/gallery/2023-11/scaled-1680-/74uimage.png)](https://wiki.morbihan-energies.fr/uploads/images/gallery/2023-11/74uimage.png)

**(A) Groupes** – Organisez vos entrées en groupes discrets pour mettre de l’ordre dans toutes vos informations sensibles. Les groupes peuvent être imbriqués les uns sous les autres pour créer une hiérarchie. Les paramètres des groupes de parents sont appliqués à leurs enfants. Vous pouvez masquer ce panneau dans le menu Affichage.

**(B) Balises** – Groupes dynamiques d’entrées pouvant être affichées rapidement en un seul clic. N'importe quel nombre de balises personnalisées peuvent être ajoutées lors de la modification d'une entrée. Ce panneau comprend également des recherches prédéfinies utiles, telles que la recherche de mots de passe expirés et faibles.

**(C) Entrées** – Les entrées contiennent toutes les informations que vous souhaitez stocker pour un site Web ou une application que vous stockez dans KeePassXC. Cette vue affiche toutes les entrées du groupe sélectionné. Chaque colonne peut être redimensionnée, réorganisée et affichée ou masquée selon vos préférences. Cliquez avec le bouton droit sur la ligne d'en-tête pour voir toutes les options disponibles.

**(D) Aperçu** – Affiche un aperçu du groupe ou de l'entrée sélectionné. Vous pouvez masquer temporairement cet aperçu à l'aide du bouton de fermeture situé à droite ou le désactiver complètement dans les paramètres de l'application.

<p class="callout info">Ici l'interface est en Anglais mais KeePassXC est nativement disponible en français.</p>

### <span style="color: rgb(53, 152, 219);">**2. Barre d'outils :**</span>

La barre d'outils fournit un moyen rapide d'effectuer des tâches courantes avec votre base de données. Certaines entrées de la barre d'outils sont désactivées dynamiquement en fonction des informations contenues dans l'entrée sélectionnée. Chaque action courante dans KeePassXC peut également être contrôlée avec un raccourci clavier.

[![image.png](https://wiki.morbihan-energies.fr/uploads/images/gallery/2023-11/scaled-1680-/SAfimage.png)](https://wiki.morbihan-energies.fr/uploads/images/gallery/2023-11/SAfimage.png)

**(A) Base de données** – Ouvrir la base de données, enregistrer la base de données, verrouiller  
**(B) Entrées de la base de données**  – Créer une entrée, modifier l'entrée, supprimer les entrées sélectionnées  
**(C) Données d'entrée** – Copier le nom d'utilisateur, copier le mot de passe, copier l'URL, effectuer la saisie automatique  
**(D) Outils** – Générateur de mot de passe,  
**recherche des paramètres d’application (E)**

## <span style="text-decoration: underline; color: rgb(45, 194, 107);">**B - Utilisation :**</span>

### <span style="color: rgb(53, 152, 219);">**1. Ajouter un entrée :**</span>

Tous les détails tels que les noms d'utilisateur, les mots de passe, les URL, les pièces jointes, les notes, etc. sont stockés dans les entrées de la base de données. Vous pouvez créer autant d'entrées que vous le souhaitez dans la base de données.

Pour ajouter une entrée, effectuez l'étape suivante :

<div class="olist arabic" id="bkmrk-acc%C3%A9dez-%C3%A0-entr%C3%A9es-%3E-">1. Accédez à Entrées &gt; Nouvelle entrée (ou appuyez sur Ctrl+N). L'écran suivant apparaît :

</div>[![image.png](https://wiki.morbihan-energies.fr/uploads/images/gallery/2023-11/scaled-1680-/XtIimage.png)](https://wiki.morbihan-energies.fr/uploads/images/gallery/2023-11/XtIimage.png)

Entrez le titre souhaité pour l'entrée, le nom d'utilisateur, le mot de passe, l'URL et les notes sur cet écran.

### <span style="color: rgb(53, 152, 219);">**2. Générateur de mot de passe :**</span>

Ce générateur de mots de passe vous aide à générer des mots de passe et des phrases secrètes aléatoires et forts que vous pouvez utiliser pour vos applications et sites Web que vous visitez.

Pour générer des mots de passe aléatoires, spécifiez les caractères à utiliser dans votre choix de mot de passe (par exemple, lettres majuscules, chiffres, caractères spéciaux, etc.) et KeePassXC sélectionnera au hasard les caractères dans l'ensemble.

Pour générer le mot de passe aléatoire à l'aide de Password Generator, effectuez les étapes suivantes :

<div class="olist arabic" id="bkmrk-acc%C3%A9dez-%C3%A0-outils-%3E-g">1. Accédez à Outils &gt; Générateur de mots de passe. L'écran suivant apparaît :
    
    [![image.png](https://wiki.morbihan-energies.fr/uploads/images/gallery/2023-11/scaled-1680-/0k9image.png)](https://wiki.morbihan-energies.fr/uploads/images/gallery/2023-11/0k9image.png)
2. Sélectionnez la longueur du mot de passe souhaité en faisant glisser le curseur Longueur.
3. Sélectionnez les jeux de caractères que vous souhaitez inclure dans votre mot de passe.
4. Utilisez le bouton régénérer (Ctrl + R) pour créer un nouveau mot de passe en utilisant les options choisies.
5. Utilisez le bouton du presse-papiers (Ctrl + C) pour copier le mot de passe généré dans le presse-papiers.

</div>## <span style="text-decoration: underline; color: rgb(45, 194, 107);">**D - Les Plugins :**</span>

### <span style="color: rgb(53, 152, 219);">**1. KeepassXC Browser :**</span>

Le gestionnaire de mots de passe KeePassXC peut s’intégrer aux navigateurs internet basés sur Chromium comme Google Chrome, Vivaldi, Brave ou encore Microsoft Edge. L’intégration de KeePassXC aux autres navigateurs basés sur Chromium se fait avec l’ajout de l’extension **KeePassXC-Browser** dans le navigateur. Elle est disponible sur le chrome web store (Google Chrome, Chromium, Vivaldi ou Brave) et le site d'extension pour Microsoft Edge.

#### <span style="color: rgb(35, 111, 161);">***1.1 - Paramétrage sur KeepassXC***</span>

Avant d’installer ce module supplémentaire à votre navigateur, il faut au préalable activer cette possibilité d’intégration dans le gestionnaire de mot de passe.

Allez dans les paramètres du gestionnaire :

[![image.png](https://wiki.morbihan-energies.fr/uploads/images/gallery/2023-11/scaled-1680-/wfzimage.png)](https://wiki.morbihan-energies.fr/uploads/images/gallery/2023-11/wfzimage.png)

Alors, dans la section **Intégration aux navigateurs** (**<span class="tadv-color">1</span>**) :

1. Activez l’option pour l’activer (<span style="color: rgb(224, 62, 45);">**<span class="tadv-color">2</span>**</span>)
2. Cochez Google Chrome, Chromium, ou autres (<span style="color: rgb(224, 62, 45);">**<span class="tadv-color">3</span>**</span>). Vous pouvez aussi adapter les autres options à votre convenance.
3. Cliquez sur le lien correspondant au navigateur où l’installer (<span style="color: rgb(224, 62, 45);">**<span class="tadv-color">4</span>**</span>) pour ouvrir la page de l’extension **KeePassXC-Browser** dans votre navigateur web.
4. Et surtout, avant d’aller plus loin, cliquez sur **OK** (<span style="color: rgb(224, 62, 45);">**<span class="tadv-color">5</span>**</span>) pour enregistrer les modifications des paramètres.

[![image.png](https://wiki.morbihan-energies.fr/uploads/images/gallery/2023-11/scaled-1680-/GtUimage.png)](https://wiki.morbihan-energies.fr/uploads/images/gallery/2023-11/GtUimage.png)

#### <span style="color: rgb(35, 111, 161);">***1.2 - Installation de l'extension dans le*** </span><span style="color: #236fa1;"><span style="font-size: 23.324px;">***navigateur***</span></span>

Sur la page de l’extension KeePassXC-Browser, cliquez sur le bouton d’ajout.

[![image.png](https://wiki.morbihan-energies.fr/uploads/images/gallery/2023-11/scaled-1680-/Uk1image.png)](https://wiki.morbihan-energies.fr/uploads/images/gallery/2023-11/Uk1image.png)

Confirmez l’installation :

[![image.png](https://wiki.morbihan-energies.fr/uploads/images/gallery/2023-11/scaled-1680-/A92image.png)](https://wiki.morbihan-energies.fr/uploads/images/gallery/2023-11/A92image.png)

Alors, une fois KeePassXC-Browser installé, son icône s’ajoute à la barre d’adresse :

[![image.png](https://wiki.morbihan-energies.fr/uploads/images/gallery/2023-11/scaled-1680-/Dwpimage.png)](https://wiki.morbihan-energies.fr/uploads/images/gallery/2023-11/Dwpimage.png)

#### <span style="color: rgb(35, 111, 161);">***1.3 - Connection entre KeepassXC et l'extension***</span>

Cliquez sur l’icône de KeePassXC-Browser dans le navigateur (**<span class="tadv-color">1</span>**). Alors dans la fenêtre popup, cliquez sur le bouton **Connecter** (**<span class="tadv-color">2</span>**).

[![image.png](https://wiki.morbihan-energies.fr/uploads/images/gallery/2023-11/scaled-1680-/Wueimage.png)](https://wiki.morbihan-energies.fr/uploads/images/gallery/2023-11/Wueimage.png)

Dans KeePassXC une fenêtre s’ouvrira pour que vous donniez un ID **unique** à cette connexion :

[![image.png](https://wiki.morbihan-energies.fr/uploads/images/gallery/2023-11/scaled-1680-/3PYimage.png)](https://wiki.morbihan-energies.fr/uploads/images/gallery/2023-11/3PYimage.png)

Cliquez sur le bouton **Enregistrer et autoriser l’accès**.

<p class="callout danger">Si vous utilisez un ID déjà utilisé, la connexion existante sera remplacée par la nouvelle et ne fonctionnera plus. Dans KeepassXC, vous pouvez voir les connexions existantes vers votre coffre en allant dans le menu `Base de donnée > Paramètres de la base de donnée...`. Puis, allez dans **Intégration aux navigateurs,** vous trouverez les clés enregistrées: [![image.png](https://wiki.morbihan-energies.fr/uploads/images/gallery/2023-11/scaled-1680-/SCQimage.png)](https://wiki.morbihan-energies.fr/uploads/images/gallery/2023-11/SCQimage.png)</p>

#### <span style="color: rgb(35, 111, 161);">***1.4 - Utiliser KeepassXC avec le navigateur*** </span>

Pour utiliser KeePassXC avec Google Chrome ou autre, il faut garder le gestionnaire de mots de passe exécuté.

<p class="callout info">Pour éviter de le fermer par inadvertance en cliquant sur la croix de fermeture de fenêtre, allez dans les paramètres du gestionnaire, et dans **Général (<span style="color: rgb(224, 62, 45);">1</span>)**, puis à la sélection **Interface utilisateur (<span style="color: rgb(224, 62, 45);">2<span style="color: rgb(0, 0, 0);">). </span></span>**<span style="color: rgb(224, 62, 45);"><span style="color: rgb(0, 0, 0);">Alors, cochez `Réduire au lieu de fermer l'appli` **(<span class="tadv-color" style="color: rgb(224, 62, 45);">3</span>)**. [![image.png](https://wiki.morbihan-energies.fr/uploads/images/gallery/2023-11/scaled-1680-/rMEimage.png)](https://wiki.morbihan-energies.fr/uploads/images/gallery/2023-11/rMEimage.png) Après, pour fermer l'application, vous devrez passer par le menu `Base de donnée > Quitter` ou utiliser le raccourci clavier <kbd>Ctrl</kbd> + <kbd>Q.</kbd> </span></span></p>

Dans le navigateur Web, l’icône de KeePassXC-Browser vous indiquera l’état de la connexion :

![keepassxc-offline](https://www.numetopia.fr/wp-content/uploads/2022/03/keepassxc-offline.png) pour KeePassXC fermé ou déconnecté.

![keepassxc-lock](https://www.numetopia.fr/wp-content/uploads/2022/03/keepassxc-lock.png) pour KeePassXC connecté, mais la base de données verrouillée.

![keepassxc-online](https://www.numetopia.fr/wp-content/uploads/2022/03/keepassxc-online.png) et pour KeePassXC connecté et prêt à être utilisé.

La première visite sur une page de connexion ayant un ou plusieurs identifiants déjà créés dans la base de donnée ouvrira une fenêtre de demande d’accès au navigateur.

Cochez **Mémoriser** (<span style="color: rgb(224, 62, 45);">**<span class="tadv-color">1</span>**</span>) et cliquez sur le bouton **Permettre les éléments sélectionnés** (<span style="color: rgb(224, 62, 45);">**<span class="tadv-color">2</span>**</span>).

[![image.png](https://wiki.morbihan-energies.fr/uploads/images/gallery/2023-11/scaled-1680-/6pGimage.png)](https://wiki.morbihan-energies.fr/uploads/images/gallery/2023-11/6pGimage.png)

[![image.png](https://wiki.morbihan-energies.fr/uploads/images/gallery/2023-11/scaled-1680-/8qRimage.png)](https://wiki.morbihan-energies.fr/uploads/images/gallery/2023-11/8qRimage.png)

Alors dans le champ de l’identifiant, cliquez sur l’icône KeePassXC. Si une seule entrée est disponible, cela complétera automatiquement les champs :

[![image.png](https://wiki.morbihan-energies.fr/uploads/images/gallery/2023-11/scaled-1680-/Z79image.png)](https://wiki.morbihan-energies.fr/uploads/images/gallery/2023-11/Z79image.png)

Ou, si plusieurs entrées sont disponibles, vous pourrez choisir celles à utiliser :

[![image.png](https://wiki.morbihan-energies.fr/uploads/images/gallery/2023-11/scaled-1680-/fU7image.png)](https://wiki.morbihan-energies.fr/uploads/images/gallery/2023-11/fU7image.png)

#### <span style="color: rgb(35, 111, 161);">***1.5 - Enregistrer une nouvelle entrée***</span>

Quand vous validerez un formulaire, KeePassXC-Browser pourra détecter automatiquement la création d’un nouvel identifiant/mot de passe. Alors, il proposera de l’enregistrer dans votre base de donnée.

[![image.png](https://wiki.morbihan-energies.fr/uploads/images/gallery/2023-11/scaled-1680-/pesimage.png)](https://wiki.morbihan-energies.fr/uploads/images/gallery/2023-11/pesimage.png)

Dans KeePassXC, vous retrouverez l’entrée créée dans le groupe KeePassXC-Browser :

[![image.png](https://wiki.morbihan-energies.fr/uploads/images/gallery/2023-11/scaled-1680-/ejbimage.png)](https://wiki.morbihan-energies.fr/uploads/images/gallery/2023-11/ejbimage.png)

Si vous mettez à jour mot de passe dans un formulaire, KeePassXC-Browser le détectera aussi. Et, vous pourrez mettre à jour l’entrée concernée directement depuis le navigateur :

[![image.png](https://wiki.morbihan-energies.fr/uploads/images/gallery/2023-11/scaled-1680-/8B8image.png)](https://wiki.morbihan-energies.fr/uploads/images/gallery/2023-11/8B8image.png)

Alors, une confirmation vous sera demandée avant qu’elle soit enregistrée dans la base de donnée.

## <span style="text-decoration: underline; color: rgb(45, 194, 107);">**C -** <span style="color: #2dc26b;">**<u>Raccourcies</u>**</span> **Claviers :**</span>

<table border="1" class="tableblock frame-none grid-rows" id="bkmrk-action-raccourci-cla" style="border-collapse: collapse; border-color: #000000;"><colgroup><col></col><col></col></colgroup><thead><tr><th class="tableblock halign-left valign-top" style="border-color: rgb(0, 0, 0);">Action</th><th class="tableblock halign-left valign-top" style="border-color: rgb(0, 0, 0);">Raccourci clavier</th></tr></thead><tbody><tr><td class="tableblock halign-left valign-top" style="border-color: rgb(0, 0, 0);">Paramètres

</td><td class="tableblock halign-left valign-top" style="border-color: rgb(0, 0, 0);">Ctrl+,

</td></tr><tr><td class="tableblock halign-left valign-top" style="border-color: rgb(0, 0, 0);">Ouvrir la base de données

</td><td class="tableblock halign-left valign-top" style="border-color: rgb(0, 0, 0);">Ctrl + O

</td></tr><tr><td class="tableblock halign-left valign-top" style="border-color: rgb(0, 0, 0);">Enregistrer la base de données

</td><td class="tableblock halign-left valign-top" style="border-color: rgb(0, 0, 0);">Ctrl+S

</td></tr><tr><td class="tableblock halign-left valign-top" style="border-color: rgb(0, 0, 0);">Enregistrer la base de données sous

</td><td class="tableblock halign-left valign-top" style="border-color: rgb(0, 0, 0);">Ctrl + Maj + S

</td></tr><tr><td class="tableblock halign-left valign-top" style="border-color: rgb(0, 0, 0);">Nouvelle base de données

</td><td class="tableblock halign-left valign-top" style="border-color: rgb(0, 0, 0);">Ctrl + Maj + N

</td></tr><tr><td class="tableblock halign-left valign-top" style="border-color: rgb(0, 0, 0);">Fermer la base de données

</td><td class="tableblock halign-left valign-top" style="border-color: rgb(0, 0, 0);">Ctrl + W ; Ctrl+F4

</td></tr><tr><td class="tableblock halign-left valign-top" style="border-color: rgb(0, 0, 0);">Verrouiller toutes les bases de données

</td><td class="tableblock halign-left valign-top" style="border-color: rgb(0, 0, 0);">Ctrl + L

</td></tr><tr><td class="tableblock halign-left valign-top" style="border-color: rgb(0, 0, 0);">Paramètres de base de données

</td><td class="tableblock halign-left valign-top" style="border-color: rgb(0, 0, 0);">Ctrl + Maj + ,

</td></tr><tr><td class="tableblock halign-left valign-top" style="border-color: rgb(0, 0, 0);">Rapports de base de données

</td><td class="tableblock halign-left valign-top" style="border-color: rgb(0, 0, 0);">Ctrl + Maj + R

</td></tr><tr><td class="tableblock halign-left valign-top" style="border-color: rgb(0, 0, 0);">Quitter

</td><td class="tableblock halign-left valign-top" style="border-color: rgb(0, 0, 0);">Ctrl + Q

</td></tr><tr><td class="tableblock halign-left valign-top" style="border-color: rgb(0, 0, 0);">Nouvelle entrée

</td><td class="tableblock halign-left valign-top" style="border-color: rgb(0, 0, 0);">Ctrl+N

</td></tr><tr><td class="tableblock halign-left valign-top" style="border-color: rgb(0, 0, 0);">Modifier l'entrée

</td><td class="tableblock halign-left valign-top" style="border-color: rgb(0, 0, 0);">Entrer ; Ctrl+E

</td></tr><tr><td class="tableblock halign-left valign-top" style="border-color: rgb(0, 0, 0);">Supprimer l'entrée

</td><td class="tableblock halign-left valign-top" style="border-color: rgb(0, 0, 0);">Supprimer

</td></tr><tr><td class="tableblock halign-left valign-top" style="border-color: rgb(0, 0, 0);">Entrée de clone

</td><td class="tableblock halign-left valign-top" style="border-color: rgb(0, 0, 0);">Ctrl+K

</td></tr><tr><td class="tableblock halign-left valign-top" style="border-color: rgb(0, 0, 0);">Copier le nom d'utilisateur

</td><td class="tableblock halign-left valign-top" style="border-color: rgb(0, 0, 0);">Ctrl + B

</td></tr><tr><td class="tableblock halign-left valign-top" style="border-color: rgb(0, 0, 0);">Copier le mot de passe

</td><td class="tableblock halign-left valign-top" style="border-color: rgb(0, 0, 0);">Ctrl+C

</td></tr><tr><td class="tableblock halign-left valign-top" style="border-color: rgb(0, 0, 0);">Copier le lien

</td><td class="tableblock halign-left valign-top" style="border-color: rgb(0, 0, 0);">Ctrl + U

</td></tr><tr><td class="tableblock halign-left valign-top" style="border-color: rgb(0, 0, 0);">Ouvrir le lien

</td><td class="tableblock halign-left valign-top" style="border-color: rgb(0, 0, 0);">Ctrl + Maj + U

</td></tr><tr><td class="tableblock halign-left valign-top" style="border-color: rgb(0, 0, 0);">Copier TOTP

</td><td class="tableblock halign-left valign-top" style="border-color: rgb(0, 0, 0);">Ctrl+T

</td></tr><tr><td class="tableblock halign-left valign-top" style="border-color: rgb(0, 0, 0);">Copier le mot de passe et TOTP

</td><td class="tableblock halign-left valign-top" style="border-color: rgb(0, 0, 0);">Ctrl + Y

</td></tr><tr><td class="tableblock halign-left valign-top" style="border-color: rgb(0, 0, 0);">Afficher TOTP

</td><td class="tableblock halign-left valign-top" style="border-color: rgb(0, 0, 0);">Ctrl + Maj + T

</td></tr><tr><td class="tableblock halign-left valign-top" style="border-color: rgb(0, 0, 0);">Déclencher la saisie automatique

</td><td class="tableblock halign-left valign-top" style="border-color: rgb(0, 0, 0);">Ctrl + Maj + V

</td></tr><tr><td class="tableblock halign-left valign-top" style="border-color: rgb(0, 0, 0);">Ajouter une clé à l'agent SSH

</td><td class="tableblock halign-left valign-top" style="border-color: rgb(0, 0, 0);">Ctrl+H

</td></tr><tr><td class="tableblock halign-left valign-top" style="border-color: rgb(0, 0, 0);">Supprimer la clé de l'agent SSH

</td><td class="tableblock halign-left valign-top" style="border-color: rgb(0, 0, 0);">Ctrl + Maj + H

</td></tr><tr><td class="tableblock halign-left valign-top" style="border-color: rgb(0, 0, 0);">Réduire la fenêtre

</td><td class="tableblock halign-left valign-top" style="border-color: rgb(0, 0, 0);">Ctrl+M

</td></tr><tr><td class="tableblock halign-left valign-top" style="border-color: rgb(0, 0, 0);">Masquer la fenêtre

</td><td class="tableblock halign-left valign-top" style="border-color: rgb(0, 0, 0);">Ctrl + Maj + M

</td></tr><tr><td class="tableblock halign-left valign-top" style="border-color: rgb(0, 0, 0);">Sélectionnez l'onglet de base de données suivant

</td><td class="tableblock halign-left valign-top" style="border-color: rgb(0, 0, 0);">Ctrl + Tabulation ; Ctrl + PageDn

</td></tr><tr><td class="tableblock halign-left valign-top" style="border-color: rgb(0, 0, 0);">Sélectionnez l'onglet de base de données précédent

</td><td class="tableblock halign-left valign-top" style="border-color: rgb(0, 0, 0);">Ctrl + Maj + Tabulation ; Ctrl + Page précédente

</td></tr><tr><td class="tableblock halign-left valign-top" style="border-color: rgb(0, 0, 0);">Sélectionnez la nième base de données

</td><td class="tableblock halign-left valign-top" style="border-color: rgb(0, 0, 0);">Ctrl + n, où n est le numéro de l'onglet de la base de données

</td></tr><tr><td class="tableblock halign-left valign-top" style="border-color: rgb(0, 0, 0);">Basculer les mots de passe masqués

</td><td class="tableblock halign-left valign-top" style="border-color: rgb(0, 0, 0);">Ctrl + Maj + C

</td></tr><tr><td class="tableblock halign-left valign-top" style="border-color: rgb(0, 0, 0);">Basculer les noms d'utilisateur masqués

</td><td class="tableblock halign-left valign-top" style="border-color: rgb(0, 0, 0);">Ctrl + Maj + B

</td></tr><tr><td class="tableblock halign-left valign-top" style="border-color: rgb(0, 0, 0);">Groupes de discussion (modifier si ciblé)

</td><td class="tableblock halign-left valign-top" style="border-color: rgb(0, 0, 0);">F1

</td></tr><tr><td class="tableblock halign-left valign-top" style="border-color: rgb(0, 0, 0);">Entrées de focus (modifier si focus)

</td><td class="tableblock halign-left valign-top" style="border-color: rgb(0, 0, 0);">F2

</td></tr><tr><td class="tableblock halign-left valign-top" style="border-color: rgb(0, 0, 0);">Recherche ciblée

</td><td class="tableblock halign-left valign-top" style="border-color: rgb(0, 0, 0);">F3 ; Ctrl+F

</td></tr><tr><td class="tableblock halign-left valign-top" style="border-color: rgb(0, 0, 0);">Effacer la recherche

</td><td class="tableblock halign-left valign-top" style="border-color: rgb(0, 0, 0);">S'échapper

</td></tr><tr><td class="tableblock halign-left valign-top" style="border-color: rgb(0, 0, 0);">Afficher les raccourcis clavier

</td><td class="tableblock halign-left valign-top" style="border-color: rgb(0, 0, 0);">Ctrl+/

</td></tr></tbody></table>

# LXC


# 01-Description

## <span style="text-decoration: underline; color: rgb(45, 194, 107);">**A - Description :**</span>

Nom DNS interne : lxc01.v.sdem.fr  
Nom DNS Externe : NC  
Type de serveur (Physique, VMware, LXC, Docker...) : VM VMware  
OS : Ubuntu 22.04 LTS  
Nom : lxc01.v.sdem.fr  
CPU : 6  
RAM : 12Go  
Disque LVM :   
 / : 50Go # ext4  
 /LXC : 300Go # Formaté par le daemon LXD en BTRFS

##### **Rôle :** 

Serveur hébergeant des CT LXC  
CT LXC :

#####   
**Accès :** 

\[\*\] Interne  
\[x\] Externe

##### **Réseaux :**

Adresse IP : 192.168.1.31  
Masque : 255.255.255.0  
Passerelle : 192.168.1.254  
DNS : 192.168.1.50  
VLAN : SDEM\_SERVEURS - 5

# 02-Installation

## <span style="text-decoration: underline; color: rgb(45, 194, 107);">**A - Paramétrage :**</span>

### <span style="color: rgb(53, 152, 219);">**1. VMware :**</span>

##### **Message UUID dans Syslog :**

Sur Ubuntu 20, le syslog est vite noyé avec des messages UUID, il y a un petit réglage à effectuer côté VMWARE :

<p class="callout info">[https://www.suse.com/support/kb/doc/?id=000016951](https://www.suse.com/support/kb/doc/?id=000016951)</p>

Pour faire simple il faut arrêter la VM et ajouter un attribut sur les VM Ubuntu 20 :

```bash
disk.EnableUUID = "TRUE"
```

##### **VMware tools :**

```
# Installation des VMware Tools :
apt install open-vm-tools
```

### <span style="color: rgb(53, 152, 219);">**1. Gestion date et heure:**</span>

```bash
# Changer la date :
date -s "02/18/2017 12:34:00"

# Changer le fuseau horaire :
rm /etc/localtime
ln -s /usr/share/zoneinfo/Europe/Paris /etc/localtime
# Pour que le changement de fuseau survive au redémarrage de la machine, il faut aussi le mettre dans le bon fichier.
vi /etc/timezone
ZONE="Europe/Paris"

# Ce qui donne en une seule commande :
sudo su
rm /etc/localtime
ln -s /usr/share/zoneinfo/Europe/Paris /etc/localtime
cat > /etc/timezone << eof
ZONE="Europe/Paris"
eof
cat /etc/timezone
exit
date
```

### <span style="color: rgb(53, 152, 219);">**3. Accès SSH :**</span>

<p class="callout info">L'algorithme ssh-rsa est désactivé dans la version de SSH livrée dans Ubuntu 22.04 car il utilise la fonction cryptographique SHA-1 qui est jugée dangereuse depuis des années.  
La connexion SSH de guacamole vers ce serveur ne fonctionne pas. Il est nécessaire de réactiver temporairement la connexion RSA en attendant la mise à jour de Guacamole.</p>

<p class="callout info">Source : [http://shaarli.guiguishow.info/?4DVyLA](http://shaarli.guiguishow.info/?4DVyLA)</p>

```bash
vi /etc/ssh/sshd_config
```

```bash
# JKT-20220517 - Connexion Guacamole :
# Source : http://shaarli.guiguishow.info/?4DVyLA
HostkeyAlgorithms +ssh-rsa
PubkeyAcceptedAlgorithms +ssh-rsa

/etc/init.d/ssh restart
```

### <span style="color: rgb(53, 152, 219);">**4. Prérequis :**</span>

```bash
# Mise à jour du serveur :
apt-get update && apt-get upgrade -y

# Installation des utilitaires :
apt-get install ntp postfix

# Installation de la supervision :
apt-get install nagios-nrpe-server nagios-plugins -y
```

#### <span style="color: rgb(35, 111, 161);">***Ajout du disque de stockage BTRFS pour LXC :***</span>

##### **Disque LXC :**

Ce disque est dédié pour stocker les CT LXC.  
On ne configure pas de base ce disque qui va être géré directement par LXC en BTRFS.  
Il ne faut pas configurer le disque en ZFS car cela nécessite une configuration avancé du paramètre ashift.  
Par défaut l'ashift est de 512byte =2^9  
Hors sur les serveurs les secteurs sont à minima 4k = 2^12  
Ce qui fait qu'il va écrire sur les disques 8 fois plus et cela va également générer un problème de fragmentation du disque et à terme une panne accéléré du disque.

### <span style="color: rgb(53, 152, 219);">**5. Installation de LXC :**</span>

Certaines terminologies courantes utilisées avec LXC incluent :  
chroot - Chroot, également appelé changement de racine ou changement de racine, est une section du système de fichiers isolée du reste du système de fichiers. Un programme exécuté dans cet environnement ne peut pas accéder aux fichiers en dehors de l'arborescence de répertoires désignée.  
cgroups - Il s'agit d'une fonctionnalité du noyau qui permet d'agréger ou de partitionner des tâches (processus) et tous leurs enfants en groupes organisés hiérarchiquement pour isoler les ressources.

```bash
# Installation de lxd et des outils associés :
# sudo apt install lxd lxc-utils iraf-dev zfsutils-linux -y
sudo apt install lxc lxd-installer
```

#### <span style="color: rgb(35, 111, 161);">***Ajouter un utilisateur au groupe LXD à des fins de gestion :***</span>

Pas besoin d'être l'utilisateur root pour gérer le démon LXD. Pour gérer le serveur LXD, ajoutez votre nom d'utilisateur au groupe lxd à l'aide de la commande adduser sur Ubuntu Linux:

```bash
sudo adduser adminme lxd
```

#### <span style="color: rgb(35, 111, 161);">***Configurer les options de mise en réseau et de stockage LXD :*** </span>

Maintenant que nous avons installé LXD, il est temps de configurer le serveur LXD. Vous devez configurer l'option de mise en réseau et de stockage telle que le répertoire, ZFS, Btrfs, etc., entrez :

```bash
sudo lxd init
```

Ensuite, vous devez répondre à une série de questions sur la façon de configurer le serveur LXD, y compris l'option de stockage et de mise en réseau.   
Voici un exemple de session que j'ai configuré pour ZFS et le sous-réseau NAT 10.105.28.1/24. N'hésitez pas à choisir les options selon vos besoins:

Prérequis pour la préparation du stockage en ZFS :

```bash
sudo lxd init

Would you like to use LXD clustering? (yes/no) [default=no]: # no
Do you want to configure a new storage pool? (yes/no) [default=yes]: # yes
Name of the new storage pool [default=default]: # lxc-storage01
Name of the storage backend to use (ceph, btrfs, dir, lvm, zfs) [default=zfs]: # btrfs
Create a new BTRFS pool? (yes/no) [default=yes]: # yes
Would you like to use an existing empty block device (e.g. a disk or partition)? (yes/no) [default=no]: # yes
Path to the existing block device: /dev/disk/by-id/scsi-36000c2920fa37484c1bbc95b339370e5 # Stockage sdb
Would you like to connect to a MAAS server? (yes/no) [default=no]: # no
Would you like to create a new local network bridge? (yes/no) [default=yes]: # yes
What should the new bridge be called? [default=lxdbr0]: # lxdbr0
What IPv4 address should be used? (CIDR subnet notation, “auto” or “none”) [default=auto]: # 192.168.25.1/24
Would you like LXD to NAT IPv4 traffic on your bridge? [default=yes]: # yes 
What IPv6 address should be used? (CIDR subnet notation, “auto” or “none”) [default=auto]: # none
Would you like the LXD server to be available over the network? (yes/no) [default=no]: # no
Would you like stale cached images to be updated automatically? (yes/no) [default=yes] # yes
Would you like a YAML "lxd init" preseed to be printed? (yes/no) [default=no]: # no

# Redémarrer le serveur :
reboot
```

Vous êtes ensuite invité à configurer un pont réseau pour les conteneurs LXD. Cela active les fonctionnalités suivantes :  
\- Chaque conteneur obtient automatiquement une adresse IP privée.  
\- Chaque conteneur peut communiquer entre eux sur le réseau privé.  
\- Chaque conteneur peut initier des connexions à Internet.  
\- Chaque conteneur reste inaccessible depuis Internet par défaut ; vous ne pouvez pas initier une connexion à partir d'Internet et atteindre un conteneur à moins que vous ne l'activiez explicitement. Vous apprendrez à autoriser l'accès à un conteneur spécifique à l'étape suivante.

Nous pouvons vérifier les informations en tapant les commandes suivantes:

```bash
lxc profile list
lxc profile show default

lxc network list
lxc network show lxdbr0

lxc storage list
lxc storage show lxc-storage01

sudo btrfs filesystem show
```

#### <span style="color: rgb(35, 111, 161);">***Configurer VIM pour éditer la configuration des CT à la place de nano*** </span>

Par défaut, nano est utilisé pour l'éditer de la configuration des containers. La documentation suivante permet de modifier l'éditeur et utilise vim.

Source : https://askubuntu.com/questions/1116800/change-default-editor-in-lxd-snap

```bash
# Modification de l'éditeur :
echo 'export EDITOR=vim' >> ~/.profile 
source ~/.profile

# Test :
lxc config edit $CTNAME
```

# 03-Exploitation

## <span style="text-decoration: underline; color: rgb(45, 194, 107);">**A - Commandes :**</span>

### <span style="color: rgb(53, 152, 219);">**1. Gestion du stockage :**</span>

#### <span style="color: rgb(35, 111, 161);">***Gestion du storage pool BTRFS***</span>

```bash
# Afficher le storage pool :
lxc storage list
lxc storage show lxc-storage01
lxc storage list info lxc-storage01

# Affiche l'espace disque du volume BTRFS :
sudo btrfs filesystem show

```

#### <span style="color: rgb(35, 111, 161);">***Gestion des fichiers des CT :***</span>

```bash
Accès au stockage des CT : 
# Emplacement : 
/var/snap/lxd/common/mntns/var/snap/lxd/common/lxd/storage-pools/lxc-storage01/containers/CT/rootfs

# Lien symbolique du CT : 
ln -s /var/snap/lxd/common/mntns/var/snap/lxd/common/lxd/storage-pools/lxc-storage01/containers/CT/rootfs/ /home/adminme/CT

```

### <span style="color: rgb(53, 152, 219);">**2. Commandes LXC :**</span>

#### <span style="color: rgb(35, 111, 161);">***Gestion LXC***</span>

```bash
# Gestion des profiles :
lxc profile list
lxc profile show default

# Gestion des réseaux :
lxc network list
lxc network show lxdbr0

# Afficher les informations d'un CT :
lxc info CT-NAME
lxc info --show-log CT-NAME
lxc show CT-NAME

# Se connecter dans un CT :
lxc exec CT-NAME bash

# Editer la configuration d'un CT :
lxc config edit CT-NAME

# Démarrage d'un serveur d'un CT :
lxc exec CT-NAME service -- ssh start

###################################
Source : https://www.cyberciti.biz/faq/create-snapshots-with-lxc-command-lxd/
### Gestion des snapshots d'un CT :
# Créer un snapshot :
lxc snapshot CT-NAME Snapname

# Vérifier les snapshots :
lxc info CT-NAME

# Restaurer un snapshot :
lxc restore CT-NAME Snapname

# Supprimer un snapshot :
lxc delete CT-NAME/Snapname
lxc delete CT-NAME/Snapname -i # Force la confirmation

lxc copy CT-NAME01/base030423 CT-NAME02
lxc delete CT-NAME/base090323

# Liste de l'image LXD intégrée pour diverses distributions Linux :
# Pour répertorier toutes les images LXD, exécutez :
lxc image list images: | grep -i ubuntu
```

#### <span style="color: rgb(35, 111, 161);">***Gestion des conteneurs***</span>

```bash
# Création d'un conteneur BASE qui servira de template :
# Syntaxe : lxc launch images:{distro}/{version}/{arch} {container-name-here}
lxc launch ubuntu:22.04 BASE

# Lister les conteneurs :
lxc list

# Répertorier les instances de conteneur Linux
# Nous pouvons répertorier les conteneurs existants en utilisant la syntaxe suivante et la commande grep / commande egrep en tant que pipe :
lxc list --fast
lxc list | grep RUNNING
lxc list | grep STOPPED
lxc list | grep -i opensuse
lxc list "*c1*"
lxc list "*c2*"
```

##### **Comment exécuter/exécuter la commande spécifiée dans un conteneur**

Nous exécutons ou exécutons des commandes dans des conteneurs à l'aide de la commande exec comme suit :

```bash
lxc exec containerName -- command
lxc exec containerName -- /path/to/script
lxc exec containerName --env EDITOR=/usr/bin/vim -- command
### run date, ip a, ip rm and other commands on various containers ###
lxc exec cenots-8-c2 -- date
lxc exec cenots-8-c2 -- ip a
lxc exec ubuntu-focal-c5 -- ip r
lxc exec fedora-31-c9 -- dnf -y update
lxc exec debian-10-www -- cat /etc/debian_version
```

##### **Comment obtenir l'accès au shell bash dans un conteneur**

Vous voulez obtenir un accès login/shell dans un conteneur nommé debian-10-www, entrez : Maintenant, vous pouvez exécuter des commandes ou installer des packages. Par exemple, utilisez la commande apt / la commande apt-get à l' intérieur du conteneur : tapez simplement exit pour revenir à l'hôte :

```bash
lxc exec {container-name} {shell-name}
lxc exec debian-10-www bash
lxc exec CT-NAME bash
lxc exec alpine-c1 sh
# cat /etc/*issue*
# apt update
# apt upgrade
# exit
```

##### **Autres commandes**

```bash
# Comment afficher des informations sur les serveurs et conteneurs LXD ?
lxc info
lxc info {container-name}
lxc info opensuse15-1-c10
lxc info -n CT-ID

# Vérifier la config :
lxc checkconfig 

# Extraire un fichier du conteneur
lxc file pull {continer-nane}/{path/to/file} {/path/to/local/dest}
lxc file pull ubuntu-xenial-c3/var/www/nginx/app/config.php .

# Copier et récupérer des fichiers d'un CT :
# Il est possible de transférer des fichiers vers un CT : PUSH
# Mais également de récupérer des fichiers depuis un CT : PULL 
# Pousser un fichier vers le conteneur
lxc file push {/path/to/file} {continer-nane}/path/to/dest/dir/
lxc file push config.php ubuntu-xenial-c3/var/www/nginx/app/
# PUSH d'un fichier vers un CT :
lxc file push /home/adminme/file.txt CT-NAME/tmp/
# PUSH d'un dossier vers un CT :
lxc file push -r /home/adminme/DOSSIER CT-NAME/tmp/
# PULL d'un fichier depuis un CT :
lxc file pull /home/adminme/file.txt CT-NAME/tmp/
# PULL d'un dossier depuis un CT :
lxc file pull -r CT-NAME/tmp/DOSSIER /home/adminme/ 


# Obtenir de l'aide sur les commandes lxc
lxc --help
lxc {command} --help
lxc list --help

# Gestion d'in Conteneur :
lxc start CT-ID
lxc restart CT-ID
lxc stop CT-ID
lxc delete CT-ID
lxc stop ubuntu-xenial-c3 && lxc delete ubuntu-xenial-c3

# Configurer l'autostart d'un CT :
lxc config set CT-ID boot.autostart true
```

## <span style="text-decoration: underline; color: rgb(45, 194, 107);">**B - Procédure de création d'un CT :**</span>

### <span style="color: rgb(53, 152, 219);">**1.** </span><span style="color: rgb(53, 152, 219);">**Création d'un CT :**</span>

```bash
# Déclarer la variable :
CTNAME=MONCT01
# Création du conteneur :
lxc launch ubuntu:22.04 $CTNAME

# Configurer l'autostart d'un CT :
lxc config set $CTNAME boot.autostart true
```

### <span style="color: rgb(53, 152, 219);">**2. Paramétrage :**</span>

<span style="color: rgb(0, 0, 0); background-color: rgb(255, 255, 255);">Editer le fichier de configuration afin de paramétrer une adresse IP fixe et le forward de port.</span>

#### <span style="color: rgb(35, 111, 161);">***Configuration réseau et forward de port :***</span>

<span style="color: rgb(0, 0, 0);">Il est nécessaire de bien renseigner le fichier de zone DNZ "lxc.morbihan-energies.fr" afin d'attribuer une adresse IP sur le réseau LXC (non routé).</span>

```bash
# Editer le fichier de configuration :
lxc config edit $CTNAME
```

Ajouter les lignes suivantes :

```bash
  devices:
    eth0:
      ipv4.address: 192.168.25.XXX
      name: eth0
      network: lxdbr0
      type: nic
  port52201:
      connect: tcp:0.0.0.0:22
      listen: tcp:192.168.1.31:52201
      type: proxy
  port53080:
      connect: tcp:0.0.0.0:80
      listen: tcp:192.168.1.31:53080
      type: proxy
```

#### <span style="color: rgb(35, 111, 161);">***Création du compte d'admin :***</span>

```bash
# Se connecter dans le conteneur :
lxc exec $CTNAME bash

# Créer un utilisateur :
useradd adminme

# Ajouter un utilisateur au groupe sudo :
usermod -aG sudo adminme

# Modifier le mot de passe :
passwd adminme
passwd root

# Création de l'arborescence pour le déploiement des clés SSH :
mkdir /home/adminme/.ssh
vi /home/adminme/.ssh/auadminmethorized_keys
chown -R adminme:adminme /home/adminme/.ssh


# Autoriser un sudo sans demande de mot de passe :
sudo visudo

# Ajouter les lignes ci-dessous :
%sudo   ALL=(ALL:ALL) NOPASSWD:ALL
```

#### <span style="color: rgb(35, 111, 161);">***Configuration de la connexion SSH :***</span>

```bash
# Autoriser la connexion par mot de passe :
vi /etc/ssh/sshd_config

#Ajouter les lignes suivantes à la fin du fichier de conf :
----------------------------------------------------------
# Autoriser connexion par mot de passe :
PasswordAuthentication yes

# JKT-20220517 - Connexion Guacamole :
# Source : http://shaarli.guiguishow.info/?4DVyLA
HostkeyAlgorithms +ssh-rsa
PubkeyAcceptedAlgorithms +ssh-rsa
----------------------------------------------------------

# Redémarrer le service SSH :
/etc/init.d/ssh restart
```

## <span style="text-decoration: underline; color: rgb(45, 194, 107);">**B - CT-BASE :**</span>

### <span style="color: rgb(53, 152, 219);">**1.** </span><span style="color: rgb(53, 152, 219);">**Description :**</span>

#### <span style="color: rgb(35, 111, 161);">***SSS-Titre 1***</span>

##### **Titre 1**

Ce Conteneur a pour objectif d'être un Template qui pourra être déployé en dupliquant un snapshot.

### <span style="color: rgb(53, 152, 219);">**1.** </span><span style="color: rgb(53, 152, 219);">**Installation :**</span>

<p class="callout warning"><span style="color: rgb(0, 0, 0);">Cette procédure n'est pas encore terminée</span></p>

```bash
# Prérequis :
apt update && apt upgrade -y
apt install software-properties-common bash-completion wget git  -y

# Installation de nginx :

# Installation de php-fpm :
$ sudo apt install php-fpm


vi parametres.php
vi /etc/nginx/sites-enabled/
vi /etc/nginx/sites-enabled/default
```

### <span style="color: rgb(53, 152, 219);">**1.** </span><span style="color: rgb(53, 152, 219);">**Exploitation :**</span>

<p class="callout warning"><span style="color: rgb(0, 0, 0);">Cette procédure n'est pas encore terminée</span></p>

# 04-Gestion réseau et port forwarding

## <span style="text-decoration: underline; color: rgb(45, 194, 107);">**A - Gestion du réseau LXC :**</span>

> <p class="callout info">Afin de réserver les adresses IP en cas de plusieurs serveur LXC et éviter les conflits. Il est nécessaire de renseigner le fichier de zone DNS "/etc/named/zone/lxc.morbihan-energies.fr".</p>

La zone sert uniquement d'inventaire et n'est pas publiée.

<table border="1" id="bkmrk-nom-du-ct-adresse-ip" style="border-collapse: collapse; width: 56.2963%; height: 237.614px;"><colgroup><col style="width: 40.6103%;"></col><col style="width: 59.371%;"></col></colgroup><tbody><tr style="height: 29.7017px;"><td class="align-center" style="height: 29.7017px;">**Nom du CT**</td><td class="align-center" style="height: 29.7017px;">**Adresse IP**</td></tr><tr style="height: 29.7017px;"><td class="align-center" style="height: 29.7017px;">BASE</td><td class="align-center" style="height: 29.7017px;">192.168.25.150</td></tr><tr style="height: 29.7017px;"><td class="align-center" style="height: 29.7017px;">WIKI</td><td class="align-center" style="height: 29.7017px;">192.168.25.151</td></tr><tr style="height: 29.7017px;"><td class="align-center" style="height: 29.7017px;">BASH</td><td class="align-center" style="height: 29.7017px;">192.168.25.152</td></tr><tr style="height: 29.7017px;"><td class="align-center" style="height: 29.7017px;">DASHBOARD</td><td class="align-center" style="height: 29.7017px;">192.168.25.153</td></tr><tr style="height: 29.7017px;"><td class="align-center" style="height: 29.7017px;">RACKTABLES</td><td class="align-center" style="height: 29.7017px;">192.168.25.232</td></tr><tr style="height: 29.7017px;"><td class="align-center" style="height: 29.7017px;">KANBOARD</td><td class="align-center" style="height: 29.7017px;">192.168.25.156</td></tr><tr style="height: 29.7017px;"><td class="align-center" style="height: 29.7017px;">  
</td><td class="align-center" style="height: 29.7017px;"> </td></tr></tbody></table>

## <span style="text-decoration: underline; color: rgb(45, 194, 107);">**B - Gestion du forwarding de port :**</span>

La gestion du forwarding de port (SSH, HTTP, MySQL...) est recensé dans un tableur spécifique :

N:\\05-Informatique\\01-Systeme\\Réseaux\\Network-Configuration.ods (Page LXC-Network)

Ce paramétrage permet à une personne de se connecter en SSH directement sur le CT sur un port spécifique sans passer par le serveur LXC.

# 10-Scripts

## <span style="text-decoration: underline; color: rgb(45, 194, 107);">**A - check-disk.sh :**</span>

Ce script à pour objectif d'envoyer un mail sur hostmaster pour avoir le délai de l'espace disque du stockage BTRFS de LXC.

Crontab -e :

```bash
# Check disques :
0 06 * * * cd /usr/local/bin/ && ./check-disk.sh 2>&1
```

Emplacement du script : /usr/local/bin/check-disk.sh

```bash
#!/bin/bash
( 
        echo To: hostmaster@morbihan-energies.fr
        echo From: hostmaster@morbihan-energies.fr
        echo Subject: Usage du disque sur le serveur lxc01.v.sdem.fr
        echo LXC01.V.SDEM.FR - Usage du disque :
        echo 
        sudo df -h /dev/mapper/ubuntu--vg-ubuntu--lv
        echo
        echo LXC01.V.SDEM.FR - Taille du stockage BTRFS de LXC01 :
        sudo btrfs filesystem show
        echo
) | /usr/sbin/sendmail -fhostmaster@morbihan-energies.fr hostmaster@morbihan-energies.fr
```

# 05 - Transfert de Conteneur

## <span style="text-decoration: underline; color: rgb(45, 194, 107);">**<span style="vertical-align: inherit;"><span style="vertical-align: inherit;"><span style="vertical-align: inherit;"><span style="vertical-align: inherit;"><span style="vertical-align: inherit;"><span style="vertical-align: inherit;"><span style="vertical-align: inherit;"><span style="vertical-align: inherit;"><span style="vertical-align: inherit;"><span style="vertical-align: inherit;">A - Transfert de Conteneur :</span></span></span></span></span></span></span></span></span></span>**</span>

<span style="vertical-align: inherit;"><span style="vertical-align: inherit;"><span style="vertical-align: inherit;"><span style="vertical-align: inherit;"><span style="vertical-align: inherit;"><span style="vertical-align: inherit;">Voici mon exemple de configuration pour utiliser l'API LXD et le protocole Simplestreams à des fins de migration :</span></span></span></span></span></span>

[![image.png](https://wiki.morbihan-energies.fr/uploads/images/gallery/2024-01/scaled-1680-/cWnimage.png)](https://wiki.morbihan-energies.fr/uploads/images/gallery/2024-01/cWnimage.png)

<span style="vertical-align: inherit;"><span style="vertical-align: inherit;"><span style="vertical-align: inherit;"><span style="vertical-align: inherit;"><span style="vertical-align: inherit;"><span style="vertical-align: inherit;">Encore une fois, vous avez besoin de deux serveurs avec LXD configuré. </span></span></span></span></span><span style="vertical-align: inherit;"><span style="vertical-align: inherit;"><span style="vertical-align: inherit;"><span style="vertical-align: inherit;"><span style="vertical-align: inherit;">J'appellerai votre machine locale serveur1 et un serveur distant j'appellerai serveur2.</span></span></span></span></span></span>

### <span style="color: rgb(53, 152, 219);">**<span style="vertical-align: inherit;"><span style="vertical-align: inherit;"><span style="vertical-align: inherit;"><span style="vertical-align: inherit;"><span style="vertical-align: inherit;"><span style="vertical-align: inherit;"><span style="vertical-align: inherit;"><span style="vertical-align: inherit;"><span style="vertical-align: inherit;"><span style="vertical-align: inherit;">1. Configurer le serveur :</span></span></span></span></span></span></span></span></span></span>**</span>

<span style="vertical-align: inherit;"><span style="vertical-align: inherit;"><span style="vertical-align: inherit;"><span style="vertical-align: inherit;"><span style="vertical-align: inherit;"><span style="vertical-align: inherit;">Ces étapes sont à faire sur les 2 Serveurs LXC.</span></span></span></span></span></span>

<span style="vertical-align: inherit;"><span style="vertical-align: inherit;"><span style="vertical-align: inherit;"><span style="vertical-align: inherit;"><span style="vertical-align: inherit;"><span style="vertical-align: inherit;">Tapez la commande suivante pour activer un accès à distance via API en indiquant l'adresse IP du serveur LXC sur lequel on est connecté.</span></span></span></span></span></span>

```
lxc config set core.https_address 192.168.1.6:8443
```

<span style="vertical-align: inherit;"><span style="vertical-align: inherit;"><span style="vertical-align: inherit;"><span style="vertical-align: inherit;"><span style="vertical-align: inherit;"><span style="vertical-align: inherit;">Définissez le mot de passe pour le démon server2 lxd : Remplacez le MOT DE PASSE ici par le mot de passe réel.</span></span></span></span></span></span>

```
lxc config set core.trust_password PASSWORD
```

### <span style="color: rgb(53, 152, 219);">**<span style="vertical-align: inherit;"><span style="vertical-align: inherit;"><span style="vertical-align: inherit;"><span style="vertical-align: inherit;"><span style="vertical-align: inherit;"><span style="vertical-align: inherit;"><span style="vertical-align: inherit;"><span style="vertical-align: inherit;"><span style="vertical-align: inherit;"><span style="vertical-align: inherit;">2. Configurer un local nommé server1 :</span></span></span></span></span></span></span></span></span></span>**</span>

<span style="vertical-align: inherit;"><span style="vertical-align: inherit;"><span style="vertical-align: inherit;"><span style="vertical-align: inherit;"><span style="vertical-align: inherit;"><span style="vertical-align: inherit;">Tapez la commande suivante sur le serveur1 pour ajouter le serveur2 et inversement :</span></span></span></span></span></span>

```
lxc remote add lxcXX.v.sdem.fr 192.168.1.6
```

<span style="vertical-align: inherit;"><span style="vertical-align: inherit;"><span style="vertical-align: inherit;"><span style="vertical-align: inherit;"><span style="vertical-align: inherit;"><span style="vertical-align: inherit;">Vous pouvez lister vos télécommandes et vous verrez « server2 » répertorié comme suit :</span></span></span></span></span></span>

```
lxc remote list
```

[![image.png](https://wiki.morbihan-energies.fr/uploads/images/gallery/2024-01/scaled-1680-/29ximage.png)](https://wiki.morbihan-energies.fr/uploads/images/gallery/2024-01/29ximage.png)

### <span style="color: rgb(53, 152, 219);">**<span style="vertical-align: inherit;"><span style="vertical-align: inherit;"><span style="vertical-align: inherit;"><span style="vertical-align: inherit;"><span style="vertical-align: inherit;"><span style="vertical-align: inherit;"><span style="vertical-align: inherit;"><span style="vertical-align: inherit;"><span style="vertical-align: inherit;"><span style="vertical-align: inherit;">3. Transfert du conteneur :</span></span></span></span></span></span></span></span></span></span>**</span>

#### <span style="color: rgb(35, 111, 161);">***<span style="vertical-align: inherit;"><span style="vertical-align: inherit;"><span style="vertical-align: inherit;"><span style="vertical-align: inherit;"><span style="vertical-align: inherit;"><span style="vertical-align: inherit;"><span style="vertical-align: inherit;"><span style="vertical-align: inherit;"><span style="vertical-align: inherit;"><span style="vertical-align: inherit;">Instantané 1</span></span></span></span></span></span></span></span></span></span>***</span>

<span style="vertical-align: inherit;"><span style="vertical-align: inherit;"><span style="vertical-align: inherit;"><span style="vertical-align: inherit;"><span style="vertical-align: inherit;"><span style="vertical-align: inherit;">Création d'une capture instantanée pour le conteneur transféré.</span></span></span></span></span></span>

```
lxc snapshot {CT_NAME} {NOM_SNAP}
```

#### <span style="color: rgb(35, 111, 161);">***<span style="vertical-align: inherit;"><span style="vertical-align: inherit;"><span style="vertical-align: inherit;"><span style="vertical-align: inherit;"><span style="vertical-align: inherit;"><span style="vertical-align: inherit;"><span style="vertical-align: inherit;"><span style="vertical-align: inherit;"><span style="vertical-align: inherit;"><span style="vertical-align: inherit;">Transfert 1</span></span></span></span></span></span></span></span></span></span>***</span>

```
lxc copy {CT_NAME}/{NOM_SNAP} server2:{CT_NAME} --verbose
```

### <span style="color: rgb(53, 152, 219);">**<span style="vertical-align: inherit;"><span style="vertical-align: inherit;"><span style="vertical-align: inherit;"><span style="vertical-align: inherit;"><span style="vertical-align: inherit;"><span style="vertical-align: inherit;"><span style="vertical-align: inherit;"><span style="vertical-align: inherit;"><span style="vertical-align: inherit;"><span style="vertical-align: inherit;">4. Script de Transfert de Conteneur :</span></span></span></span></span></span></span></span></span></span>**</span>

<span style="vertical-align: inherit;"><span style="vertical-align: inherit;"><span style="vertical-align: inherit;"><span style="vertical-align: inherit;"><span style="vertical-align: inherit;"><span style="vertical-align: inherit;">Voici un script permettant d'automatiser avec Salt le transfert d'un conteneur entre 2 serveurs LXC.</span></span></span></span></span></span>

```
##############################################################
# Auteur : mkermorvant                                       #
# Date de modification : 20240115                            #
#                                                            #
# Description : Script de migration de conteneur lxc         #
#                                                            #
##############################################################
#! /bin/bash                                                 #
#                                                            #
##############################################################
# Variables :
echo""
read -p "Entrez le nom de votre Serveur Source: " SOURCE
read -p "Entrez le nom actuel de votre conteneur: " CT_NAME
read -p "Entrez le nom de votre Snapshot: " SNAP_NAME
echo ""
echo "Début de la Migration du Conteneur."
##############################################################
# 1 - Création de la Snapshot
echo "Création de la Snapshot."
echo""
salt ${SOURCE} cmd.run "lxc snapshot ${CT_NAME} ${SNAP_NAME}"
# 2 - Information supplémentaire
salt ${SOURCE} cmd.run "lxc remote list"
read -p "Entrez le nom de votre Remote Serveur: " REMOTE_SERV
# 3 - Migration du conteneur
salt ${SOURCE} cmd.run "lxc copy ${CT_NAME}/${SNAP_NAME} ${REMOTE_SERV}:${CT_NAME} --verbose"
echo ""
# 4 - Suppression du Conteneur de Base
read -r -p "Voulez-vous supprimer le conteneur ? [y/N] " response

case "$response" in
    [yY][eE][sS]|[yY])
        echo "Suppression de votre premier conteneur."
        salt ${SOURCE} cmd.run "lxc stop ${CT_NAME}"
        salt ${SOURCE} cmd.run "lxc delete ${CT_NAME}"
        echo ""
        echo "Le transfère de votre conteneur LXC est maintenant fini !"
        ;;
    *)
        echo "Le transfère de votre conteneur LXC est maintenant fini !"
        ;;
esac
```

## <span style="text-decoration: underline; color: rgb(45, 194, 107);">**<span style="vertical-align: inherit;"><span style="vertical-align: inherit;"><span style="vertical-align: inherit;"><span style="vertical-align: inherit;"><span style="vertical-align: inherit;"><span style="vertical-align: inherit;"><span style="vertical-align: inherit;"><span style="vertical-align: inherit;"><span style="vertical-align: inherit;"><span style="vertical-align: inherit;">B - Création de Conteneur :</span></span></span></span></span></span></span></span></span></span>**</span>

### <span style="color: rgb(53, 152, 219);">**<span style="vertical-align: inherit;"><span style="vertical-align: inherit;"><span style="vertical-align: inherit;"><span style="vertical-align: inherit;"><span style="vertical-align: inherit;"><span style="vertical-align: inherit;"><span style="vertical-align: inherit;"><span style="vertical-align: inherit;"><span style="vertical-align: inherit;"><span style="vertical-align: inherit;">1. Script de Création de conteneur LXC :</span></span></span></span></span></span></span></span></span></span>**</span>

```bash
#############################################################
# Auteur : mkermorvant                                      #
# Date de modification : 20240108                           #
#                                                           #
# Description : Script de création de conteneur lxc         #
#                                                           #
#############################################################
#                                                           #
#! /bin/bash                                                #
#                                                           #
#############################################################
# Variables :
echo""
read -p "Entrez le nom de votre Serveur LXC: " SERVER
read -p "Entrez la distribution à installer: " DISTRIB
read -p "Entrez la version à installer: " VERSION
read -p "Entrez le nom de votre conteneur: " CONTENEUR
read -p "Donner le nom de votre snapshot: " SNAP
echo ""
echo "Début de la création du conteneur."
############################################################
# 1 - Création du conteneur
salt ${SERVER} cmd.run "lxc launch ${DISTRIB}:${VERSION} ${CONTENEUR}"
echo ""
# 2 - Création d'une Snapshot
echo "Création d'une Snapshot."
salt ${SERVER} cmd.run "lxc snapshot ${CONTENEUR} ${SNAP}"
echo ""
# 3 - Infos Conteneur
salt ${SERVER} cmd.run "lxc info ${CONTENEUR}"
echo ""
echo "Votre conteneur ${CONTENEUR} est maintenant créé et opérationnelle"
echo ""
```

# Zammad


# 01 - Description

## <span style="text-decoration: underline; color: rgb(45, 194, 107);">**<span style="vertical-align: inherit;"><span style="vertical-align: inherit;">A - </span></span>**</span><span style="text-decoration: underline; color: rgb(45, 194, 107);">**<span style="vertical-align: inherit;"><span style="vertical-align: inherit;"><span style="vertical-align: inherit;"><span style="vertical-align: inherit;"><span style="vertical-align: inherit;"><span style="vertical-align: inherit;"><span style="vertical-align: inherit;"><span style="vertical-align: inherit;"><span style="vertical-align: inherit;"><span style="vertical-align: inherit;">Une description :</span></span></span></span></span></span></span></span></span></span>**</span>

<span style="vertical-align: inherit;"><span style="vertical-align: inherit;"><span style="vertical-align: inherit;"><span style="vertical-align: inherit;"><span style="vertical-align: inherit;"><span style="vertical-align: inherit;"><span style="vertical-align: inherit;"><span style="vertical-align: inherit;"><span style="vertical-align: inherit;"><span style="vertical-align: inherit;">Nom DNS interne : </span></span></span></span></span></span></span></span></span></span>  
<span style="vertical-align: inherit;"><span style="vertical-align: inherit;"><span style="vertical-align: inherit;"><span style="vertical-align: inherit;"><span style="vertical-align: inherit;"><span style="vertical-align: inherit;"><span style="vertical-align: inherit;"><span style="vertical-align: inherit;"><span style="vertical-align: inherit;"><span style="vertical-align: inherit;">Nom DNS Externe : </span></span></span></span></span></span></span></span></span></span>  
<span style="vertical-align: inherit;"><span style="vertical-align: inherit;"><span style="vertical-align: inherit;"><span style="vertical-align: inherit;"><span style="vertical-align: inherit;"><span style="vertical-align: inherit;"><span style="vertical-align: inherit;"><span style="vertical-align: inherit;"><span style="vertical-align: inherit;"><span style="vertical-align: inherit;">Type de serveur (Physique, VMware, LXC, Docker...) : VM VMWare &lt; /span&gt;</span></span></span></span></span></span></span></span></span></span><span style="vertical-align: inherit;"><span style="vertical-align: inherit;"><span style="vertical-align: inherit;"><span style="vertical-align: inherit;"><span style="vertical-align: inherit;"><span style="vertical-align: inherit;"><span style="vertical-align: inherit;"><span style="vertical-align: inherit;"><span style="vertical-align: inherit;"><span style="vertical-align: inherit;">Disque LVM : </span></span></span></span></span></span></span></span></span><span style="vertical-align: inherit;"><span style="vertical-align: inherit;"><span style="vertical-align: inherit;"><span style="vertical-align: inherit;"><span style="vertical-align: inherit;"><span style="vertical-align: inherit;"><span style="vertical-align: inherit;"><span style="vertical-align: inherit;"><span style="vertical-align: inherit;"> / : </span></span></span></span></span></span></span></span></span><span style="vertical-align: inherit;"><span style="vertical-align: inherit;"><span style="vertical-align: inherit;"><span style="vertical-align: inherit;"><span style="vertical-align: inherit;"><span style="vertical-align: inherit;"><span style="vertical-align: inherit;"><span style="vertical-align: inherit;"><span style="vertical-align: inherit;">RAM :4Go </span></span></span></span></span></span></span></span></span><span style="vertical-align: inherit;"><span style="vertical-align: inherit;"><span style="vertical-align: inherit;"><span style="vertical-align: inherit;"><span style="vertical-align: inherit;"><span style="vertical-align: inherit;"><span style="vertical-align: inherit;"><span style="vertical-align: inherit;"><span style="vertical-align: inherit;">CPU : 3 </span></span></span></span></span></span></span></span></span></span>  
<span style="vertical-align: inherit;"><span style="vertical-align: inherit;"><span style="vertical-align: inherit;"><span style="vertical-align: inherit;"><span style="vertical-align: inherit;"><span style="vertical-align: inherit;"><span style="vertical-align: inherit;"><span style="vertical-align: inherit;"><span style="vertical-align: inherit;"><span style="vertical-align: inherit;">OS : Debian 12 </span></span></span></span></span></span></span></span></span></span>

#### <span style="color: rgb(35, 111, 161);">***<span style="vertical-align: inherit;"><span style="vertical-align: inherit;"><span style="vertical-align: inherit;"><span style="vertical-align: inherit;"><span style="vertical-align: inherit;"><span style="vertical-align: inherit;"><span style="vertical-align: inherit;"><span style="vertical-align: inherit;"><span style="vertical-align: inherit;"><span style="vertical-align: inherit;">Réseaux :</span></span></span></span></span></span></span></span></span></span>***</span>

<span style="color: rgb(0, 0, 0);"><span style="vertical-align: inherit;"><span style="vertical-align: inherit;"><span style="vertical-align: inherit;"><span style="vertical-align: inherit;"><span style="vertical-align: inherit;"><span style="vertical-align: inherit;"><span style="vertical-align: inherit;"><span style="vertical-align: inherit;"><span style="vertical-align: inherit;"><span style="vertical-align: inherit;">Adresse IP : 192.168.56.190 </span></span></span></span></span></span></span></span></span></span>  
<span style="vertical-align: inherit;"><span style="vertical-align: inherit;"><span style="vertical-align: inherit;"><span style="vertical-align: inherit;"><span style="vertical-align: inherit;"><span style="vertical-align: inherit;"><span style="vertical-align: inherit;"><span style="vertical-align: inherit;"><span style="vertical-align: inherit;"><span style="vertical-align: inherit;">Masque : 255.255.255.0 </span></span></span></span></span></span></span></span></span></span>  
<span style="vertical-align: inherit;"><span style="vertical-align: inherit;"><span style="vertical-align: inherit;"><span style="vertical-align: inherit;"><span style="vertical-align: inherit;"><span style="vertical-align: inherit;"><span style="vertical-align: inherit;"><span style="vertical-align: inherit;"><span style="vertical-align: inherit;"><span style="vertical-align: inherit;">Passerelle : 192.168.56.254 </span></span></span></span></span></span></span></span></span></span>  
<span style="vertical-align: inherit;"><span style="vertical-align: inherit;"><span style="vertical-align: inherit;"><span style="vertical-align: inherit;"><span style="vertical-align: inherit;"><span style="vertical-align: inherit;"><span style="vertical-align: inherit;"><span style="vertical-align: inherit;"><span style="vertical-align: inherit;"><span style="vertical-align: inherit;">DNS : 192.168.56.1 192.168.1.50</span></span></span></span></span></span></span></span></span></span>  
</span>

### <span style="color: rgb(53, 152, 219);">**<span style="vertical-align: inherit;"><span style="vertical-align: inherit;"><span style="vertical-align: inherit;"><span style="vertical-align: inherit;"><span style="vertical-align: inherit;"><span style="vertical-align: inherit;"><span style="vertical-align: inherit;"><span style="vertical-align: inherit;"><span style="vertical-align: inherit;"><span style="vertical-align: inherit;">1. Rôle :</span></span></span></span></span></span></span></span></span></span>**</span>

<span style="vertical-align: inherit;"><span style="vertical-align: inherit;"><span style="vertical-align: inherit;"><span style="vertical-align: inherit;"><span style="vertical-align: inherit;"><span style="vertical-align: inherit;"><span style="vertical-align: inherit;"><span style="vertical-align: inherit;"><span style="vertical-align: inherit;"><span style="vertical-align: inherit;">Zammad est une solution de gestion de support/tickets opensource qui comporte beaucoup de fonctionnalités de haut niveau pour s'interfacer dans le système d'information existant ainsi qu'avec les principales plateformes de réseaux sociaux. </span></span></span></span></span></span></span></span></span><span style="vertical-align: inherit;"><span style="vertical-align: inherit;"><span style="vertical-align: inherit;"><span style="vertical-align: inherit;"><span style="vertical-align: inherit;"><span style="vertical-align: inherit;"><span style="vertical-align: inherit;"><span style="vertical-align: inherit;"><span style="vertical-align: inherit;">Il vous permet de centralisé la gestion de vos échanges supports ou contacts téléphoniques, courriels et autres.</span></span></span></span></span></span></span></span></span></span>

### <span style="color: rgb(53, 152, 219);">**<span style="vertical-align: inherit;"><span style="vertical-align: inherit;"><span style="vertical-align: inherit;"><span style="vertical-align: inherit;"><span style="vertical-align: inherit;"><span style="vertical-align: inherit;"><span style="vertical-align: inherit;"><span style="vertical-align: inherit;"><span style="vertical-align: inherit;"><span style="vertical-align: inherit;">1. Accès :</span></span></span></span></span></span></span></span></span></span>**</span>

##### **<span style="vertical-align: inherit;"><span style="vertical-align: inherit;"><span style="vertical-align: inherit;"><span style="vertical-align: inherit;"><span style="vertical-align: inherit;"><span style="vertical-align: inherit;"><span style="vertical-align: inherit;"><span style="vertical-align: inherit;"><span style="vertical-align: inherit;"><span style="vertical-align: inherit;">Méthode d'accès :</span></span></span></span></span></span></span></span></span></span>**

<span style="vertical-align: inherit;"><span style="vertical-align: inherit;"><span style="vertical-align: inherit;"><span style="vertical-align: inherit;"><span style="vertical-align: inherit;"><span style="vertical-align: inherit;"><span style="vertical-align: inherit;"><span style="vertical-align: inherit;"><span style="vertical-align: inherit;"><span style="vertical-align: inherit;">\[\*\] Interne </span></span></span></span></span></span></span></span></span></span>  
<span style="vertical-align: inherit;"><span style="vertical-align: inherit;"><span style="vertical-align: inherit;"><span style="vertical-align: inherit;"><span style="vertical-align: inherit;"><span style="vertical-align: inherit;"><span style="vertical-align: inherit;"><span style="vertical-align: inherit;"><span style="vertical-align: inherit;"><span style="vertical-align: inherit;">\[x\] Externe</span></span></span></span></span></span></span></span></span></span>


### <span style="color: rgb(53, 152, 219);">**<span style="vertical-align: inherit;"><span style="vertical-align: inherit;"><span style="vertical-align: inherit;"><span style="vertical-align: inherit;"><span style="vertical-align: inherit;"><span style="vertical-align: inherit;"><span style="vertical-align: inherit;"><span style="vertical-align: inherit;"><span style="vertical-align: inherit;"><span style="vertical-align: inherit;">1. Checklist - Création du serveur :</span></span></span></span></span></span></span></span></span></span>**</span>

#### <span style="color: rgb(35, 111, 161);">***<span style="vertical-align: inherit;"><span style="vertical-align: inherit;"><span style="vertical-align: inherit;"><span style="vertical-align: inherit;"><span style="vertical-align: inherit;"><span style="vertical-align: inherit;"><span style="vertical-align: inherit;"><span style="vertical-align: inherit;"><span style="vertical-align: inherit;"><span style="vertical-align: inherit;">Sécurité :</span></span></span></span></span></span></span></span></span></span>***</span>

<span style="vertical-align: inherit;"><span style="vertical-align: inherit;"><span style="vertical-align: inherit;"><span style="vertical-align: inherit;"><span style="vertical-align: inherit;"><span style="vertical-align: inherit;"><span style="vertical-align: inherit;"><span style="vertical-align: inherit;"><span style="vertical-align: inherit;"><span style="vertical-align: inherit;">\[\*\] Création compte adminme </span></span></span></span></span></span></span></span></span></span>  
<span style="vertical-align: inherit;"><span style="vertical-align: inherit;"><span style="vertical-align: inherit;"><span style="vertical-align: inherit;"><span style="vertical-align: inherit;"><span style="vertical-align: inherit;"><span style="vertical-align: inherit;"><span style="vertical-align: inherit;"><span style="vertical-align: inherit;"><span style="vertical-align: inherit;">\[\*\] Changement mot de passe root </span></span></span></span></span></span></span></span></span></span>  
<span style="vertical-align: inherit;"><span style="vertical-align: inherit;"><span style="vertical-align: inherit;"><span style="vertical-align: inherit;"><span style="vertical-align: inherit;"><span style="vertical-align: inherit;"><span style="vertical-align: inherit;"><span style="vertical-align: inherit;"><span style="vertical-align: inherit;"><span style="vertical-align: inherit;">\[\*\] Changement mot de passe adminme &lt; a i=3&gt;\[\*\] Sécurisation des mots de passe (20 caractères minimum et 3 types de caractères différents) </span></span></span></span></span></span></span></span></span></span><span style="vertical-align: inherit;"><span style="vertical-align: inherit;"><span style="vertical-align: inherit;"><span style="vertical-align: inherit;"><span style="vertical-align: inherit;"><span style="vertical-align: inherit;"><span style="vertical-align: inherit;"><span style="vertical-align: inherit;"><span style="vertical-align: inherit;"><span style="vertical-align: inherit;">\[\*\] Mise à jour du coffre fort de mot de passe &lt; a i=5&gt;\[\*\] Déploiement clé SSH </span></span></span></span></span></span></span></span></span><span style="vertical-align: inherit;"><span style="vertical-align: inherit;"><span style="vertical-align: inherit;"><span style="vertical-align: inherit;"><span style="vertical-align: inherit;"><span style="vertical-align: inherit;"><span style="vertical-align: inherit;"><span style="vertical-align: inherit;"><span style="vertical-align: inherit;">\[ \] Paramétrage du SUDO NOPASSWORD </span></span></span></span></span></span></span></span></span><span style="vertical-align: inherit;"><span style="vertical-align: inherit;"><span style="vertical-align: inherit;"><span style="vertical-align: inherit;"><span style="vertical-align: inherit;"><span style="vertical-align: inherit;"><span style="vertical-align: inherit;"><span style="vertical-align: inherit;"><span style="vertical-align: inherit;">Liste des Ports ouverts : </span></span></span></span></span></span></span></span></span></span>

## <span style="text-decoration: underline; color: rgb(45, 194, 107);">**<span style="vertical-align: inherit;"><span style="vertical-align: inherit;"><span style="vertical-align: inherit;"><span style="vertical-align: inherit;"><span style="vertical-align: inherit;"><span style="vertical-align: inherit;"><span style="vertical-align: inherit;"><span style="vertical-align: inherit;"><span style="vertical-align: inherit;"><span style="vertical-align: inherit;">B - LXC</span></span></span></span></span></span></span></span></span></span>**</span><span style="text-decoration: underline; color: rgb(45, 194, 107);"> </span>

### <span style="color: rgb(53, 152, 219);">**<span style="vertical-align: inherit;"><span style="vertical-align: inherit;"><span style="vertical-align: inherit;"><span style="vertical-align: inherit;"><span style="vertical-align: inherit;"><span style="vertical-align: inherit;"><span style="vertical-align: inherit;"><span style="vertical-align: inherit;"><span style="vertical-align: inherit;"><span style="vertical-align: inherit;">1. Rôle :</span></span></span></span></span></span></span></span></span></span>**</span>

<span style="vertical-align: inherit;"><span style="vertical-align: inherit;"><span style="vertical-align: inherit;"><span style="vertical-align: inherit;"><span style="vertical-align: inherit;"><span style="vertical-align: inherit;"><span style="vertical-align: inherit;"><span style="vertical-align: inherit;"><span style="vertical-align: inherit;"><span style="vertical-align: inherit;">Le projet Linux Containers (LXC) est un outil de conteneurisation, c'est une plateforme de conteneurs Open Source qui fournit un ensemble d'outils, de modèles, de bibliothèques et de liaisons de langage. </span></span></span></span></span></span></span></span></span><span style="vertical-align: inherit;"><span style="vertical-align: inherit;"><span style="vertical-align: inherit;"><span style="vertical-align: inherit;"><span style="vertical-align: inherit;"><span style="vertical-align: inherit;"><span style="vertical-align: inherit;"><span style="vertical-align: inherit;"><span style="vertical-align: inherit;">Le projet LXC dispose d'une interface en ligne de commande simple qui facilite la prise en main pour les nouveaux utilisateurs. </span></span></span></span></span></span></span></span></span><span style="vertical-align: inherit;"><span style="vertical-align: inherit;"><span style="vertical-align: inherit;"><span style="vertical-align: inherit;"><span style="vertical-align: inherit;"><span style="vertical-align: inherit;"><span style="vertical-align: inherit;"><span style="vertical-align: inherit;"><span style="vertical-align: inherit;">Il contient un environnement de virtualisation au niveau du système d'exploitation qu'il est possible d'installer sur de nombreux systèmes fonctionnant sur Linux.</span></span></span></span></span></span></span></span></span></span>

### <span style="color: rgb(53, 152, 219);">**<span style="vertical-align: inherit;"><span style="vertical-align: inherit;"><span style="vertical-align: inherit;"><span style="vertical-align: inherit;"><span style="vertical-align: inherit;"><span style="vertical-align: inherit;"><span style="vertical-align: inherit;"><span style="vertical-align: inherit;"><span style="vertical-align: inherit;"><span style="vertical-align: inherit;">2. Qu'est-ce que la Conteneurisation :</span></span></span></span></span></span></span></span></span></span>**</span>

<span style="color: rgb(0, 0, 0);"><span style="vertical-align: inherit;"><span style="vertical-align: inherit;"><span style="vertical-align: inherit;"><span style="vertical-align: inherit;"><span style="vertical-align: inherit;"><span style="vertical-align: inherit;"><span style="vertical-align: inherit;"><span style="vertical-align: inherit;"><span style="vertical-align: inherit;"><span style="vertical-align: inherit;">Un conteneur est une technologie qui permet d'assembler et d'isoler des applications avec leur environnement d'exécution complet, c'est-à-dire tous les fichiers nécessaires à leur exécution. </span></span></span></span></span></span></span></span></span><span style="vertical-align: inherit;"><span style="vertical-align: inherit;"><span style="vertical-align: inherit;"><span style="vertical-align: inherit;"><span style="vertical-align: inherit;"><span style="vertical-align: inherit;"><span style="vertical-align: inherit;"><span style="vertical-align: inherit;"><span style="vertical-align: inherit;">Les applications conteneurisées sont plus faciles à déplacer d'un environnement vers un autre (développement, test, production, etc.), tout en conservant l'intégralité de leurs fonctions.&lt; /span&gt;</span></span></span></span></span></span></span></span></span></span></span>

[![image.png](https://wiki.morbihan-energies.fr/uploads/images/gallery/2023-12/scaled-1680-/hSCimage.png)](https://wiki.morbihan-energies.fr/uploads/images/gallery/2023-12/hSCimage.png)

### <span style="color: rgb(53, 152, 219);">**<span style="vertical-align: inherit;"><span style="vertical-align: inherit;"><span style="vertical-align: inherit;"><span style="vertical-align: inherit;"><span style="vertical-align: inherit;"><span style="vertical-align: inherit;"><span style="vertical-align: inherit;"><span style="vertical-align: inherit;"><span style="vertical-align: inherit;"><span style="vertical-align: inherit;">3. Conteneurs et virtualisation ; </span></span></span></span></span></span></span></span></span><span style="vertical-align: inherit;"><span style="vertical-align: inherit;"><span style="vertical-align: inherit;"><span style="vertical-align: inherit;"><span style="vertical-align: inherit;"><span style="vertical-align: inherit;"><span style="vertical-align: inherit;"><span style="vertical-align: inherit;"><span style="vertical-align: inherit;">quelles sont les différences :</span></span></span></span></span></span></span></span></span></span>**</span>

<span style="color: rgb(0, 0, 0);"><span style="vertical-align: inherit;"><span style="vertical-align: inherit;"><span style="vertical-align: inherit;"><span style="vertical-align: inherit;"><span style="vertical-align: inherit;"><span style="vertical-align: inherit;"><span style="vertical-align: inherit;"><span style="vertical-align: inherit;"><span style="vertical-align: inherit;"><span style="vertical-align: inherit;">Ce n'est pas tout à fait la même chose. </span></span></span></span></span></span></span></span></span><span style="vertical-align: inherit;"><span style="vertical-align: inherit;"><span style="vertical-align: inherit;"><span style="vertical-align: inherit;"><span style="vertical-align: inherit;"><span style="vertical-align: inherit;"><span style="vertical-align: inherit;"><span style="vertical-align: inherit;"><span style="vertical-align: inherit;">Les conteneurs et la virtualisation sont plutôt complémentaires. </span></span></span></span></span></span></span></span></span><span style="vertical-align: inherit;"><span style="vertical-align: inherit;"><span style="vertical-align: inherit;"><span style="vertical-align: inherit;"><span style="vertical-align: inherit;"><span style="vertical-align: inherit;"><span style="vertical-align: inherit;"><span style="vertical-align: inherit;"><span style="vertical-align: inherit;">Voici deux définitions simples pour y voir plus clair :</span></span></span></span></span></span></span></span></span></span></span>

- <span style="vertical-align: inherit;"><span style="vertical-align: inherit;"><span style="vertical-align: inherit;"><span style="vertical-align: inherit;"><span style="vertical-align: inherit;"><span style="vertical-align: inherit;"><span style="vertical-align: inherit;"><span style="vertical-align: inherit;"><span style="vertical-align: inherit;"><span style="vertical-align: inherit;">La virtualisation permet à vos systèmes d'exploitation (Windows ou Linux) de s'exécuter simultanément sur un seul système matériel.</span></span></span></span></span></span></span></span></span></span>
- <span style="vertical-align: inherit;"><span style="vertical-align: inherit;"><span style="vertical-align: inherit;"><span style="vertical-align: inherit;"><span style="vertical-align: inherit;"><span style="vertical-align: inherit;"><span style="vertical-align: inherit;"><span style="vertical-align: inherit;"><span style="vertical-align: inherit;"><span style="vertical-align: inherit;">Les conteneurs partagent le même noyau de système d'exploitation et isolent les processus de l'application du reste du système.</span></span></span></span></span></span></span></span></span></span>

[![image.png](https://wiki.morbihan-energies.fr/uploads/images/gallery/2023-12/scaled-1680-/h6Iimage.png)](https://wiki.morbihan-energies.fr/uploads/images/gallery/2023-12/h6Iimage.png)

<span style="color: rgb(0, 0, 0);"><span style="vertical-align: inherit;"><span style="vertical-align: inherit;"><span style="vertical-align: inherit;"><span style="vertical-align: inherit;"><span style="vertical-align: inherit;"><span style="vertical-align: inherit;"><span style="vertical-align: inherit;"><span style="vertical-align: inherit;"><span style="vertical-align: inherit;"><span style="vertical-align: inherit;">Qu'est-ce que cela signifie ? </span></span></span></span></span></span></span></span></span><span style="vertical-align: inherit;"><span style="vertical-align: inherit;"><span style="vertical-align: inherit;"><span style="vertical-align: inherit;"><span style="vertical-align: inherit;"><span style="vertical-align: inherit;"><span style="vertical-align: inherit;"><span style="vertical-align: inherit;"><span style="vertical-align: inherit;">En premier lieu, la virtualisation utilise un hyperviseur pour émuler le matériel, ce qui permet d'exécuter plusieurs systèmes d'exploitation en parallèle. </span></span></span></span></span></span></span></span></span><span style="vertical-align: inherit;"><span style="vertical-align: inherit;"><span style="vertical-align: inherit;"><span style="vertical-align: inherit;"><span style="vertical-align: inherit;"><span style="vertical-align: inherit;"><span style="vertical-align: inherit;"><span style="vertical-align: inherit;"><span style="vertical-align: inherit;">C'est une solution moins légère que les conteneurs. </span></span></span></span></span></span></span></span></span></span></span><span style="vertical-align: inherit;"><span style="vertical-align: inherit;"><span style="vertical-align: inherit;"><span style="vertical-align: inherit;"><span style="vertical-align: inherit;"><span style="vertical-align: inherit;"><span style="vertical-align: inherit;"><span style="vertical-align: inherit;"><span style="vertical-align: inherit;"><span style="vertical-align: inherit;">Les conteneurs Linux s'exécutent en natif sur leur système d'exploitation, qu'ils partagent entre eux. </span></span></span></span></span></span></span></span></span><span style="vertical-align: inherit;"><span style="vertical-align: inherit;"><span style="vertical-align: inherit;"><span style="vertical-align: inherit;"><span style="vertical-align: inherit;"><span style="vertical-align: inherit;"><span style="vertical-align: inherit;"><span style="vertical-align: inherit;"><span style="vertical-align: inherit;">Vos applications et services restent ainsi légers et s'exécutent rapidement en parallèle.</span></span></span></span></span></span></span></span></span></span>

### <span style="color: rgb(53, 152, 219);">**<span style="vertical-align: inherit;"><span style="vertical-align: inherit;"><span style="vertical-align: inherit;"><span style="vertical-align: inherit;"><span style="vertical-align: inherit;"><span style="vertical-align: inherit;"><span style="vertical-align: inherit;"><span style="vertical-align: inherit;"><span style="vertical-align: inherit;"><span style="vertical-align: inherit;">1. Commande LXC :</span></span></span></span></span></span></span></span></span></span>**</span>

#### <span style="color: rgb(35, 111, 161);">***<span style="vertical-align: inherit;"><span style="vertical-align: inherit;"><span style="vertical-align: inherit;"><span style="vertical-align: inherit;"><span style="vertical-align: inherit;"><span style="vertical-align: inherit;"><span style="vertical-align: inherit;"><span style="vertical-align: inherit;"><span style="vertical-align: inherit;"><span style="vertical-align: inherit;">Gestion LXC :</span></span></span></span></span></span></span></span></span></span>***</span>

```bash
# Affiche différentes informations du conteneur comme le nom des snapshots, ressources utilisées, etc...
lxc info {CT-NAME}

# Permet de se connecter aux conteneurs :
lxc exec {CT-NAME} bash

# Créer un snapshot :
lxc snapshot {CT-NAME} {Snapname}

# Restaurer un snapshot :
lxc restore {CT-NAME} Snapname

# Supprimer un snapshot :
lxc delete {CT-NAME}/{Snapname}

# Gestion des profils :
lxc profile list
lxc profile show default

# Gestion des réseaux :
lxc network list
lxc network show lxdbr0

# Éditer la configuration d'un CT :
lxc config edit {CT-NAME}

# Démarrage d'un serveur d'un CT :
lxc exec CT-NAME service -- ssh start
```

#### <span style="color: rgb(35, 111, 161);">***<span style="vertical-align: inherit;"><span style="vertical-align: inherit;"><span style="vertical-align: inherit;"><span style="vertical-align: inherit;"><span style="vertical-align: inherit;"><span style="vertical-align: inherit;"><span style="vertical-align: inherit;"><span style="vertical-align: inherit;"><span style="vertical-align: inherit;"><span style="vertical-align: inherit;">Gestion des conteneurs :</span></span></span></span></span></span></span></span></span></span>***</span>

```bash
# Création d'un conteneur
lxc launch {distrib}:{version} {CT_Name} 

#Suprimer un conteneur
lxc delete {CT_NAME}

# Arréter un conteneur
lxc stop {CT_Name} 

# Démarrer un conteneur
lxc start {CT_Name}

# Lister les conteneurs :
lxc list
```

# 02 - Installation

## <span style="text-decoration: underline; color: rgb(45, 194, 107);">**<span style="vertical-align: inherit;"><span style="vertical-align: inherit;"><span style="vertical-align: inherit;"><span style="vertical-align: inherit;"><span style="vertical-align: inherit;"><span style="vertical-align: inherit;"><span style="vertical-align: inherit;"><span style="vertical-align: inherit;"><span style="vertical-align: inherit;"><span style="vertical-align: inherit;">A - Préparation à l'installation :</span></span></span></span></span></span></span></span></span></span>**</span>

> [<span style="vertical-align: inherit;"><span style="vertical-align: inherit;"><span style="vertical-align: inherit;"><span style="vertical-align: inherit;"><span style="vertical-align: inherit;"><span style="vertical-align: inherit;"><span style="vertical-align: inherit;"><span style="vertical-align: inherit;"><span style="vertical-align: inherit;"><span style="vertical-align: inherit;">https://docs.zammad.org/en/latest/install/package.html</span></span></span></span></span></span></span></span></span></span>](https://docs.zammad.org/en/latest/install/package.html)
> 
> [<span style="vertical-align: inherit;"><span style="vertical-align: inherit;"><span style="vertical-align: inherit;"><span style="vertical-align: inherit;"><span style="vertical-align: inherit;"><span style="vertical-align: inherit;"><span style="vertical-align: inherit;"><span style="vertical-align: inherit;"><span style="vertical-align: inherit;"><span style="vertical-align: inherit;">https://docs.zammad.org/en/latest/install/elasticsearch.html#configure-zammad-with-elasticsearch</span></span></span></span></span></span></span></span></span></span>](https://docs.zammad.org/en/latest/install/elasticsearch.html#configure-zammad-with-elasticsearch)
> 
> [<span style="vertical-align: inherit;"><span style="vertical-align: inherit;"><span style="vertical-align: inherit;"><span style="vertical-align: inherit;"><span style="vertical-align: inherit;"><span style="vertical-align: inherit;"><span style="vertical-align: inherit;"><span style="vertical-align: inherit;"><span style="vertical-align: inherit;"><span style="vertical-align: inherit;">https://docs.zammad.org/en/latest/getting-started/configure-webserver.html</span></span></span></span></span></span></span></span></span></span>](https://docs.zammad.org/en/latest/getting-started/configure-webserver.html)

### <span style="color: rgb(53, 152, 219);">**<span style="vertical-align: inherit;"><span style="vertical-align: inherit;"><span style="vertical-align: inherit;"><span style="vertical-align: inherit;"><span style="vertical-align: inherit;"><span style="vertical-align: inherit;"><span style="vertical-align: inherit;"><span style="vertical-align: inherit;"><span style="vertical-align: inherit;"><span style="vertical-align: inherit;">1. Prérequis :</span></span></span></span></span></span></span></span></span></span>**</span>

<span style="vertical-align: inherit;"><span style="vertical-align: inherit;">Tout d'abord, pour le bon fonctionnement de Zammad il vous faudra installer Postfix.</span></span>

```bash
#Installation postfix
apt install postfix
```

### <span style="color: rgb(53, 152, 219);">**<span style="vertical-align: inherit;"><span style="vertical-align: inherit;"><span style="vertical-align: inherit;"><span style="vertical-align: inherit;"><span style="vertical-align: inherit;"><span style="vertical-align: inherit;"><span style="vertical-align: inherit;"><span style="vertical-align: inherit;"><span style="vertical-align: inherit;"><span style="vertical-align: inherit;">2. Installation de la dépendances du forfait :</span></span></span></span></span></span></span></span></span></span>**</span>

<span style="vertical-align: inherit;"><span style="vertical-align: inherit;"><span style="vertical-align: inherit;"><span style="vertical-align: inherit;"><span style="vertical-align: inherit;"><span style="vertical-align: inherit;"><span style="vertical-align: inherit;"><span style="vertical-align: inherit;"><span style="vertical-align: inherit;"><span style="vertical-align: inherit;">Les dépendances ci-dessous doivent être installées sur votre système.</span></span></span></span></span></span></span></span></span></span>

```bash
#Installation des dépendances du package
apt install curl apt-transport-https gnupg
```

### <span style="color: rgb(53, 152, 219);">**<span style="vertical-align: inherit;"><span style="vertical-align: inherit;"><span style="vertical-align: inherit;"><span style="vertical-align: inherit;"><span style="vertical-align: inherit;"><span style="vertical-align: inherit;"><span style="vertical-align: inherit;"><span style="vertical-align: inherit;"><span style="vertical-align: inherit;"><span style="vertical-align: inherit;">3. Configuration d'Elasticsearch :</span></span></span></span></span></span></span></span></span></span>**</span>

<p class="callout info"><span style="vertical-align: inherit;"><span style="vertical-align: inherit;"><span style="vertical-align: inherit;"><span style="vertical-align: inherit;"><span style="vertical-align: inherit;"><span style="vertical-align: inherit;"><span style="vertical-align: inherit;"><span style="vertical-align: inherit;"><span style="vertical-align: inherit;"><span style="vertical-align: inherit;">Source : https://docs.zammad.org/en/latest/install/elasticsearch.html</span></span></span></span></span></span></span></span></span></span></p>

#### <span style="color: rgb(35, 111, 161);">***<span style="vertical-align: inherit;"><span style="vertical-align: inherit;"><span style="vertical-align: inherit;"><span style="vertical-align: inherit;"><span style="vertical-align: inherit;"><span style="vertical-align: inherit;"><span style="vertical-align: inherit;"><span style="vertical-align: inherit;"><span style="vertical-align: inherit;"><span style="vertical-align: inherit;">Installation</span></span></span></span></span></span></span></span></span></span>***</span>

```bash
#Installation d'Elacticsearch

apt install apt-transport-https sudo wget curl gnupg

echo "deb [signed-by=/etc/apt/trusted.gpg.d/elasticsearch.gpg] https://artifacts.elastic.co/packages/7.x/apt stable main"| \
  tee -a /etc/apt/sources.list.d/elastic-7.x.list > /dev/null

curl -fsSL https://artifacts.elastic.co/GPG-KEY-elasticsearch | \
  gpg --dearmor | tee /etc/apt/trusted.gpg.d/elasticsearch.gpg> /dev/null

apt update

apt install elasticsearch

/usr/share/elasticsearch/bin/elasticsearch-plugin install ingest-attachment
```

<span style="vertical-align: inherit;"><span style="vertical-align: inherit;"><span style="vertical-align: inherit;"><span style="vertical-align: inherit;"><span style="vertical-align: inherit;"><span style="vertical-align: inherit;"><span style="vertical-align: inherit;"><span style="vertical-align: inherit;"><span style="vertical-align: inherit;"><span style="vertical-align: inherit;">Après avoir installé Elasticsearch et son plugin de pièce jointe, assurez-vous de l'activer par défaut et démarrez-le.</span></span></span></span></span></span></span></span></span></span>

```bash
#Démarrage d'Elasticsearch
systemctl start elasticsearch
systemctl enable elasticsearch
```

### <span style="color: rgb(53, 152, 219);">**<span style="vertical-align: inherit;"><span style="vertical-align: inherit;"><span style="vertical-align: inherit;"><span style="vertical-align: inherit;"><span style="vertical-align: inherit;"><span style="vertical-align: inherit;"><span style="vertical-align: inherit;"><span style="vertical-align: inherit;"><span style="vertical-align: inherit;"><span style="vertical-align: inherit;">4. Vérification des paramètres régionaux :</span></span></span></span></span></span></span></span></span></span>**</span>

<span style="vertical-align: inherit;"><span style="vertical-align: inherit;"><span style="vertical-align: inherit;"><span style="vertical-align: inherit;"><span style="vertical-align: inherit;"><span style="vertical-align: inherit;"><span style="vertical-align: inherit;"><span style="vertical-align: inherit;"><span style="vertical-align: inherit;"><span style="vertical-align: inherit;">Pour que Zammad fonctionne correctement, votre système doit utiliser les paramètres régionaux corrects.</span></span></span></span></span></span></span></span></span></span>

```bash
#Répertoriez vos paramètres régionaux actuels
apt install locales
locale-gen fr_FR.UTF-8
echo "LANG=fr_FR.UTF-8
```

## <span style="text-decoration: underline; color: rgb(45, 194, 107);">**<span style="vertical-align: inherit;"><span style="vertical-align: inherit;"><span style="vertical-align: inherit;"><span style="vertical-align: inherit;"><span style="vertical-align: inherit;"><span style="vertical-align: inherit;"><span style="vertical-align: inherit;"><span style="vertical-align: inherit;"><span style="vertical-align: inherit;"><span style="vertical-align: inherit;">B - Installation de Zammad :</span></span></span></span></span></span></span></span></span></span>**</span>

#### <span style="color: rgb(35, 111, 161);">***<span style="vertical-align: inherit;"><span style="vertical-align: inherit;"><span style="vertical-align: inherit;"><span style="vertical-align: inherit;"><span style="vertical-align: inherit;"><span style="vertical-align: inherit;"><span style="vertical-align: inherit;"><span style="vertical-align: inherit;"><span style="vertical-align: inherit;"><span style="vertical-align: inherit;">Ajout d'un référentiel</span></span></span></span></span></span></span></span></span></span>***</span>

```bash
#Installer la clé référentiel
curl -fsSL https://dl.packager.io/srv/zammad/zammad/key | \
  gpg --dearmor | tee /etc/apt/trusted.gpg.d/pkgr-zammad.gpg> /dev/null

#Ubuntu 22.04 
echo "deb [signed-by=/etc/apt/trusted.gpg.d/pkgr-zammad.gpg] https://dl.packager.io/srv/deb/zammad/zammad/stable/ubuntu 22.04 main"| \
   tee /etc/apt/sources.list.d/zammad.list > /dev/null
```

#### <span style="color: rgb(35, 111, 161);">***<span style="vertical-align: inherit;"><span style="vertical-align: inherit;"><span style="vertical-align: inherit;"><span style="vertical-align: inherit;"><span style="vertical-align: inherit;"><span style="vertical-align: inherit;"><span style="vertical-align: inherit;"><span style="vertical-align: inherit;"><span style="vertical-align: inherit;"><span style="vertical-align: inherit;"> Installation de Zammad </span></span></span></span></span></span></span></span></span></span>***</span>

```bash
#Installation de Zammad
apt update
apt install zammad
```

## <span style="text-decoration: underline; color: rgb(45, 194, 107);">**<span style="vertical-align: inherit;"><span style="vertical-align: inherit;"><span style="vertical-align: inherit;"><span style="vertical-align: inherit;"><span style="vertical-align: inherit;"><span style="vertical-align: inherit;"><span style="vertical-align: inherit;"><span style="vertical-align: inherit;"><span style="vertical-align: inherit;"><span style="vertical-align: inherit;">C - Connexion à Zammad :</span></span></span></span></span></span></span></span></span></span>**</span>

```bash
#Définir l'adresse du serveur Elasticsearch
zammad run rails r "Setting.set('es_url', 'http://localhost:9200')"

#Construire l'index de recherche
zammad run rake zammad:searchindex:rebuild
```

## <span style="text-decoration: underline; color: rgb(45, 194, 107);">**<span style="vertical-align: inherit;"><span style="vertical-align: inherit;"><span style="vertical-align: inherit;"><span style="vertical-align: inherit;"><span style="vertical-align: inherit;"><span style="vertical-align: inherit;"><span style="vertical-align: inherit;"><span style="vertical-align: inherit;"><span style="vertical-align: inherit;"><span style="vertical-align: inherit;">D - Configuration des fichiers de conf :</span></span></span></span></span></span></span></span></span></span>**</span>

#### <span style="color: rgb(35, 111, 161);">***<span style="vertical-align: inherit;"><span style="vertical-align: inherit;"><span style="vertical-align: inherit;"><span style="vertical-align: inherit;"><span style="vertical-align: inherit;"><span style="vertical-align: inherit;"><span style="vertical-align: inherit;"><span style="vertical-align: inherit;"><span style="vertical-align: inherit;"><span style="vertical-align: inherit;"> Obtenez un fichier de configuration actuelle</span></span></span></span></span></span></span></span></span></span>***</span>

<span style="vertical-align: inherit;"><span style="vertical-align: inherit;"><span style="vertical-align: inherit;"><span style="vertical-align: inherit;"><span style="vertical-align: inherit;"><span style="vertical-align: inherit;"><span style="vertical-align: inherit;"><span style="vertical-align: inherit;"><span style="vertical-align: inherit;"><span style="vertical-align: inherit;">Copiez et écrasez la valeur par défaut </span></span></span></span></span></span></span></span></span></span>`<span class="pre">zammad.conf</span>`<span style="vertical-align: inherit;"><span style="vertical-align: inherit;"><span style="vertical-align: inherit;"><span style="vertical-align: inherit;"><span style="vertical-align: inherit;"><span style="vertical-align: inherit;"><span style="vertical-align: inherit;"><span style="vertical-align: inherit;"><span style="vertical-align: inherit;"><span style="vertical-align: inherit;"> en utilisant</span></span></span></span></span></span></span></span></span></span>

```bash
cp /opt/zammad/contrib/nginx/zammad_ssl.conf /etc/nginx/sites-available/zammad.conf
```

#### <span style="color: rgb(35, 111, 161);">***<span style="vertical-align: inherit;"><span style="vertical-align: inherit;"><span style="vertical-align: inherit;"><span style="vertical-align: inherit;"><span style="vertical-align: inherit;"><span style="vertical-align: inherit;"><span style="vertical-align: inherit;"><span style="vertical-align: inherit;"><span style="vertical-align: inherit;"><span style="vertical-align: inherit;"> Ajustez le fichier de configuration</span></span></span></span></span></span></span></span></span></span>***</span>

<span style="vertical-align: inherit;"><span style="vertical-align: inherit;"><span style="vertical-align: inherit;"><span style="vertical-align: inherit;"><span style="vertical-align: inherit;"><span style="vertical-align: inherit;"><span style="vertical-align: inherit;"><span style="vertical-align: inherit;"><span style="vertical-align: inherit;"><span style="vertical-align: inherit;">Ajustez le fichier que vous venez de copier avec un éditeur de texte de votre choix (par exemple </span></span></span></span></span></span></span></span></span></span>`<span class="pre">vi</span>`<span style="vertical-align: inherit;"><span style="vertical-align: inherit;"><span style="vertical-align: inherit;"><span style="vertical-align: inherit;"><span style="vertical-align: inherit;"><span style="vertical-align: inherit;"><span style="vertical-align: inherit;"><span style="vertical-align: inherit;"><span style="vertical-align: inherit;"><span style="vertical-align: inherit;">ou </span></span></span></span></span></span></span></span></span></span>`<span class="pre">nano</span>`<span style="vertical-align: inherit;"><span style="vertical-align: inherit;"><span style="vertical-align: inherit;"><span style="vertical-align: inherit;"><span style="vertical-align: inherit;"><span style="vertical-align: inherit;"><span style="vertical-align: inherit;"><span style="vertical-align: inherit;"><span style="vertical-align: inherit;"><span style="vertical-align: inherit;">).</span></span></span></span></span></span></span></span></span></span>

```bash
nano /etc/nginx/sites-available/zammad.conf
```

<span style="vertical-align: inherit;"><span style="vertical-align: inherit;"><span style="vertical-align: inherit;"><span style="vertical-align: inherit;"><span style="vertical-align: inherit;"><span style="vertical-align: inherit;"><span style="vertical-align: inherit;"><span style="vertical-align: inherit;"><span style="vertical-align: inherit;"><span style="vertical-align: inherit;">Localisez n'importe quelle </span></span></span></span></span></span></span></span></span></span>`<span class="pre">server_name</span>` <span style="vertical-align: inherit;"><span style="vertical-align: inherit;"><span style="vertical-align: inherit;"><span style="vertical-align: inherit;"><span style="vertical-align: inherit;"><span style="vertical-align: inherit;"><span style="vertical-align: inherit;"><span style="vertical-align: inherit;"><span style="vertical-align: inherit;"><span style="vertical-align: inherit;">directive et ajustez </span></span></span></span></span></span></span></span></span></span>`<span class="pre">example.com</span>` <span style="vertical-align: inherit;"><span style="vertical-align: inherit;"><span style="vertical-align: inherit;"><span style="vertical-align: inherit;"><span style="vertical-align: inherit;"><span style="vertical-align: inherit;"><span style="vertical-align: inherit;"><span style="vertical-align: inherit;"><span style="vertical-align: inherit;"><span style="vertical-align: inherit;">la au sous-domaine que vous avez choisi pour votre instance Zammad.</span></span></span></span></span></span></span></span></span></span>

[![image.png](https://wiki.morbihan-energies.fr/uploads/images/gallery/2023-12/scaled-1680-/77dimage.png)](https://wiki.morbihan-energies.fr/uploads/images/gallery/2023-12/77dimage.png)

<p class="callout warning"><span style="vertical-align: inherit;"><span style="vertical-align: inherit;">Pour que le serveur soit opérationnel, il est important de supprimer toute la partie ssl du fichier de conf étant donné que c'est le proxy qui prendra en charge le ssl.</span></span>[![2023-12-07 10_07_36-Édition Page 02 - Installation _ Wiki Morbihan-Energies.png](https://wiki.morbihan-energies.fr/uploads/images/gallery/2023-12/scaled-1680-/2023-12-07-10-07-36-edition-page-02-installation-wiki-morbihan-energies.png)](https://wiki.morbihan-energies.fr/uploads/images/gallery/2023-12/2023-12-07-10-07-36-edition-page-02-installation-wiki-morbihan-energies.png)</p>

#### <span style="color: rgb(35, 111, 161);">***<span style="vertical-align: inherit;"><span style="vertical-align: inherit;"><span style="vertical-align: inherit;"><span style="vertical-align: inherit;"><span style="vertical-align: inherit;"><span style="vertical-align: inherit;"><span style="vertical-align: inherit;"><span style="vertical-align: inherit;"><span style="vertical-align: inherit;"><span style="vertical-align: inherit;"> Configuration du </span></span></span></span></span></span></span></span></span></span>***</span><span style="color: #236fa1;"><span style="font-size: 23.324px;">***<span style="vertical-align: inherit;"><span style="vertical-align: inherit;"> conteneur</span></span>***</span></span>

<span style="vertical-align: inherit;"><span style="vertical-align: inherit;">Après avoir édité le fichier de configuration de </span></span><span id="bkmrk-zammad"><span style="vertical-align: inherit;"><span style="vertical-align: inherit;">Zammad</span></span></span><span style="vertical-align: inherit;"><span style="vertical-align: inherit;"> , il est nécessaire de modifier également celui du conteneur </span></span><span id="bkmrk-lxc"><span style="vertical-align: inherit;"><span style="vertical-align: inherit;">LXC</span></span></span><span style="vertical-align: inherit;"><span style="vertical-align: inherit;"> .</span></span>

```bash
#Configuration du conteneur LXC
lxc config edit {CT_Name}
```

<span style="vertical-align: inherit;"><span style="vertical-align: inherit;">Une fois dans le fichier de conf, supprimez la ligne "devices \[ \]" et remplacez le par : </span></span>

```bash
devices:
 eth0:
  ipv4.address: {adresse ip du conteneur}
  name: eth0
  network: lxdbr1
  type: nic
port22215:
  connect: tcp:0.0.0.0:22
  listen: tcp:192.168.56.190:22215
  type: proxy
port44215:
  connect: tcp:0.0.0.0:80
  listen: tcp:192.168.56.190:44215
  type: proxy
```

<p class="callout warning"><span style="vertical-align: inherit;"><span style="vertical-align: inherit;">Attention, pensez à bien modifier l'adresse Ip ainsi que les différents ports.</span></span></p>

## <span style="text-decoration: underline; color: rgb(45, 194, 107);">**<span style="vertical-align: inherit;"><span style="vertical-align: inherit;"><span style="vertical-align: inherit;"><span style="vertical-align: inherit;"><span style="vertical-align: inherit;"><span style="vertical-align: inherit;"><span style="vertical-align: inherit;"><span style="vertical-align: inherit;"><span style="vertical-align: inherit;"><span style="vertical-align: inherit;">E - Configuration du Serveur Web :</span></span></span></span></span></span></span></span></span></span>**</span>

<span style="vertical-align: inherit;"><span style="vertical-align: inherit;">Une fois arrivé sur la page ci-dessous, la configuration peut commencer.</span></span>

[![Zammad Web.png](https://wiki.morbihan-energies.fr/uploads/images/gallery/2023-12/scaled-1680-/zammad-web.png)](https://wiki.morbihan-energies.fr/uploads/images/gallery/2023-12/zammad-web.png)

<span style="vertical-align: inherit;"><span style="vertical-align: inherit;">Après avoir cliqué sur "Set ip a new system", il vous faudra créer un compte administrateur.</span></span>

[![02-Compte admin Zammad.png](https://wiki.morbihan-energies.fr/uploads/images/gallery/2023-12/scaled-1680-/02-compte-admin-zammad.png)](https://wiki.morbihan-energies.fr/uploads/images/gallery/2023-12/02-compte-admin-zammad.png)

<span style="vertical-align: inherit;"><span style="vertical-align: inherit;">Ensuite, vous devrez remplir le nom et le logo de l'organisation.</span></span>

[![03-Organisation.png](https://wiki.morbihan-energies.fr/uploads/images/gallery/2023-12/scaled-1680-/mT303-organisation.png)](https://wiki.morbihan-energies.fr/uploads/images/gallery/2023-12/mT303-organisation.png)

<span style="vertical-align: inherit;"><span style="vertical-align: inherit;">Maintenant, vous devrez configurer la notification par e-mail.</span></span>

[![04-Notif Email.png](https://wiki.morbihan-energies.fr/uploads/images/gallery/2023-12/scaled-1680-/04-notif-email.png)](https://wiki.morbihan-energies.fr/uploads/images/gallery/2023-12/04-notif-email.png)

<span style="vertical-align: inherit;"><span style="vertical-align: inherit;">Ici, vous avez le choix de connecter les canaux ou bien de passer afin d'utiliser Zammad au plus vite.</span></span>

[![05-paramétrage des canaux.png](https://wiki.morbihan-energies.fr/uploads/images/gallery/2023-12/scaled-1680-/05-parametrage-canaux.png)](https://wiki.morbihan-energies.fr/uploads/images/gallery/2023-12/05-parametrage-canaux.png)

<span style="vertical-align: inherit;"><span style="vertical-align: inherit;">Si vous choisissez de connecter les canaux, vous devrez remplir le compte email.</span></span>

[![06- E-mail.png](https://wiki.morbihan-energies.fr/uploads/images/gallery/2023-12/scaled-1680-/06-email.png)](https://wiki.morbihan-energies.fr/uploads/images/gallery/2023-12/06-email.png)

<span style="vertical-align: inherit;"><span style="vertical-align: inherit;">Puis pour finir, vous devrez remplir l'email entrant.</span></span>

[![07-Email participant.png](https://wiki.morbihan-energies.fr/uploads/images/gallery/2023-12/scaled-1680-/07-email-entrant.png)](https://wiki.morbihan-energies.fr/uploads/images/gallery/2023-12/07-email-entrant.png)

<span style="vertical-align: inherit;"><span style="vertical-align: inherit;">Une fois toutes ces étapes finies, l'installation de votre Zammad est terminée et vous n'avez plus cas l'utiliser !</span></span>

# 03 - Exploitation

## <span style="text-decoration: underline; color: rgb(45, 194, 107);">**<span style="vertical-align: inherit;"><span style="vertical-align: inherit;"><span style="vertical-align: inherit;"><span style="vertical-align: inherit;"><span style="vertical-align: inherit;"><span style="vertical-align: inherit;"><span style="vertical-align: inherit;"><span style="vertical-align: inherit;"><span style="vertical-align: inherit;"><span style="vertical-align: inherit;"><span style="vertical-align: inherit;"><span style="vertical-align: inherit;">A-Interface :</span></span></span></span></span></span></span></span></span></span></span></span>**</span>

<span style="vertical-align: inherit;"><span style="vertical-align: inherit;"><span style="vertical-align: inherit;"><span style="vertical-align: inherit;"><span style="vertical-align: inherit;"><span style="vertical-align: inherit;"><span style="vertical-align: inherit;"><span style="vertical-align: inherit;"><span style="vertical-align: inherit;"><span style="vertical-align: inherit;"><span style="vertical-align: inherit;"><span style="vertical-align: inherit;">Après avoir installé Zammad, pour utiliser ses nombreuses fonctionnalités, vous devrez dans un premier temps vous connecter avec les identifiants créés au préalable.</span></span></span></span></span></span></span></span></span></span></span></span>

[![01-Connexions.png](https://wiki.morbihan-energies.fr/uploads/images/gallery/2023-12/scaled-1680-/01-connexions.png)](https://wiki.morbihan-energies.fr/uploads/images/gallery/2023-12/01-connexions.png)

<span style="vertical-align: inherit;"><span style="vertical-align: inherit;"><span style="vertical-align: inherit;"><span style="vertical-align: inherit;"><span style="vertical-align: inherit;"><span style="vertical-align: inherit;"><span style="vertical-align: inherit;"><span style="vertical-align: inherit;"><span style="vertical-align: inherit;"><span style="vertical-align: inherit;"><span style="vertical-align: inherit;"><span style="vertical-align: inherit;">Après vous être connecté, vous arriverez sur l'interface ci-dessous : </span></span></span></span></span></span></span></span></span></span></span></span>

[![02-Interface Web.png](https://wiki.morbihan-energies.fr/uploads/images/gallery/2023-12/scaled-1680-/02-interface-web.png)](https://wiki.morbihan-energies.fr/uploads/images/gallery/2023-12/02-interface-web.png)

<span id="bkmrk-01--%C2%A0le-point-num%C3%A9ro-1"><span id="bkmrk-01-"><span style="vertical-align: inherit;"><span style="vertical-align: inherit;"><span style="vertical-align: inherit;"><span style="vertical-align: inherit;"><span style="vertical-align: inherit;"><span style="vertical-align: inherit;"><span style="vertical-align: inherit;"><span style="vertical-align: inherit;"><span style="vertical-align: inherit;"><span style="vertical-align: inherit;"><span style="vertical-align: inherit;"><span style="vertical-align: inherit;">01-</span></span></span></span></span></span></span></span></span></span></span></span></span><span style="vertical-align: inherit;"><span style="vertical-align: inherit;"><span style="vertical-align: inherit;"><span style="vertical-align: inherit;"><span style="vertical-align: inherit;"><span style="vertical-align: inherit;"><span style="vertical-align: inherit;"><span style="vertical-align: inherit;"><span style="vertical-align: inherit;"><span style="vertical-align: inherit;"><span style="vertical-align: inherit;"><span style="vertical-align: inherit;"> Le point numéro 1 permet la création de ticket.</span></span></span></span></span></span></span></span></span></span></span></span></span>

<span id="bkmrk-02--%C2%A0la-page-aper%C3%A7ue-1"><span class="s-rg" id="bkmrk-02-"><span style="vertical-align: inherit;"><span style="vertical-align: inherit;"><span style="vertical-align: inherit;"><span style="vertical-align: inherit;"><span style="vertical-align: inherit;"><span style="vertical-align: inherit;"><span style="vertical-align: inherit;"><span style="vertical-align: inherit;"><span style="vertical-align: inherit;"><span style="vertical-align: inherit;"><span style="vertical-align: inherit;"><span style="vertical-align: inherit;">02-</span></span></span></span></span></span></span></span></span></span></span></span></span><span style="vertical-align: inherit;"><span style="vertical-align: inherit;"><span style="vertical-align: inherit;"><span style="vertical-align: inherit;"><span style="vertical-align: inherit;"><span style="vertical-align: inherit;"><span style="vertical-align: inherit;"><span style="vertical-align: inherit;"><span style="vertical-align: inherit;"><span style="vertical-align: inherit;"><span style="vertical-align: inherit;"><span style="vertical-align: inherit;"> La page aperçue est une page qui permet de voir l'ensemble des tickets de manière classée </span></span></span></span></span></span></span></span></span></span></span></span></span>

<span id="bkmrk-03--%C2%A0comme-on-peut-l-1"><span class="s-rg" id="bkmrk-03-"><span style="vertical-align: inherit;"><span style="vertical-align: inherit;"><span style="vertical-align: inherit;"><span style="vertical-align: inherit;"><span style="vertical-align: inherit;"><span style="vertical-align: inherit;"><span style="vertical-align: inherit;"><span style="vertical-align: inherit;"><span style="vertical-align: inherit;"><span style="vertical-align: inherit;"><span style="vertical-align: inherit;"><span style="vertical-align: inherit;">03-</span></span></span></span></span></span></span></span></span></span></span></span></span><span style="vertical-align: inherit;"><span style="vertical-align: inherit;"><span style="vertical-align: inherit;"><span style="vertical-align: inherit;"><span style="vertical-align: inherit;"><span style="vertical-align: inherit;"><span style="vertical-align: inherit;"><span style="vertical-align: inherit;"><span style="vertical-align: inherit;"><span style="vertical-align: inherit;"><span style="vertical-align: inherit;"><span style="vertical-align: inherit;"> Comme on peut le voir ci-dessus le point numéro 3 est le tableau de bord, il permet de voir statistiques différentes de la gestion des tickets.</span></span></span></span></span></span></span></span></span></span></span></span></span><span id="bkmrk-%C2%A0%C2%A0"> </span>

<span id="bkmrk-04-le-point-4-est-le-1"><span style="vertical-align: inherit;"><span style="vertical-align: inherit;"><span style="vertical-align: inherit;"><span style="vertical-align: inherit;"><span style="vertical-align: inherit;"><span style="vertical-align: inherit;"><span style="vertical-align: inherit;"><span style="vertical-align: inherit;"><span style="vertical-align: inherit;"><span style="vertical-align: inherit;"><span style="vertical-align: inherit;"><span style="vertical-align: inherit;">04-Le point 4 est le flux d'activité, il permet de voir les différentes actions qui ont été faites comme la création d'un utilisateur ou d'un ticket.</span></span></span></span></span></span></span></span></span></span></span></span></span>

<span id="bkmrk-05--%C2%A0le-point-num%C3%A9ro-1"><span class="s-rg" id="bkmrk-05-"><span style="vertical-align: inherit;"><span style="vertical-align: inherit;"><span style="vertical-align: inherit;"><span style="vertical-align: inherit;"><span style="vertical-align: inherit;"><span style="vertical-align: inherit;"><span style="vertical-align: inherit;"><span style="vertical-align: inherit;"><span style="vertical-align: inherit;"><span style="vertical-align: inherit;"><span style="vertical-align: inherit;"><span style="vertical-align: inherit;">05-</span></span></span></span></span></span></span></span></span></span></span></span></span><span style="vertical-align: inherit;"><span style="vertical-align: inherit;"><span style="vertical-align: inherit;"><span style="vertical-align: inherit;"><span style="vertical-align: inherit;"><span style="vertical-align: inherit;"><span style="vertical-align: inherit;"><span style="vertical-align: inherit;"><span style="vertical-align: inherit;"><span style="vertical-align: inherit;"><span style="vertical-align: inherit;"><span style="vertical-align: inherit;"> Le point numéro 5 définit l'emplacement des paramètres.</span></span></span></span></span></span></span></span></span></span></span></span></span>

<span id="bkmrk-06--%C2%A0en-6%2C-vous-pour-1"><span class="s-rg" id="bkmrk-06-"><span style="vertical-align: inherit;"><span style="vertical-align: inherit;"><span style="vertical-align: inherit;"><span style="vertical-align: inherit;"><span style="vertical-align: inherit;"><span style="vertical-align: inherit;"><span style="vertical-align: inherit;"><span style="vertical-align: inherit;"><span style="vertical-align: inherit;"><span style="vertical-align: inherit;"><span style="vertical-align: inherit;"><span style="vertical-align: inherit;">06-</span></span></span></span></span></span></span></span></span></span></span></span></span><span style="vertical-align: inherit;"><span style="vertical-align: inherit;"><span style="vertical-align: inherit;"><span style="vertical-align: inherit;"><span style="vertical-align: inherit;"><span style="vertical-align: inherit;"><span style="vertical-align: inherit;"><span style="vertical-align: inherit;"><span style="vertical-align: inherit;"><span style="vertical-align: inherit;"><span style="vertical-align: inherit;"><span style="vertical-align: inherit;"> En 6, vous pourrez voir les statistiques des différents tickets de la création à la fermeture.</span></span></span></span></span></span></span></span></span></span></span></span></span>

<span id="bkmrk-07--%C2%A0le-point-7-vous-1"><span id="bkmrk-07-"><span style="vertical-align: inherit;"><span style="vertical-align: inherit;"><span style="vertical-align: inherit;"><span style="vertical-align: inherit;"><span style="vertical-align: inherit;"><span style="vertical-align: inherit;"><span style="vertical-align: inherit;"><span style="vertical-align: inherit;"><span style="vertical-align: inherit;"><span style="vertical-align: inherit;"><span style="vertical-align: inherit;"><span style="vertical-align: inherit;">07-</span></span></span></span></span></span></span></span></span></span></span></span></span><span style="vertical-align: inherit;"><span style="vertical-align: inherit;"><span style="vertical-align: inherit;"><span style="vertical-align: inherit;"><span style="vertical-align: inherit;"><span style="vertical-align: inherit;"><span style="vertical-align: inherit;"><span style="vertical-align: inherit;"><span style="vertical-align: inherit;"><span style="vertical-align: inherit;"><span style="vertical-align: inherit;"><span style="vertical-align: inherit;"> Le point 7 vous permettra de personnaliser votre profil.</span></span></span></span></span></span></span></span></span></span></span></span></span>

## <span style="text-decoration: underline; color: rgb(45, 194, 107);">**<span style="vertical-align: inherit;"><span style="vertical-align: inherit;"><span style="vertical-align: inherit;"><span style="vertical-align: inherit;"><span style="vertical-align: inherit;"><span style="vertical-align: inherit;"><span style="vertical-align: inherit;"><span style="vertical-align: inherit;"><span style="vertical-align: inherit;"><span style="vertical-align: inherit;"><span style="vertical-align: inherit;"><span style="vertical-align: inherit;">B - Création d'un Utilisateur :</span></span></span></span></span></span></span></span></span></span></span></span>**</span>

<span style="vertical-align: inherit;"><span style="vertical-align: inherit;"><span style="vertical-align: inherit;"><span style="vertical-align: inherit;"><span style="vertical-align: inherit;"><span style="vertical-align: inherit;"><span style="vertical-align: inherit;"><span style="vertical-align: inherit;"><span style="vertical-align: inherit;"><span style="vertical-align: inherit;"><span style="vertical-align: inherit;"><span style="vertical-align: inherit;">Pour créer un utilisateur, vous devrez tout d'abord aller dans les paramètres situés en bas à gauche de votre interface.</span></span></span></span></span></span></span></span></span></span></span></span>

[![03- Paramètre.png](https://wiki.morbihan-energies.fr/uploads/images/gallery/2023-12/scaled-1680-/03-parametre.png)](https://wiki.morbihan-energies.fr/uploads/images/gallery/2023-12/03-parametre.png)

<span style="vertical-align: inherit;"><span style="vertical-align: inherit;"><span style="vertical-align: inherit;"><span style="vertical-align: inherit;"><span style="vertical-align: inherit;"><span style="vertical-align: inherit;"><span style="vertical-align: inherit;"><span style="vertical-align: inherit;"><span style="vertical-align: inherit;"><span style="vertical-align: inherit;"><span style="vertical-align: inherit;"><span style="vertical-align: inherit;">Une fois dans cette interface, vous n'aurez plus cas cliquer sur "Nouvel Utilisateur".</span></span></span></span></span></span></span></span></span></span></span></span>

[![04- Nouvel utilisateur.png](https://wiki.morbihan-energies.fr/uploads/images/gallery/2023-12/scaled-1680-/04-nouvel-utilisateur.png)](https://wiki.morbihan-energies.fr/uploads/images/gallery/2023-12/04-nouvel-utilisateur.png)

<span style="vertical-align: inherit;"><span style="vertical-align: inherit;"><span style="vertical-align: inherit;"><span style="vertical-align: inherit;"><span style="vertical-align: inherit;"><span style="vertical-align: inherit;"><span style="vertical-align: inherit;"><span style="vertical-align: inherit;"><span style="vertical-align: inherit;"><span style="vertical-align: inherit;"><span style="vertical-align: inherit;"><span style="vertical-align: inherit;">Après cela, vous n'avez plus cas définir les informations ainsi que les autorisations qu'il va avoir.</span></span></span></span></span></span></span></span></span></span></span></span>

[![05- Rôle.png](https://wiki.morbihan-energies.fr/uploads/images/gallery/2023-12/scaled-1680-/05-role.png)](https://wiki.morbihan-energies.fr/uploads/images/gallery/2023-12/05-role.png)

## <span style="text-decoration: underline; color: rgb(45, 194, 107);">**<span style="vertical-align: inherit;"><span style="vertical-align: inherit;"><span style="vertical-align: inherit;"><span style="vertical-align: inherit;"><span style="vertical-align: inherit;"><span style="vertical-align: inherit;"><span style="vertical-align: inherit;"><span style="vertical-align: inherit;"><span style="vertical-align: inherit;"><span style="vertical-align: inherit;"><span style="vertical-align: inherit;"><span style="vertical-align: inherit;">C - Création de ticket :</span></span></span></span></span></span></span></span></span></span></span></span>**</span>

<span style="vertical-align: inherit;"><span style="vertical-align: inherit;"><span style="vertical-align: inherit;"><span style="vertical-align: inherit;"><span style="vertical-align: inherit;"><span style="vertical-align: inherit;"><span style="vertical-align: inherit;"><span style="vertical-align: inherit;"><span style="vertical-align: inherit;"><span style="vertical-align: inherit;"><span style="vertical-align: inherit;"><span style="vertical-align: inherit;">Pour créer un ticket, il vous suffit de cliquer sur la croix verte en bas à droite de l'interface de Zammad.</span></span></span></span></span></span></span></span></span></span></span></span>

[![06-Billet de création.png](https://wiki.morbihan-energies.fr/uploads/images/gallery/2023-12/scaled-1680-/06-creation-ticket.png)](https://wiki.morbihan-energies.fr/uploads/images/gallery/2023-12/06-creation-ticket.png)

<span style="vertical-align: inherit;"><span style="vertical-align: inherit;"><span style="vertical-align: inherit;"><span style="vertical-align: inherit;"><span style="vertical-align: inherit;"><span style="vertical-align: inherit;"><span style="vertical-align: inherit;"><span style="vertical-align: inherit;"><span style="vertical-align: inherit;"><span style="vertical-align: inherit;"><span style="vertical-align: inherit;"><span style="vertical-align: inherit;">Vous arriverez ensuite sur l'interface ci-dessous ou il vous suffira de remplir votre ticket.</span></span></span></span></span></span></span></span></span></span></span></span>

[![07- Paramètre tcket.png](https://wiki.morbihan-energies.fr/uploads/images/gallery/2023-12/scaled-1680-/07-parametre-tcket.png)](https://wiki.morbihan-energies.fr/uploads/images/gallery/2023-12/07-parametre-tcket.png)

## <span style="text-decoration: underline; color: rgb(45, 194, 107);">**<span style="vertical-align: inherit;"><span style="vertical-align: inherit;"><span style="vertical-align: inherit;"><span style="vertical-align: inherit;"><span style="vertical-align: inherit;"><span style="vertical-align: inherit;"><span style="vertical-align: inherit;"><span style="vertical-align: inherit;"><span style="vertical-align: inherit;"><span style="vertical-align: inherit;"><span style="vertical-align: inherit;"><span style="vertical-align: inherit;">D - Gestion des billets :</span></span></span></span></span></span></span></span></span></span></span></span>**</span>

<span style="vertical-align: inherit;"><span style="vertical-align: inherit;"><span style="vertical-align: inherit;"><span style="vertical-align: inherit;"><span style="vertical-align: inherit;"><span style="vertical-align: inherit;"><span style="vertical-align: inherit;"><span style="vertical-align: inherit;"><span style="vertical-align: inherit;"><span style="vertical-align: inherit;"><span style="vertical-align: inherit;"><span style="vertical-align: inherit;">Pour gérer les différents tickets, vous devez aller dans l'onglet aperçu et vous pourrez y voir l'intégralité des tickets qui sont créés.</span></span></span></span></span></span></span></span></span></span></span></span>

[![08- Gestion de ticket.png](https://wiki.morbihan-energies.fr/uploads/images/gallery/2023-12/scaled-1680-/08-gestion-de-ticket.png)](https://wiki.morbihan-energies.fr/uploads/images/gallery/2023-12/08-gestion-de-ticket.png)

<span style="vertical-align: inherit;"><span style="vertical-align: inherit;"><span style="vertical-align: inherit;"><span style="vertical-align: inherit;"><span style="vertical-align: inherit;"><span style="vertical-align: inherit;"><span style="vertical-align: inherit;"><span style="vertical-align: inherit;"><span style="vertical-align: inherit;"><span style="vertical-align: inherit;">Une fois le ticket visible, vous pouvez cliquer dessus pour l'ouvrir. </span></span></span></span></span></span></span></span></span><span style="vertical-align: inherit;"><span style="vertical-align: inherit;"><span style="vertical-align: inherit;"><span style="vertical-align: inherit;"><span style="vertical-align: inherit;"><span style="vertical-align: inherit;"><span style="vertical-align: inherit;"><span style="vertical-align: inherit;"><span style="vertical-align: inherit;">Sur la partie de droite, vous pouvez indiquer qui est le propriétaire du ticket, l'état du ticket ainsi que sa priorité.</span></span></span></span></span></span></span></span></span></span>

[![image.png](https://wiki.morbihan-energies.fr/uploads/images/gallery/2023-12/scaled-1680-/28bimage.png)](https://wiki.morbihan-energies.fr/uploads/images/gallery/2023-12/28bimage.png)

<span style="vertical-align: inherit;"><span style="vertical-align: inherit;"><span style="vertical-align: inherit;"><span style="vertical-align: inherit;"><span style="vertical-align: inherit;"><span style="vertical-align: inherit;"><span style="vertical-align: inherit;"><span style="vertical-align: inherit;"><span style="vertical-align: inherit;"><span style="vertical-align: inherit;">Lorsque vous cliquez sur la zone de texte, vous avez la possibilité d'envoyer un message ou bien de créer une note. </span></span></span></span></span></span></span></span></span><span style="vertical-align: inherit;"><span style="vertical-align: inherit;"><span style="vertical-align: inherit;"><span style="vertical-align: inherit;"><span style="vertical-align: inherit;"><span style="vertical-align: inherit;"><span style="vertical-align: inherit;"><span style="vertical-align: inherit;"><span style="vertical-align: inherit;">Si vous voulez que votre message soit visible par le créateur du ticket, il faut que les chaînes de gauche soient déverrouillées, dans le cas contraire, le message aura une lueur orange et ne pourra pas être vu par le client.</span></span></span></span></span></span></span></span></span></span>

[![image.png](https://wiki.morbihan-energies.fr/uploads/images/gallery/2023-12/scaled-1680-/FIiimage.png)](https://wiki.morbihan-energies.fr/uploads/images/gallery/2023-12/FIiimage.png)

## <span style="text-decoration: underline; color: rgb(45, 194, 107);">**<span style="vertical-align: inherit;"><span style="vertical-align: inherit;"><span style="vertical-align: inherit;"><span style="vertical-align: inherit;"><span style="vertical-align: inherit;"><span style="vertical-align: inherit;"><span style="vertical-align: inherit;"><span style="vertical-align: inherit;"><span style="vertical-align: inherit;"><span style="vertical-align: inherit;"><span style="vertical-align: inherit;"><span style="vertical-align: inherit;">E - Création des Organisations :</span></span></span></span></span></span></span></span></span></span></span></span>**</span>

### <span style="color: rgb(53, 152, 219);">**<span style="vertical-align: inherit;"><span style="vertical-align: inherit;"><span style="vertical-align: inherit;"><span style="vertical-align: inherit;"><span style="vertical-align: inherit;"><span style="vertical-align: inherit;"><span style="vertical-align: inherit;"><span style="vertical-align: inherit;">1. Création de l'organisation</span></span></span></span></span></span></span></span>**</span>

<span style="vertical-align: inherit;"><span style="vertical-align: inherit;"><span style="vertical-align: inherit;"><span style="vertical-align: inherit;"><span style="vertical-align: inherit;"><span style="vertical-align: inherit;">En allant dans les paramètres de Zammad, vous avez un onglet nommé organisations. </span></span></span></span></span><span style="vertical-align: inherit;"><span style="vertical-align: inherit;"><span style="vertical-align: inherit;"><span style="vertical-align: inherit;"><span style="vertical-align: inherit;">Cet onglet vous permet de créer des organisations qui peuvent être ajoutées à différents utilisateurs. </span></span></span></span></span><span style="vertical-align: inherit;"><span style="vertical-align: inherit;"><span style="vertical-align: inherit;"><span style="vertical-align: inherit;"><span style="vertical-align: inherit;">Pour cela a commencé par cliquer sur l'onglet "Nouvelle Organisation".</span></span></span></span></span></span>

[![image.png](https://wiki.morbihan-energies.fr/uploads/images/gallery/2023-12/scaled-1680-/1sJimage.png)](https://wiki.morbihan-energies.fr/uploads/images/gallery/2023-12/1sJimage.png)

<span style="vertical-align: inherit;"><span style="vertical-align: inherit;"><span style="vertical-align: inherit;"><span style="vertical-align: inherit;"><span style="vertical-align: inherit;"><span style="vertical-align: inherit;">Vous arriverez ensuite sur l'interface ci-dessous ou vous pourrez remplir les paramètres de votre organisation. </span></span></span></span></span><span style="vertical-align: inherit;"><span style="vertical-align: inherit;"><span style="vertical-align: inherit;"><span style="vertical-align: inherit;"><span style="vertical-align: inherit;">Pour valider vos organisations, vous n'aurez plus cas, cliquez sur envoyer.</span></span></span></span></span></span>

[![image.png](https://wiki.morbihan-energies.fr/uploads/images/gallery/2023-12/scaled-1680-/zDpimage.png)](https://wiki.morbihan-energies.fr/uploads/images/gallery/2023-12/zDpimage.png)

### <span style="color: rgb(53, 152, 219);">**<span style="vertical-align: inherit;"><span style="vertical-align: inherit;"><span style="vertical-align: inherit;"><span style="vertical-align: inherit;"><span style="vertical-align: inherit;"><span style="vertical-align: inherit;">2. </span></span></span></span></span></span>**<span style="color: #3598db;"><span style="font-size: 32.662px;">**<span style="vertical-align: inherit;"><span style="vertical-align: inherit;"><span style="vertical-align: inherit;"><span style="vertical-align: inherit;"><span style="vertical-align: inherit;"><span style="vertical-align: inherit;">Attribution</span></span></span></span></span></span>**</span></span>**<span style="vertical-align: inherit;"><span style="vertical-align: inherit;"><span style="vertical-align: inherit;"><span style="vertical-align: inherit;"><span style="vertical-align: inherit;"><span style="vertical-align: inherit;"> de l'organisation</span></span></span></span></span></span>**</span>

<span style="vertical-align: inherit;"><span style="vertical-align: inherit;"><span style="vertical-align: inherit;"><span style="vertical-align: inherit;"><span style="vertical-align: inherit;"><span style="vertical-align: inherit;">Une fois créé, vous pouvez affecter un utilisateur à votre organisation. </span></span></span></span></span><span style="vertical-align: inherit;"><span style="vertical-align: inherit;"><span style="vertical-align: inherit;"><span style="vertical-align: inherit;"><span style="vertical-align: inherit;">Pour cela, allez dans les paramètres puis dans l'onglet utilisateur, cliquez sur votre utilisateur.</span></span></span></span></span></span>

[![image.png](https://wiki.morbihan-energies.fr/uploads/images/gallery/2023-12/scaled-1680-/JEUimage.png)](https://wiki.morbihan-energies.fr/uploads/images/gallery/2023-12/JEUimage.png)

<span style="vertical-align: inherit;"><span style="vertical-align: inherit;"><span style="vertical-align: inherit;"><span style="vertical-align: inherit;"><span style="vertical-align: inherit;"><span style="vertical-align: inherit;">Une fois dans l'interface ci-dessous complétée l'onglet "Organisation" avec le nom de l'organisation créée au paravent. </span></span></span></span></span></span>

[![image.png](https://wiki.morbihan-energies.fr/uploads/images/gallery/2023-12/scaled-1680-/IGCimage.png)](https://wiki.morbihan-energies.fr/uploads/images/gallery/2023-12/IGCimage.png)

<span style="vertical-align: inherit;"><span style="vertical-align: inherit;"><span style="vertical-align: inherit;"><span style="vertical-align: inherit;"><span style="vertical-align: inherit;"><span style="vertical-align: inherit;">Une fois ajouter votre utilisateur sera ajouter à l'organisation et cela sera précisé dans son profil utilisateur.</span></span></span></span></span></span>

## <span style="text-decoration: underline; color: rgb(45, 194, 107);">**<span style="vertical-align: inherit;"><span style="vertical-align: inherit;"><span style="vertical-align: inherit;"><span style="vertical-align: inherit;"><span style="vertical-align: inherit;"><span style="vertical-align: inherit;"><span style="vertical-align: inherit;"><span style="vertical-align: inherit;"><span style="vertical-align: inherit;"><span style="vertical-align: inherit;">F - Configuration de Zammad :</span></span></span></span></span></span></span></span></span></span>**</span>

<span style="vertical-align: inherit;"><span style="vertical-align: inherit;">Pour les étapes suivantes, nous avons le service Infra, DEV et SIG qui doivent recevoir leurs tickets. Chaque service doit pouvoir attribuer un ticket à l'un de ses membres, ils doivent également pouvoir déléguer un ticket à un autre service.</span></span>

### <span style="color: rgb(53, 152, 219);">**<span style="vertical-align: inherit;"><span style="vertical-align: inherit;"><span style="vertical-align: inherit;"><span style="vertical-align: inherit;"><span style="vertical-align: inherit;"><span style="vertical-align: inherit;">1.Groupe</span></span></span></span></span></span>**</span>

<span style="vertical-align: inherit;"><span style="vertical-align: inherit;">Pour commencer, il faut tout d'abord créer un groupe avec les différents services.</span></span>

#### <span style="color: rgb(35, 111, 161);">***<span style="vertical-align: inherit;"><span style="vertical-align: inherit;">Création des groupes 1</span></span>***</span>

<span style="vertical-align: inherit;"><span style="vertical-align: inherit;">Dans un 1er temps, vous allez créer un premier groupe de service, vous devrez vous rendre dans l'onglet "Groupe" situé dans les paramètres. Vous devrez ensuite cliquer sur un nouveau groupe.</span></span>

[![image.png](https://wiki.morbihan-energies.fr/uploads/images/gallery/2023-12/scaled-1680-/ke4image.png)](https://wiki.morbihan-energies.fr/uploads/images/gallery/2023-12/ke4image.png)

<span style="vertical-align: inherit;"><span style="vertical-align: inherit;"><span style="vertical-align: inherit;"><span style="vertical-align: inherit;"><span style="vertical-align: inherit;"><span style="vertical-align: inherit;">Une fois dans l'interface ci-dessous, vous n'aurez plus cas nommé votre manager et le créé.</span></span></span></span></span></span>

[![image.png](https://wiki.morbihan-energies.fr/uploads/images/gallery/2023-12/scaled-1680-/Qw0image.png)](https://wiki.morbihan-energies.fr/uploads/images/gallery/2023-12/Qw0image.png)

<span style="vertical-align: inherit;"><span style="vertical-align: inherit;">Une fois votre premier service créé, vous n'avez plus cas faire la même chose pour les autres.</span></span>

#### <span style="color: rgb(35, 111, 161);">***<span style="vertical-align: inherit;"><span style="vertical-align: inherit;">Ajout d'utilisateur dans le groupe 2</span></span>***</span>

<span id="bkmrk-si-vous-souhaitez-aj"><span style="vertical-align: inherit;"><span style="vertical-align: inherit;">Si vous souhaitez ajouter un utilisateur au groupe, vous devrez vous diriger dans l'onglet utilisateur cliqué sur l'utilisateur.</span></span></span><span id="bkmrk-%C2%A0vous-arriverez-ensu"><span style="vertical-align: inherit;"><span style="vertical-align: inherit;"> Vous arriverez ensuite sur l'utilisateur. interface ci-dessous ou vous n'aurez plus </span></span><span class="s-bl" id="bkmrk-cas-choisir"><span style="vertical-align: inherit;"><span style="vertical-align: inherit;">cas choisir</span></span></span><span style="vertical-align: inherit;"><span style="vertical-align: inherit;"> le groupe a associer et les permissions accordées, dans notre cas toutes les permissions au groupe. </span></span></span><span id="bkmrk-%C2%A0n%27oubliez-pas-de-cl"><span style="vertical-align: inherit;"><span style="vertical-align: inherit;"> N'oubliez pas de cliquer sur ajouter pour enregistrer !</span></span></span>

[![image.png](https://wiki.morbihan-energies.fr/uploads/images/gallery/2023-12/scaled-1680-/RWbimage.png)](https://wiki.morbihan-energies.fr/uploads/images/gallery/2023-12/RWbimage.png)

#### <span style="color: rgb(35, 111, 161);"><span style="color: #236fa1;"><span style="font-size: 23.324px;">***<span style="vertical-align: inherit;"><span style="vertical-align: inherit;">Délégation de tâche</span></span>***</span></span>***<span style="vertical-align: inherit;"><span style="vertical-align: inherit;"> 3</span></span>***</span>

<span style="vertical-align: inherit;"><span style="vertical-align: inherit;">Afin que chaque groupe puisse se transférer des billets, il est important qu'un opérateur possède des droits sur chaque groupe. Des permissions "totale" dans le groupe de son service et seulement les autorisations de modification pour les autres services.</span></span>

[![image.png](https://wiki.morbihan-energies.fr/uploads/images/gallery/2023-12/scaled-1680-/hCzimage.png)](https://wiki.morbihan-energies.fr/uploads/images/gallery/2023-12/hCzimage.png)

<span style="vertical-align: inherit;"><span style="vertical-align: inherit;">On peut voir ici que cet utilisateur fait partie du service Infra.</span></span>

### <span style="color: rgb(53, 152, 219);">**<span style="vertical-align: inherit;"><span style="vertical-align: inherit;"><span style="vertical-align: inherit;"><span style="vertical-align: inherit;"><span style="vertical-align: inherit;"><span style="vertical-align: inherit;">2. Rôles</span></span></span></span></span></span>**</span>

<span style="vertical-align: inherit;"><span style="vertical-align: inherit;">Par défaut dans Zammad, il y a 3 rôles :</span></span>

- <span style="vertical-align: inherit;"><span style="vertical-align: inherit;">Administrateur</span></span>
- <span style="vertical-align: inherit;"><span style="vertical-align: inherit;">Opérateur </span></span>
- <span style="vertical-align: inherit;"><span style="vertical-align: inherit;">Client</span></span>

<span style="vertical-align: inherit;"><span style="vertical-align: inherit;">Ici pour chaque membre des services Ifra, DEV et SIG nous allons leur mettre des droits d'opérateur afin qu'ils puissent gérer leur ticket.</span></span>

#### <span style="color: rgb(35, 111, 161);">***<span style="vertical-align: inherit;"><span style="vertical-align: inherit;">Création des Rôles 1</span></span>***</span>

<span style="vertical-align: inherit;"><span style="vertical-align: inherit;"><span style="vertical-align: inherit;"><span style="vertical-align: inherit;">Dans notre cas, les rôles fournis par Zammad ne seront pas suffisants, c'est pour cela que nous allons commencer par dupliquer 2 fois le rôle "Opérateur". </span></span></span><span style="vertical-align: inherit;"><span style="vertical-align: inherit;"><span style="vertical-align: inherit;">Pour dupliquer un rôle allez dans l'onglet rôle et sélectionnez le logo de droite.</span></span></span></span>

[![image.png](https://wiki.morbihan-energies.fr/uploads/images/gallery/2023-12/scaled-1680-/ApYimage.png)](https://wiki.morbihan-energies.fr/uploads/images/gallery/2023-12/ApYimage.png)

<span style="vertical-align: inherit;"><span style="vertical-align: inherit;"><span style="vertical-align: inherit;"><span style="vertical-align: inherit;">Une fois dupliquer, vous pouvez les renommées en cliquant dessus et en modifiant simplement le nom.</span></span></span></span>

#### <span style="color: rgb(35, 111, 161);">***<span style="vertical-align: inherit;"><span style="vertical-align: inherit;"><span style="vertical-align: inherit;"><span style="vertical-align: inherit;">Ajout des droits opérateur 2</span></span></span></span>***</span>

<span id="bkmrk-une-fois-nos-3-r%C3%B4les-1"><span style="vertical-align: inherit;"><span style="vertical-align: inherit;"><span style="vertical-align: inherit;"><span style="vertical-align: inherit;">Une fois nos 3 rôles créés, il faut ajouter les utilisateurs. </span></span></span></span></span><span id="bkmrk-%C2%A0pour-cela%2C-allez-au"><span style="vertical-align: inherit;"><span style="vertical-align: inherit;"><span style="vertical-align: inherit;"><span style="vertical-align: inherit;"> Pour cela, allez au même endroit que pour associer un groupe et ajouter l'opérateur à son service.</span></span></span></span></span><span id="bkmrk-%C2%A0-12"> </span>

[![image.png](https://wiki.morbihan-energies.fr/uploads/images/gallery/2023-12/scaled-1680-/RdJimage.png)](https://wiki.morbihan-energies.fr/uploads/images/gallery/2023-12/RdJimage.png)

<span style="vertical-align: inherit;"><span style="vertical-align: inherit;"><span style="vertical-align: inherit;"><span style="vertical-align: inherit;">On peut voir ici que l'opérateur fait partie du groupe SIG.</span></span></span></span>

### <span style="color: rgb(53, 152, 219);">**<span style="vertical-align: inherit;"><span style="vertical-align: inherit;"><span style="vertical-align: inherit;"><span style="vertical-align: inherit;"><span style="vertical-align: inherit;"><span style="vertical-align: inherit;"><span style="vertical-align: inherit;"><span style="vertical-align: inherit;">3. Aperçu</span></span></span></span></span></span></span></span>**</span>

<span style="vertical-align: inherit;"><span style="vertical-align: inherit;"><span style="vertical-align: inherit;"><span style="vertical-align: inherit;">Si ce n'est pas déjà le cas, vous devrez ajouter vos différents rôles au aperçu afin que chaque rôle puisse voir les différentes catégories de ticket. </span></span></span><span style="vertical-align: inherit;"><span style="vertical-align: inherit;"><span style="vertical-align: inherit;">Pour cela aller dans l'onglet "Aperçu" et sélectionné les 3 petits points, vous n'aurez plus cas ajouter les différents rôles.</span></span></span></span>

[![image.png](https://wiki.morbihan-energies.fr/uploads/images/gallery/2023-12/scaled-1680-/SP9image.png)](https://wiki.morbihan-energies.fr/uploads/images/gallery/2023-12/SP9image.png)

### <span style="color: rgb(53, 152, 219);">**<span style="vertical-align: inherit;"><span style="vertical-align: inherit;"><span style="vertical-align: inherit;"><span style="vertical-align: inherit;"><span style="vertical-align: inherit;"><span style="vertical-align: inherit;"><span style="vertical-align: inherit;"><span style="vertical-align: inherit;">4. Vérification</span></span></span></span></span></span></span></span>**</span>

<span style="vertical-align: inherit;"><span style="vertical-align: inherit;"><span style="vertical-align: inherit;"><span style="vertical-align: inherit;">Après ces différentes étapes, quand vous vous rendez dans les paramètres d'un utilisateur, vous devriez avoir ceci.</span></span></span></span>

[![image.png](https://wiki.morbihan-energies.fr/uploads/images/gallery/2023-12/scaled-1680-/INkimage.png)](https://wiki.morbihan-energies.fr/uploads/images/gallery/2023-12/INkimage.png)

<span style="vertical-align: inherit;"><span style="vertical-align: inherit;"><span style="vertical-align: inherit;"><span style="vertical-align: inherit;">Si c'est le cas, vos 3 services sont prêts, si un client a créé un ticket, il pourra choisir l'un des 3 services pour envoyer le ticket. </span></span></span><span style="vertical-align: inherit;"><span style="vertical-align: inherit;"><span style="vertical-align: inherit;">Du côté de l'opérateur, il est possible de choisir un responsable de ticket et il est également possible de pouvoir changer le ticket de service.</span></span></span></span>

## <span style="text-decoration: underline; color: rgb(45, 194, 107);">**<span style="vertical-align: inherit;"><span style="vertical-align: inherit;"><span style="vertical-align: inherit;"><span style="vertical-align: inherit;"><span style="vertical-align: inherit;"><span style="vertical-align: inherit;"><span style="vertical-align: inherit;"><span style="vertical-align: inherit;"><span style="vertical-align: inherit;"><span style="vertical-align: inherit;">G - Configuration de l'email :</span></span></span></span></span></span></span></span></span></span>**</span>

Afin que les utilisateurs puissent envoyer un ticket sans passer par l'interface web, il est possible de configurer des adresses emails qui transfèreront leurs mails à Zammad.

Pour commencer, allez dans l'onglet e-mail et cliquer sur "Nouveau".

[![image.png](https://wiki.morbihan-energies.fr/uploads/images/gallery/2023-12/scaled-1680-/E2dimage.png)](https://wiki.morbihan-energies.fr/uploads/images/gallery/2023-12/E2dimage.png)

Vous arriverez dans l'interface ci-dessous ou vous devrez remplir les différentes informations de l'adresse mail qui va recevoir les différents tickets.

[![image.png](https://wiki.morbihan-energies.fr/uploads/images/gallery/2023-12/scaled-1680-/FvXimage.png)](https://wiki.morbihan-energies.fr/uploads/images/gallery/2023-12/FvXimage.png)

<span style="vertical-align: inherit;"><span style="vertical-align: inherit;"><span style="vertical-align: inherit;"><span style="vertical-align: inherit;">Après avoir cliqué sur connecter, il vous affichera un message d'erreur et d'autre information à complété.</span></span></span></span>

<span style="vertical-align: inherit;"><span style="vertical-align: inherit;"><span style="vertical-align: inherit;"><span style="vertical-align: inherit;">Remplissez le nom d'hôte, ici "imap.morbihan-energies.fr" et sélectionné "Pas de SSL".</span></span></span></span>

[![image.png](https://wiki.morbihan-energies.fr/uploads/images/gallery/2023-12/scaled-1680-/XiKimage.png)](https://wiki.morbihan-energies.fr/uploads/images/gallery/2023-12/XiKimage.png)

Une fois ces informations remplie, valider vos paramètres et votre email sera relié à Zammad.

# 04 - Maintenance

## <span style="text-decoration: underline; color: rgb(45, 194, 107);">**<span style="vertical-align: inherit;"><span style="vertical-align: inherit;">A - Mises à jours :</span></span>**</span>

### <span style="color: rgb(53, 152, 219);">**<span style="vertical-align: inherit;"><span style="vertical-align: inherit;">1. Mise à jour Zammad :</span></span>**</span>

<span style="vertical-align: inherit;"><span style="vertical-align: inherit;">Si vous souhaitez mettre à jour votre système Zammad, vous devrez commencer par stopper le service.</span></span>

```bash
#Arrêtez Zammad
systemctl stop zammad
```

<span style="vertical-align: inherit;"><span style="vertical-align: inherit;">Une fois Zammad arrêtez vous devrez commencer par vider le cash.</span></span>

```bash
#Vider le cache Zammad
zammad run rails r "Rails.cache.clear"
```

<span style="vertical-align: inherit;"><span style="vertical-align: inherit;">Une fois ces étapes effectuées, il ne vous reste plus cas mettre à jour Zammad. </span></span>

```bash
#Mettre à jour Zammad
apt update
apt upgrade
```

## <span style="text-decoration: underline; color: rgb(45, 194, 107);">**<span style="vertical-align: inherit;"><span style="vertical-align: inherit;"><span style="vertical-align: inherit;"><span style="vertical-align: inherit;"><span style="vertical-align: inherit;"><span style="vertical-align: inherit;"><span style="vertical-align: inherit;"><span style="vertical-align: inherit;"><span style="vertical-align: inherit;"><span style="vertical-align: inherit;"><span style="vertical-align: inherit;"><span style="vertical-align: inherit;">B-Entretien :</span></span></span></span></span></span></span></span></span></span></span></span>**</span>

### <span style="color: rgb(53, 152, 219);">**<span style="vertical-align: inherit;"><span style="vertical-align: inherit;"><span style="vertical-align: inherit;"><span style="vertical-align: inherit;"><span style="vertical-align: inherit;"><span style="vertical-align: inherit;"><span style="vertical-align: inherit;"><span style="vertical-align: inherit;"><span style="vertical-align: inherit;"><span style="vertical-align: inherit;"><span style="vertical-align: inherit;"><span style="vertical-align: inherit;">1. Création Sauvegarde :</span></span></span></span></span></span></span></span></span></span></span></span>**</span>

<span style="vertical-align: inherit;"><span style="vertical-align: inherit;">Avant de pouvoir exécuter une sauvegarde ou une restauration, les scripts vous demandent de fournir un fichier de configuration. Nous expédions un </span></span>`<span class="pre">config.dist</span>`<span style="vertical-align: inherit;"><span style="vertical-align: inherit;"> dans les </span></span>`<span class="pre">/opt/zammad/contrib/backup</span>`<span style="vertical-align: inherit;"><span style="vertical-align: inherit;"> répertoire que vous pouvez simplement renommer.</span></span>

<span style="vertical-align: inherit;"><span style="vertical-align: inherit;">Pour ce faire, exécutez les commandes suivantes en tant qu'utilisateur </span></span>`<span class="pre">root</span>`<span style="vertical-align: inherit;"><span style="vertical-align: inherit;"> ou </span></span>`<span class="pre">zammad</span>`<span style="vertical-align: inherit;"><span style="vertical-align: inherit;">.</span></span>

```bash
cd /opt/zammad/contrib/backup/
mv config.dist config
```

```bash
#Création de la Backup
/opt/zammad/contrib/backup/zammad_backup.sh
```

[![image.png](https://wiki.morbihan-energies.fr/uploads/images/gallery/2023-12/scaled-1680-/4sUimage.png)](https://wiki.morbihan-energies.fr/uploads/images/gallery/2023-12/4sUimage.png)

### <span style="color: rgb(53, 152, 219);"><span style="vertical-align: inherit;"><span style="vertical-align: inherit;"><span style="vertical-align: inherit;"><span style="vertical-align: inherit;"><span style="vertical-align: inherit;"><span style="vertical-align: inherit;"><span style="vertical-align: inherit;"><span style="vertical-align: inherit;"><span style="vertical-align: inherit;"><span style="vertical-align: inherit;">**<span style="vertical-align: inherit;"><span style="vertical-align: inherit;">2. </span></span>**<span style="color: #3598db;"><span style="font-size: 32.662px;">**<span style="vertical-align: inherit;"><span style="vertical-align: inherit;">Restauration</span></span>**</span></span>**<span style="vertical-align: inherit;"><span style="vertical-align: inherit;"> d'une sauvegarde :</span></span>**</span></span></span></span></span></span></span></span></span></span></span>

```bash
#Restoration d'une Backup
/opt/zammad/contrib/backup/zammad_restore.sh
```

[![image.png](https://wiki.morbihan-energies.fr/uploads/images/gallery/2023-12/scaled-1680-/MfOimage.png)](https://wiki.morbihan-energies.fr/uploads/images/gallery/2023-12/MfOimage.png)

# MK-GLPI - Comparatif avec Zammad


# 01-Cahier des charges

GLPI va permettre de faire la remonté d'inventaire du parc informatique via l'agent Fusion Inventory qui sera déployé sur l'ensemble des postes.

En parallèle une gestion de ticket sera mise en place pour pouvoir répondre aux demandes internes mais aussi potentiellement aux demandes externes.

Cahier des charges :

GLPI doit pouvoir être connecté à notre serveur OpenLDAP pour l'authentification.  
GLPI doit pouvoir fournir une interface web permettant de gérer les tickets  
GLPI doit pouvoir gérer plusieurs types de demande de ticket :  
\- Création d'un ticket depuis l'interface  
\- Création d'un ticket depuis 1 ou plusieurs adresses mail en fonction du type de demande  
GLPI doit pouvoir cloisonner les types de demande par groupe d'utilisateur

Exemple de type de demande :   
\- Support Service Informatique Interne  
\- Supprt Applicatif GO  
\- Support Applicatif SIG  
\- Support autres à définir

GLPI doit pouvoir adapter le processus de gestion de vie du ticket en fonction du type de demande

GLPI doit pouvoir remonter de stats de suivi des tickets de façon manuelle voir automatique

# 02-Exploitation de GLPI

## <span style="text-decoration: underline; color: rgb(45, 194, 107);">**<span style="vertical-align: inherit;"><span style="vertical-align: inherit;">B - Gestion des entités :</span></span>**</span>

### <span style="color: rgb(53, 152, 219);">**<span style="vertical-align: inherit;"><span style="vertical-align: inherit;">1. Principe de fonctionnement :</span></span>**</span>

<span style="vertical-align: inherit;"><span style="vertical-align: inherit;">Les entités servent principalement à classer et à isoler des éléments. </span></span>  
<span style="vertical-align: inherit;"><span style="vertical-align: inherit;">Un utilisateur attribué à une entité aura une visibilité uniquement sur cette entité. </span><span style="vertical-align: inherit;">le choix de cette visibilité est défini par le profil de l'utilisateur.</span></span>

<span style="vertical-align: inherit;"><span style="vertical-align: inherit;">L'entité racine est toujours présente. </span><span style="vertical-align: inherit;">C'est le point de départ de l'arborescence, et on ne devrait rien y mettre si ce n'est le compte super-admin.</span></span>

<span style="vertical-align: inherit;"><span style="vertical-align: inherit;">L'entité clients doit contenir l'ensemble des entités de nos clients. </span><span style="vertical-align: inherit;">Chaque client doit posséder sa propre entité.</span></span>

### <span style="color: rgb(53, 152, 219);">**<span style="vertical-align: inherit;"><span style="vertical-align: inherit;">2. Création d'une entité :</span></span>**</span>

<span style="vertical-align: inherit;"><span style="vertical-align: inherit;">Cliquez sur le menu "Administration/Entités", cliquez sur le signe "+" pour ajouter une entité.</span></span>

[![Pasted_image.png](https://wiki.morbihan-energies.fr/uploads/images/gallery/2023-06/scaled-1680-/VvEpasted-image.png)](https://wiki.morbihan-energies.fr/uploads/images/gallery/2023-06/VvEpasted-image.png)

<span style="vertical-align: inherit;"><span style="vertical-align: inherit;">Renseigné les champs demandés : </span></span>  
<span style="vertical-align: inherit;"><span style="vertical-align: inherit;">Nom : Nom du client </span></span>  
<span style="vertical-align: inherit;"><span style="vertical-align: inherit;">Comme enfant de : l'entité doit toujours être enfant de Clients, elle héritera de la configuration de base de l'entité.</span></span>

[![Pasted_image001.png](https://wiki.morbihan-energies.fr/uploads/images/gallery/2023-06/scaled-1680-/mdqpasted-image001.png)](https://wiki.morbihan-energies.fr/uploads/images/gallery/2023-06/mdqpasted-image001.png)

<span style="vertical-align: inherit;"><span style="vertical-align: inherit;">Cliquez sur le bouton "Ajouter" pour créer l'entité. </span></span>  
<span style="vertical-align: inherit;"><span style="vertical-align: inherit;">Pour éditer ou modifier une entité, il suffit de retourner dans le menu "Administration/Entités" et de sélectionner le nom de l'entité.</span></span>

### <span style="color: rgb(53, 152, 219);">**<span style="vertical-align: inherit;"><span style="vertical-align: inherit;">3. Modifier l'entité d'un ticket :</span></span>**</span>

<span style="vertical-align: inherit;"><span style="vertical-align: inherit;">Lorsqu'un ticket est créé au support alors que le contact n'est pas référencé dans la base utilisateurs de GLPI, ce ticket est attribué par défaut à l'entité "Client". </span></span>  
<span style="vertical-align: inherit;"><span style="vertical-align: inherit;">Il est important de ne jamais laisser de ticket attribué à l'entité client pour des raisons de confidentialité et de suivi des tickets pour les clients. </span></span>  
<span style="vertical-align: inherit;"><span style="vertical-align: inherit;">Si le contact n'existe pas, il faut le créer. </span><span style="vertical-align: inherit;">Voir la procédure de création d'un utilisateur.</span></span>

<span style="vertical-align: inherit;"><span style="vertical-align: inherit;">Pour modifier l'entité d'un ticket, il faut Aller dans "Accueil/Vue globale" : </span></span>  
<span style="vertical-align: inherit;"><span style="vertical-align: inherit;"> - Si le ticket n'est pas encore attribué à un technicien : cliquez sur "Nouveau". </span></span>  
<span style="vertical-align: inherit;"><span style="vertical-align: inherit;"> - Si le ticket à déjà été attribué à un technicien : cliquez sur "En cours (Attributé)".</span></span>

[![Pasted_image002.png](https://wiki.morbihan-energies.fr/uploads/images/gallery/2023-06/scaled-1680-/22Vpasted-image002.png)](https://wiki.morbihan-energies.fr/uploads/images/gallery/2023-06/22Vpasted-image002.png)

### <span style="color: rgb(53, 152, 219);">**<span style="vertical-align: inherit;"><span style="vertical-align: inherit;">4. Modifier l'entité d'un ticket :</span></span>**</span>

<span style="vertical-align: inherit;"><span style="vertical-align: inherit;">Cocher le ou les tickets à déplacer dans une même entité puis cliquer sur le bouton "Actions".</span></span>

<span style="vertical-align: inherit;"><span style="vertical-align: inherit;">Dans le menu "Action", sélectionnez "Ajouter à la liste de transfert" puis cliquez sur "Envoyer".</span></span>

[![Pasted_image003.png](https://wiki.morbihan-energies.fr/uploads/images/gallery/2023-06/scaled-1680-/zxnpasted-image003.png)](https://wiki.morbihan-energies.fr/uploads/images/gallery/2023-06/zxnpasted-image003.png)

<span style="vertical-align: inherit;"><span style="vertical-align: inherit;">Dans la fenêtre sur le menu déroulant du "mode de transfert" et sélectionnez "Complet".</span></span>

[![Pasted_image004.png](https://wiki.morbihan-energies.fr/uploads/images/gallery/2023-06/scaled-1680-/KMqpasted-image004.png)](https://wiki.morbihan-energies.fr/uploads/images/gallery/2023-06/KMqpasted-image004.png)

<span style="vertical-align: inherit;"><span style="vertical-align: inherit;">Sélectionnez ensuite l'entité dans le menu déroulant et cliquez sur "Exécuter".</span></span>

[![Pasted_image005.png](https://wiki.morbihan-energies.fr/uploads/images/gallery/2023-06/scaled-1680-/MQ1pasted-image005.png)](https://wiki.morbihan-energies.fr/uploads/images/gallery/2023-06/MQ1pasted-image005.png)

<span style="vertical-align: inherit;"><span style="vertical-align: inherit;">Le ticket est maintenant associé à l'entité choisie.</span></span>

## <span style="text-decoration: underline; color: rgb(45, 194, 107);">**<span style="vertical-align: inherit;"><span style="vertical-align: inherit;">B - Gestion des profils :</span></span>**</span>

### <span style="color: rgb(53, 152, 219);">**<span style="vertical-align: inherit;"><span style="vertical-align: inherit;">1. Principe de fonctionnement :</span></span>**</span>

<span style="vertical-align: inherit;"><span style="vertical-align: inherit;">Un profil utilisateur permet de personnaliser les accès et l'affichage des menus de GLPI pour les clients.</span></span>

### <span style="color: rgb(53, 152, 219);">**<span style="vertical-align: inherit;"><span style="vertical-align: inherit;">2. Liste des profils existants :</span></span>**</span>

**<span style="vertical-align: inherit;"><span style="vertical-align: inherit;">Super\_Admin :</span></span>**  
<span style="vertical-align: inherit;"><span style="vertical-align: inherit;"> Ce profil est uniquement attribué aux personnes de Netensia car il donne tout les accès à GLPI.</span></span>

**<span style="vertical-align: inherit;"><span style="vertical-align: inherit;">Client\_XXX :</span></span>**  
<span style="vertical-align: inherit;"><span style="vertical-align: inherit;"> Ce profil est attribué par défaut à la création d'un nouvel utilisateur dans GLPI. </span><span style="vertical-align: inherit;">Il permet de limiter la consultation des tickets uniquement dans l'entité de l'utilisateur.</span></span>

**<span style="vertical-align: inherit;"><span style="vertical-align: inherit;">post-only :</span></span>**  
<span style="vertical-align: inherit;"><span style="vertical-align: inherit;"> Ce profil permet de visualiser uniquement ses propres tickets dans GLPI. </span><span style="vertical-align: inherit;">Utile pour les prestataires de nos clients par exemple.</span></span>

**<span style="vertical-align: inherit;"><span style="vertical-align: inherit;">Notif\_tickets :</span></span>**  
<span style="vertical-align: inherit;"><span style="vertical-align: inherit;"> Ce profil est utilisé pour les alertes de nouveaux tickets dans Rocket.Chat</span></span>

## <span style="text-decoration: underline; color: rgb(45, 194, 107);">**<span style="vertical-align: inherit;"><span style="vertical-align: inherit;">C - Procédure de création et de modification d'un utilisateur :</span></span>** </span>

Un compte utilisateur peut être attaché à une ou plusieurs entités. Lors de la création d'un utilisateur, il faut s'assurer d'être dans l'entité racine (celle par défaut).

### <span style="color: rgb(53, 152, 219);">**1. Création d'un nouveau compte utilisateur :**</span>

Cliquer sur "Administration/Utilisateurs"  
Dans le menu (de gauche) "Utilisateurs", renseignez les éléments ci-dessous :   
\- Identifiant : pnom (1ere lettre du prénom suivi du nom de famille, le tout en minuscule).  
\- Nom de Famille : (1ere lettre en Majuscule, le reste en minuscule).  
\- Prénom : (1ere lettre en Majuscule, le reste en minuscule).  
\- Actif : Oui  
\- Adresses de messagerie : Il est possible d'en ajouter plusieurs depuis le passage à la version 0.90.  
\- Entité par défaut : Renseigner ce champ plus tard en suivant la procédure décrite pus bas. Il n'est pas possible d'ajouter l'entité par défaut avant d'avoir habilité l'utilisateur dans son entité.

Cliquer sur le bouton "Sauvegarder" afin d'enregistrer les modifications.

### <span style="color: rgb(53, 152, 219);">**2. Ajouter d'une habilitation à un utilisateur :**</span>

L'habilitation permet d'associer un utilisateur à une entité.  
Cliquer sur le menu de gauche "Habilitations".

Sélectionner l'entité que vous souhaitez ajouter à l'utilisateur, choisissez le profil "Client\_XXX" et cliquer sur le bouton ajouter.  
L'utilisateur est maintenant associé à l'entité désirée.

### <span style="color: rgb(53, 152, 219);">**3. Modifier l'entité par défaut d'un utilisateur :**</span>

Il faut maintenant modifier l'entité par défaut de l'utilisateur. Pour cela, cliquer de nouveau sur le menu de gacuhe "Utilisateur", modifier le champ "Entité par défaut" en bas à droite et sélectionner l'entité. cliquer sur "Sauvegarder" afin d'enregistrer les modifications.

## <span style="text-decoration: underline; color: rgb(45, 194, 107);">**D - Suppression ticket en Base sans notification :**</span>

Dans certains cas, il peut être utile de supprimer un ticket directement depuis la base de données de GLPI. Cette méthode permet d'éviter de notifier le contact au moment de la suppression/clôture.  
Il faut utiliser cette méthode le moins possible afin de garder une base de données saine et des stats cohérents.

Se connecter en SSH sur "extranet.netensia.net"  
Se connecter à MySQL et taper la commande ci-dessous avec entre parenthèse le N° du ticket.

```bash
mysql
USE glpi
UPDATE glpi_tickets SET status='6' WHERE ID IN (N°_Ticket);
```

Le ticket disparaîtra de l'interface GLPI sans notification.

## <span style="text-decoration: underline; color: rgb(45, 194, 107);">**E - Mise à jour de GLPI :**</span>

La mise à jour de GLPI ne doit pas être appliquée directement sur la PROD.  
Il est préconiser de copier le dossier ainsi que la base de données pour tester la mise à jour.

### <span style="color: rgb(53, 152, 219);">**1. Sauvegarde :**</span>

```bash
# Sauvegarder le dossier /var/www/glpi en /var/www/glpi_DATE.bck
cp -rp /var/www/glpi /var/www/glpi_20180110.bck

# Sauvegarder la base de données :
mysqldump glpi > /root/glpi-20180110.sql
```

### <span style="color: rgb(53, 152, 219);">**2. Création de la base de test de GLPI :**</span>

```bash
# Copier le dossier glpi sur un dossier de test :
cp -rp /var/www/glpi /var/www/glpitest
```

Modification du vhost :   
Editer le fichier "/etc/apache2/sites-enabled/extranet.netensia.net.conf" et décommenter la ligne ci-dessous :

```bash
	Alias /glpitest /var/www/glpitest
```

```bash
# Création de la base de test : 
create database glpi2;

# Import dans la base de test : 
mysql -D glpi2 < /root/glpi-20180110.sql
```

### <span style="color: rgb(53, 152, 219);">**3. Installation de la nouvelle version :**</span>

 Télécharger et décompresser la nouvelle version de GLPI dans /root  
Il est important de le faire dans root car la décompresser va créer un dossier glpi. Il ne faut pas écraser la PROD.

```bash
cd /root/
wget https://github.com/glpi-project/glpi/releases/download/9.2.1/glpi-9.2.1.tgz
tar zxf glpi-9.2.1.tgz
```

Copier le contenu dans le dossier glpitest (sans confirmation) :

```bash
\cp -rf /root/glpi/* /var/www/glpitest/
```

### <span style="color: rgb(53, 152, 219);">**4. Paramétrage de la nouvelle version de GLPI (Base de données...) :**</span>

Se connecter sur l'URL ci-dessous :

```bash
URL : https://extranet.domain.tld/glpitest
```

## <span style="text-decoration: underline; color: rgb(45, 194, 107);">**F - Configuration de la gestion des flux mail :**</span>

Dans cette configuration, la création de tickets se fait via une seule adresse mail.   
Garder cette adresse et créer autant d'alias que d'entités souhaitées (selon le nombre de services, de sous-services, etc)  
Dans cette procédure, une entité = un alias = un service  
Ici une illustration de l'arborescence :

[![Pasted_image117.png](https://wiki.morbihan-energies.fr/uploads/images/gallery/2023-06/scaled-1680-/pasted-image117.png)](https://wiki.morbihan-energies.fr/uploads/images/gallery/2023-06/pasted-image117.png)

Commencer par créer les collecteurs de mails en plus de celui précédemment créé.  
Remplir les champs comme pour le premier collecteur en prêtant attention à bien saisir un alias comme nom et non pas l'adresse mail originale.

Attention également à saisir le bon id et mot de passe qui sont ceux de l'adresse originale.

[![Pasted_image118.png](https://wiki.morbihan-energies.fr/uploads/images/gallery/2023-06/scaled-1680-/pasted-image118.png)](https://wiki.morbihan-energies.fr/uploads/images/gallery/2023-06/pasted-image118.png)

Lorsque l'opération a été répétée autant de fois qu'il y a d'alias, le résultat doit ressembler au suivant :

[![Pasted_image119.png](https://wiki.morbihan-energies.fr/uploads/images/gallery/2023-06/scaled-1680-/pasted-image119.png)](https://wiki.morbihan-energies.fr/uploads/images/gallery/2023-06/pasted-image119.png)

Continuer avec la création des entités.   
Se rendre sur Administration puis Entités.

[![Pasted_image120.png](https://wiki.morbihan-energies.fr/uploads/images/gallery/2023-06/scaled-1680-/pasted-image120.png)](https://wiki.morbihan-energies.fr/uploads/images/gallery/2023-06/pasted-image120.png)

Ici, créer une entité "enfant" de l'entité racine native de GLPI. Cela n'est pas forcément nécessaire, mais cela permet de garder une base saine et surtout du pouvoir rajouter une ou plusieurs structures au cas où l'entreprise se développe dans le futur.   
Cliquer sur "+".

[![Pasted_image121.png](https://wiki.morbihan-energies.fr/uploads/images/gallery/2023-06/scaled-1680-/pasted-image121.png)](https://wiki.morbihan-energies.fr/uploads/images/gallery/2023-06/pasted-image121.png)

Saisir le nom de l'entité, la première correspond généralement au nom de votre entrerpise ou domaine, choisir enfant de l'entité racine puis Ajouter.

[![Pasted_image122.png](https://wiki.morbihan-energies.fr/uploads/images/gallery/2023-06/scaled-1680-/pasted-image122.png)](https://wiki.morbihan-energies.fr/uploads/images/gallery/2023-06/pasted-image122.png)

Retourner dans le menu des entités et cliquer sur celle qui vient d'être créée.

[![Pasted_image124.png](https://wiki.morbihan-energies.fr/uploads/images/gallery/2023-06/scaled-1680-/pasted-image124.png)](https://wiki.morbihan-energies.fr/uploads/images/gallery/2023-06/pasted-image124.png)

La page suivante s'affiche. Non-ogbligatoire à remplir l'onglet adresse (en vert).   
Dans l'onglet suivant Informations avancées, choisir le répertoire LDAP.

[![Pasted_image126.png](https://wiki.morbihan-energies.fr/uploads/images/gallery/2023-06/scaled-1680-/pasted-image126.png)](https://wiki.morbihan-energies.fr/uploads/images/gallery/2023-06/pasted-image126.png)

Dans l'onglet notifications, saisir l'adresse mail du support concerné ainsi que l'identifiant de l'administrateur.   
 Laisser les autres paramètres en héritage de l'entité parente.   
Ne pas oublier de sauvegarder en bas de page.

[![Pasted_image127.png](https://wiki.morbihan-energies.fr/uploads/images/gallery/2023-06/scaled-1680-/pasted-image127.png)](https://wiki.morbihan-energies.fr/uploads/images/gallery/2023-06/pasted-image127.png)

Dans assistance, paramétrer la clôture automatique des futurs tickets.   
Choisir l'effet souhaité, immédiat, 1 jour, 2 jours, 7 jours, etc.   
Sauvegarder.

[![Pasted_image009.png](https://wiki.morbihan-energies.fr/uploads/images/gallery/2023-06/scaled-1680-/kbXpasted-image009.png)](https://wiki.morbihan-energies.fr/uploads/images/gallery/2023-06/kbXpasted-image009.png)

Se positionner ensuite sur utilisateur et paramétrer l'administrateur général de glpi en super-admin.   
 Le paramètre récursif permet à l'administrateur d'associer le profil également sur les entités enfants.

[![Pasted_image128.png](https://wiki.morbihan-energies.fr/uploads/images/gallery/2023-06/scaled-1680-/pasted-image128.png)](https://wiki.morbihan-energies.fr/uploads/images/gallery/2023-06/pasted-image128.png)

Répéter la manipulation pour chaque nouvelle entité.   
Avant d'associer les utilisateurs à l'entité, il faut paramétrer le profil "self-service", profil d'utilisateur souhaitant faire un ticket.   
Cela va permettre de choisir l'interface de connexion simplifiée, les différents types de droits des utilisateurs du groupe.

[![Pasted_image002.png](https://wiki.morbihan-energies.fr/uploads/images/gallery/2023-06/scaled-1680-/Erhpasted-image002.png)](https://wiki.morbihan-energies.fr/uploads/images/gallery/2023-06/Erhpasted-image002.png)

[![Pasted_image003.png](https://wiki.morbihan-energies.fr/uploads/images/gallery/2023-06/scaled-1680-/p6Npasted-image003.png)](https://wiki.morbihan-energies.fr/uploads/images/gallery/2023-06/p6Npasted-image003.png)

Choisir les paramètres selon le cahier des charges en cours.

[![Pasted_image004.png](https://wiki.morbihan-energies.fr/uploads/images/gallery/2023-06/scaled-1680-/7DXpasted-image004.png)](https://wiki.morbihan-energies.fr/uploads/images/gallery/2023-06/7DXpasted-image004.png)

[![Pasted_image005.png](https://wiki.morbihan-energies.fr/uploads/images/gallery/2023-06/scaled-1680-/al7pasted-image005.png)](https://wiki.morbihan-energies.fr/uploads/images/gallery/2023-06/al7pasted-image005.png)

[![Pasted_image007.png](https://wiki.morbihan-energies.fr/uploads/images/gallery/2023-06/scaled-1680-/LpMpasted-image007.png)](https://wiki.morbihan-energies.fr/uploads/images/gallery/2023-06/LpMpasted-image007.png)

[![Pasted_image006.png](https://wiki.morbihan-energies.fr/uploads/images/gallery/2023-06/scaled-1680-/Muopasted-image006.png)](https://wiki.morbihan-energies.fr/uploads/images/gallery/2023-06/Muopasted-image006.png)

[![Pasted_image008.png](https://wiki.morbihan-energies.fr/uploads/images/gallery/2023-06/scaled-1680-/Xwzpasted-image008.png)](https://wiki.morbihan-energies.fr/uploads/images/gallery/2023-06/Xwzpasted-image008.png)

S'arrêter après cette dernière sauvegarde.   
Associer maintenant les utilisateurs aux entités.   
Se rendre sur la page utilisateur, onglet habilitation, choisir la bonne entité, le profil souhaité, et non récursif (PS :Le profil " self-service" est paramétrable dans administration/profils)

[![Pasted_image001.png](https://wiki.morbihan-energies.fr/uploads/images/gallery/2023-06/scaled-1680-/I7Fpasted-image001.png)](https://wiki.morbihan-energies.fr/uploads/images/gallery/2023-06/I7Fpasted-image001.png)

Les utilisateurs sont associés à l'entité avec leur profil correspondant.

## <span style="text-decoration: underline; color: rgb(45, 194, 107);">**G - Automatisation de la récupération des mails :**</span>

Pour commencer, se connecter au serveur qui héberge GLPI.   
 S'identifer en utilisateur root.   
 Saisir la commande suivante.

```bash
crontab -e
```

 Ajouter en dernière ligne ceci puis contrôle o pour sauvegarder et contrôle x pour quitter.

[![Pasted_image112.png](https://wiki.morbihan-energies.fr/uploads/images/gallery/2023-06/scaled-1680-/pasted-image112.png)](https://wiki.morbihan-energies.fr/uploads/images/gallery/2023-06/pasted-image112.png)

 (Pour information, les étoiles correspondent dans l'ordre à : minute, heure, jour/mois, mois, jour/semaine)  
 Ici la syncrhonisation se fera donc toutes les minutes.   
 Vérifier le bon fonctionnement de cron avec les deux commandes suivantes.   
 La première informe si cron est actif et la seconde informe de son bon fonctionnement.

```bash
	systemctl status cron
```

[![Pasted_image108.png](https://wiki.morbihan-energies.fr/uploads/images/gallery/2023-06/scaled-1680-/pasted-image108.png)](https://wiki.morbihan-energies.fr/uploads/images/gallery/2023-06/pasted-image108.png)

```bash
tail -f /var/log/cron.log
```

[![Pasted_image115.png](https://wiki.morbihan-energies.fr/uploads/images/gallery/2023-06/scaled-1680-/pasted-image115.png)](https://wiki.morbihan-energies.fr/uploads/images/gallery/2023-06/pasted-image115.png)

 Configurer maintenant les actions automatiques dans Glpi.  
 Pour cela, se rendre sur l'onglet Configuration, puis Actions automatiques.

[![Pasted_image100.png](https://wiki.morbihan-energies.fr/uploads/images/gallery/2023-06/scaled-1680-/7xtpasted-image100.png)](https://wiki.morbihan-energies.fr/uploads/images/gallery/2023-06/7xtpasted-image100.png)

Sélectionner toutes les actions et cliquer sur actions.

[![Pasted_image105.png](https://wiki.morbihan-energies.fr/uploads/images/gallery/2023-06/scaled-1680-/pasted-image105.png)](https://wiki.morbihan-energies.fr/uploads/images/gallery/2023-06/pasted-image105.png)

Sélectionner ensuite modifier, mode d'exécution et choisir CLI afin que ça soit la commande Cron qui soit prise en compte pour l'automatisation, finir en cliquant sur envoyer.

[![image.png](https://wiki.morbihan-energies.fr/uploads/images/gallery/2023-06/scaled-1680-/Pkuimage.png)](https://wiki.morbihan-energies.fr/uploads/images/gallery/2023-06/Pkuimage.png)

Toutes les actions sont paramétrées en CLI.

[![Pasted_image107.png](https://wiki.morbihan-energies.fr/uploads/images/gallery/2023-06/scaled-1680-/pasted-image107.png)](https://wiki.morbihan-energies.fr/uploads/images/gallery/2023-06/pasted-image107.png)

Saisir mailgate dans la barre de recherche et cliquer pour ouvrir les paramètres.

[![Pasted_image102.png](https://wiki.morbihan-energies.fr/uploads/images/gallery/2023-06/scaled-1680-/pu1pasted-image102.png)](https://wiki.morbihan-energies.fr/uploads/images/gallery/2023-06/pu1pasted-image102.png)

Apporter les modifications suivantes. Choisir une fréquence d'exécution égale à celle configurée avec crontab précédemment, statut en programmée et SURTOUT bien choisir CLI dans le mode d'exécution.

[![Pasted_image116.png](https://wiki.morbihan-energies.fr/uploads/images/gallery/2023-06/scaled-1680-/pasted-image116.png)](https://wiki.morbihan-energies.fr/uploads/images/gallery/2023-06/pasted-image116.png)

 Faire un test avec un envoi de mail utilisteur au support, le ticket se créé automatiquement.

## <span style="text-decoration: underline; color: rgb(45, 194, 107);">**H - Gestion des catégories :**</span>

### <span style="color: rgb(53, 152, 219);">**1. base de connaissances :**</span>

Glpi propose nativement la création d'une base de données de connaissances afin de mutualiser les connassances des différents techniciens sur les différentes problématiques qu'ils peuvent rencontrer.   
Pour qu'elle soit active, il faut créer des catégories (voir même des sous-catégories) afin de classer les informations.

Se rendre dans configuration, intitulés puis catégories de la base de connaissances.

[![Pasted_image.png](https://wiki.morbihan-energies.fr/uploads/images/gallery/2023-06/scaled-1680-/uWopasted-image.png)](https://wiki.morbihan-energies.fr/uploads/images/gallery/2023-06/uWopasted-image.png)

Activer l'effet pour les sous-entités.   
Saisir le nom du répertoire de connaissance voulu.   
Ajouter.

[![Pasted_image001.png](https://wiki.morbihan-energies.fr/uploads/images/gallery/2023-06/scaled-1680-/UHdpasted-image001.png)](https://wiki.morbihan-energies.fr/uploads/images/gallery/2023-06/UHdpasted-image001.png)

Répéter l'action autant de fois que de répertoire souhaité.

### <span style="color: rgb(53, 152, 219);">**1. ITIL :**</span>

Les catégories ITL vont déterminées la catégorie à laquelle un ticket va être affecté.

Se rendre sur configuration puis intitulés.   
Cliquer sur catégories ITIL.

[![Pasted_image.png](https://wiki.morbihan-energies.fr/uploads/images/gallery/2023-06/scaled-1680-/134pasted-image.png)](https://wiki.morbihan-energies.fr/uploads/images/gallery/2023-06/134pasted-image.png)

### <span style="color: rgb(53, 152, 219);">**1. Sauvegarde :**</span>

Un

#####   


## <span style="text-decoration: underline; color: rgb(45, 194, 107);">**I - Changement de logo :**</span>

Pour changer de logo, utiliser filezilla client et se connecter au serveur hébergeant glpi.   
La connexion établie se rendre dans /var/www/html/glpi/pics  
Les deux logos qui seront modifier ici seront celui de la page d'identification et celui de l'acceuil de l'interface web.   
Le premier s'intitule login\_logo\_glpi et le second fd\_logo.

Attention les images doivent être en .png et respecter la taille des logos glpi de base.

[![Pasted_image.png](https://wiki.morbihan-energies.fr/uploads/images/gallery/2023-06/scaled-1680-/b9tpasted-image.png)](https://wiki.morbihan-energies.fr/uploads/images/gallery/2023-06/b9tpasted-image.png)

Lorsque cela est fait, se déconnecter (si connecter) de l'interface web et se reconnecter. Les logos auront été modifiés.

## <span style="text-decoration: underline; color: rgb(45, 194, 107);">**J - Gestion des tickets :**</span>

### <span style="color: rgb(53, 152, 219);">**1. Création de tickets par mail :**</span>

Commencer par créer un collecteur de mail. Pour cela, se rendre sur Configuration puis Collecteurs.

[![Pasted_image078.png](https://wiki.morbihan-energies.fr/uploads/images/gallery/2023-06/scaled-1680-/pasted-image078.png)](https://wiki.morbihan-energies.fr/uploads/images/gallery/2023-06/pasted-image078.png)

Cliquer sur le "+" et une fenêtre s'ouvre.

[![Pasted_image079.png](https://wiki.morbihan-energies.fr/uploads/images/gallery/2023-06/scaled-1680-/pasted-image079.png)](https://wiki.morbihan-energies.fr/uploads/images/gallery/2023-06/pasted-image079.png)

[![Pasted_image080.png](https://wiki.morbihan-energies.fr/uploads/images/gallery/2023-06/scaled-1680-/pasted-image080.png)](https://wiki.morbihan-energies.fr/uploads/images/gallery/2023-06/pasted-image080.png)

 Plusieurs champs sont à remplir.   
   
 Nom : @ mails du serveur  
 Actif : Oui  
 Serveur : Domaine du serveur de mail  
 Options de connexion : Ici attention à bien vérifier les options configurer ces options par rapport aux paramètres du serveur mail que l'on souhaite lié.   
 Dossier des messages entrants : Saisir le nom du dossier de réception voulu ou laisser ce champs vide.   
 Port : Optionnel mais conseiller.  
 Chaine de connexion : Se créée lors qu'un numéro de port est saisi.   
 Identifiant : Id du compte de l'@ mail.  
 Mot de passe : Son mot de passe.   
   
 Les champs suivants ont été laissés par défaut comme illustré ci-dessous.   
 Sauvegarder.

[![Pasted_image083.png](https://wiki.morbihan-energies.fr/uploads/images/gallery/2023-06/scaled-1680-/pasted-image083.png)](https://wiki.morbihan-energies.fr/uploads/images/gallery/2023-06/pasted-image083.png)

Cliquer ensuite sur Actions puis Récupérer les courriels maintenant.

[![Pasted_image084.png](https://wiki.morbihan-energies.fr/uploads/images/gallery/2023-06/scaled-1680-/pasted-image084.png)](https://wiki.morbihan-energies.fr/uploads/images/gallery/2023-06/pasted-image084.png)

Une petite notification apparaît dans le bas droit de l'écran.

[![Pasted_image085.png](https://wiki.morbihan-energies.fr/uploads/images/gallery/2023-06/scaled-1680-/pasted-image085.png)](https://wiki.morbihan-energies.fr/uploads/images/gallery/2023-06/pasted-image085.png)

Quand cette étape est finie, envoyer ou se faire envoyer un mail par un utilisateur de la baseDN.   
 Une nouvelle notification s'affiche.

[![Pasted_image086.png](https://wiki.morbihan-energies.fr/uploads/images/gallery/2023-06/scaled-1680-/pasted-image086.png)](https://wiki.morbihan-energies.fr/uploads/images/gallery/2023-06/pasted-image086.png)

 Un message d'erreur indiquant une erreur concernant l'envoie du mail retour.   
 Le mail qui s'envoie sur la boîte mail du support pour prévenir de la demande.

[![Pasted_image089.png](https://wiki.morbihan-energies.fr/uploads/images/gallery/2023-06/scaled-1680-/pasted-image089.png)](https://wiki.morbihan-energies.fr/uploads/images/gallery/2023-06/pasted-image089.png)

Se rendre dans l'onglet Configuration, puis Notifications.

[![Pasted_image090.png](https://wiki.morbihan-energies.fr/uploads/images/gallery/2023-06/scaled-1680-/pasted-image090.png)](https://wiki.morbihan-energies.fr/uploads/images/gallery/2023-06/pasted-image090.png)

Activer toutes les notifications, enregistrer puis cliquer sur Configuration des notifications par courriels.

[![Pasted_image091.png](https://wiki.morbihan-energies.fr/uploads/images/gallery/2023-06/scaled-1680-/pasted-image091.png)](https://wiki.morbihan-energies.fr/uploads/images/gallery/2023-06/pasted-image091.png)

Ici remplir les champs suivant l'exemple qui suit.

[![Pasted_image093.png](https://wiki.morbihan-energies.fr/uploads/images/gallery/2023-06/scaled-1680-/pasted-image093.png)](https://wiki.morbihan-energies.fr/uploads/images/gallery/2023-06/pasted-image093.png)

Après avoir cliquer sur Envoyer un courriel de test à l'administrateur, cette notification s'affiche.

[![Pasted_image094.png](https://wiki.morbihan-energies.fr/uploads/images/gallery/2023-06/scaled-1680-/pasted-image094.png)](https://wiki.morbihan-energies.fr/uploads/images/gallery/2023-06/pasted-image094.png)

Consulter la boîte mail associer et s'assurer d'avoir reçu le mail correspondant au test.

[![pasted_image095.png](https://wiki.morbihan-energies.fr/uploads/images/gallery/2023-06/scaled-1680-/pasted-image095.png)](https://wiki.morbihan-energies.fr/uploads/images/gallery/2023-06/pasted-image095.png)

Un ticket a été créé précédemment suite à l'envoie du mail test pour le collecteur.   
 Cliquer sur Assistance, puis Tickets.

[![pasted_image087.png](https://wiki.morbihan-energies.fr/uploads/images/gallery/2023-06/scaled-1680-/pasted-image087.png)](https://wiki.morbihan-energies.fr/uploads/images/gallery/2023-06/pasted-image087.png)

La page des tickets s'affiche, le ticket créé par l'envoi d'un mail utilistauer est bien présent.

[![pasted_image096.png](https://wiki.morbihan-energies.fr/uploads/images/gallery/2023-06/scaled-1680-/pasted-image096.png)](https://wiki.morbihan-energies.fr/uploads/images/gallery/2023-06/pasted-image096.png)

Et l'envoi du mail associé à la demande se fait aussi correctement.

[![pasted_image097.png](https://wiki.morbihan-energies.fr/uploads/images/gallery/2023-06/scaled-1680-/pasted-image097.png)](https://wiki.morbihan-energies.fr/uploads/images/gallery/2023-06/pasted-image097.png)

La création de tickets par mail se déroule comme voulue tout comme l'envoi des mails suite aux demandes.   
   
A ce stade, la récupération des mails se fait manuellement mais celle-ci peut être automatiser.

### <span style="color: rgb(53, 152, 219);">**2. Suivi des tickets :**</span>

Le suivi du ticket est la première manipulation du technicien qui va donner vie au ticket et entamé la procédure de support.

#### <span style="color: rgb(35, 111, 161);">***Gabarit du suivi*** </span>

[![pasted_image.png](https://wiki.morbihan-energies.fr/uploads/images/gallery/2023-06/scaled-1680-/Z8Ppasted-image.png)](https://wiki.morbihan-energies.fr/uploads/images/gallery/2023-06/Z8Ppasted-image.png)

Le gabarit de suivi va permettre l'intégration direct d'un message expliquant par exemple que le ticket vient d'être pris en charge par les équipes supports.   
Le contenu de ce gabarit est envoyé par mail à l'utilisateur demandeur.

[![pasted_image001.png](https://wiki.morbihan-energies.fr/uploads/images/gallery/2023-06/scaled-1680-/BCJpasted-image001.png)](https://wiki.morbihan-energies.fr/uploads/images/gallery/2023-06/BCJpasted-image001.png)

### <span style="color: rgb(53, 152, 219);">**3. Les solutions des tickets :**</span>

#### <span style="color: rgb(35, 111, 161);">***Types de solution***</span>

Se rendre sur configuration puis intitulés.   
Cliquer sur l'intitulé types de solutions.

[![pasted_image.png](https://wiki.morbihan-energies.fr/uploads/images/gallery/2023-06/scaled-1680-/bripasted-image.png)](https://wiki.morbihan-energies.fr/uploads/images/gallery/2023-06/bripasted-image.png)

Cliquer le "+" d'ajout.

[![pasted_image001.png](https://wiki.morbihan-energies.fr/uploads/images/gallery/2023-06/scaled-1680-/nbkpasted-image001.png)](https://wiki.morbihan-energies.fr/uploads/images/gallery/2023-06/nbkpasted-image001.png)

Saisir le nom du type de solution  
Ajouter

[![pasted_image002.png](https://wiki.morbihan-energies.fr/uploads/images/gallery/2023-06/scaled-1680-/29epasted-image002.png)](https://wiki.morbihan-energies.fr/uploads/images/gallery/2023-06/29epasted-image002.png)

Exemple d'une liste de types de solutions

[![pasted_image003.png](https://wiki.morbihan-energies.fr/uploads/images/gallery/2023-06/scaled-1680-/HSHpasted-image003.png)](https://wiki.morbihan-energies.fr/uploads/images/gallery/2023-06/HSHpasted-image003.png)

#### <span style="color: rgb(35, 111, 161);">***Gabarits de solution***</span>

Le gabarit de solutions va permettre l'intégration direct d'un message expliquant quelle solution va être appliquée.  
Le contenu de ce gabarit est envoyé par mail à l'utilisateur demandeur.

[![pasted_image004.png](https://wiki.morbihan-energies.fr/uploads/images/gallery/2023-06/scaled-1680-/DxNpasted-image004.png)](https://wiki.morbihan-energies.fr/uploads/images/gallery/2023-06/DxNpasted-image004.png)

Cliquer sur "+" d'ajout

[![pasted_image005.png](https://wiki.morbihan-energies.fr/uploads/images/gallery/2023-06/scaled-1680-/hZVpasted-image005.png)](https://wiki.morbihan-energies.fr/uploads/images/gallery/2023-06/hZVpasted-image005.png)

Autoriser l'effet sur les sous-entités.   
Nommer le gabarit, saisir le contenu et ajouter.   
Laisser volontairement le champ type de solution vide. Celui-ci sera défini lors du traitement du ticket par le technicien.

[![pasted_image006.png](https://wiki.morbihan-energies.fr/uploads/images/gallery/2023-06/scaled-1680-/Zt5pasted-image006.png)](https://wiki.morbihan-energies.fr/uploads/images/gallery/2023-06/Zt5pasted-image006.png)

Répéter l'opération autant de fois que désiré.

## <span style="text-decoration: underline; color: rgb(45, 194, 107);">**K - Gestion des groupes :**</span>

Il est possible d'ajouter des groupes via un LDAP mais aussi manuellement.

[![pasted_image.png](https://wiki.morbihan-energies.fr/uploads/images/gallery/2023-06/scaled-1680-/NTopasted-image.png)](https://wiki.morbihan-energies.fr/uploads/images/gallery/2023-06/NTopasted-image.png)

A réitérer autant de fois que nécessaire.

## <span style="text-decoration: underline; color: rgb(45, 194, 107);">**L - Gestion des règles :**</span>

### <span style="color: rgb(53, 152, 219);">**1. Règle pour que le ticket se créé dans la même entité que l'utilisateur demandeur :**</span>

[![pasted_image.png](https://wiki.morbihan-energies.fr/uploads/images/gallery/2023-06/scaled-1680-/ZTJpasted-image.png)](https://wiki.morbihan-energies.fr/uploads/images/gallery/2023-06/ZTJpasted-image.png)

 Se rendre dans les règles pour assigner un ticket créé via un collecteur de courriels.

[![pasted_image001.png](https://wiki.morbihan-energies.fr/uploads/images/gallery/2023-06/scaled-1680-/diXpasted-image001.png)](https://wiki.morbihan-energies.fr/uploads/images/gallery/2023-06/diXpasted-image001.png)

 Cliquer sur le "+" pour créer une nouvelle règle.

[![pasted_image003.png](https://wiki.morbihan-energies.fr/uploads/images/gallery/2023-06/scaled-1680-/vdBpasted-image003.png)](https://wiki.morbihan-energies.fr/uploads/images/gallery/2023-06/vdBpasted-image003.png)

Saisir le nom de la nouvelle règle, ou en opérateur logique et oui pour actif.

[![pasted_image006.png](https://wiki.morbihan-energies.fr/uploads/images/gallery/2023-06/scaled-1680-/iS4pasted-image006.png)](https://wiki.morbihan-energies.fr/uploads/images/gallery/2023-06/iS4pasted-image006.png)

<span style="vertical-align: inherit;"><span style="vertical-align: inherit;"> Dans les critères, choisir l'utilisateur possédant le profil "self-service" et ajouter. </span></span>

[![pasted_image007.png](https://wiki.morbihan-energies.fr/uploads/images/gallery/2023-06/scaled-1680-/y6bpasted-image007.png)](https://wiki.morbihan-energies.fr/uploads/images/gallery/2023-06/y6bpasted-image007.png)

<span style="vertical-align: inherit;"><span style="vertical-align: inherit;"> Dans actions, cliquez sur ajouter une nouvelle action. </span></span>

[![pasted_image008.png](https://wiki.morbihan-energies.fr/uploads/images/gallery/2023-06/scaled-1680-/sBHpasted-image008.png)](https://wiki.morbihan-energies.fr/uploads/images/gallery/2023-06/sBHpasted-image008.png)

<span style="vertical-align: inherit;"><span style="vertical-align: inherit;"> Choisir entité depuis profil de l'utilisateur et ajouter. </span></span>

[![pasted_image009.png](https://wiki.morbihan-energies.fr/uploads/images/gallery/2023-06/scaled-1680-/A9ipasted-image009.png)](https://wiki.morbihan-energies.fr/uploads/images/gallery/2023-06/A9ipasted-image009.png)

<span style="vertical-align: inherit;"><span style="vertical-align: inherit;"> L'action apparaît comme ci-dessous. </span></span>

[![pasted_image010.png](https://wiki.morbihan-energies.fr/uploads/images/gallery/2023-06/scaled-1680-/6PUpasted-image010.png)](https://wiki.morbihan-energies.fr/uploads/images/gallery/2023-06/6PUpasted-image010.png)

<span style="vertical-align: inherit;"><span style="vertical-align: inherit;"> La règle est créée, l'entité du ticket sera la bonne entité de l'utilisateur. </span></span>

[![pasted_image011.png](https://wiki.morbihan-energies.fr/uploads/images/gallery/2023-06/scaled-1680-/tOmpasted-image011.png)](https://wiki.morbihan-energies.fr/uploads/images/gallery/2023-06/tOmpasted-image011.png)

### <span style="color: rgb(53, 152, 219);">**<span style="vertical-align: inherit;"><span style="vertical-align: inherit;">2. Règle pour la priorité des billets</span></span>** </span>

<span style="vertical-align: inherit;"><span style="vertical-align: inherit;"> Se rendre dans les règles métiers pour les tickets </span></span>

[![pasted_image012.png](https://wiki.morbihan-energies.fr/uploads/images/gallery/2023-06/scaled-1680-/aDjpasted-image012.png)](https://wiki.morbihan-energies.fr/uploads/images/gallery/2023-06/aDjpasted-image012.png)

<span style="vertical-align: inherit;"><span style="vertical-align: inherit;"> Cliquez sur le "+" d'ajout de règle</span></span>

[![pasted_image013.png](https://wiki.morbihan-energies.fr/uploads/images/gallery/2023-06/scaled-1680-/I7bpasted-image013.png)](https://wiki.morbihan-energies.fr/uploads/images/gallery/2023-06/I7bpasted-image013.png)

<span style="vertical-align: inherit;"><span style="vertical-align: inherit;"> Nommer la nouvelle règle priorités et suivre l'exemple suivant.</span></span>

[![pasted_image014.png](https://wiki.morbihan-energies.fr/uploads/images/gallery/2023-06/scaled-1680-/Go6pasted-image014.png)](https://wiki.morbihan-energies.fr/uploads/images/gallery/2023-06/Go6pasted-image014.png)

<span style="vertical-align: inherit;"><span style="vertical-align: inherit;"> Dans critères, choisir description, est, urgent. </span><span style="vertical-align: inherit;">C'est à dire que tous les mails entrants ayant urgent dans leur contenu seront classés en très haute priorité.</span></span>

[![pasted_image015.png](https://wiki.morbihan-energies.fr/uploads/images/gallery/2023-06/scaled-1680-/CGbpasted-image015.png)](https://wiki.morbihan-energies.fr/uploads/images/gallery/2023-06/CGbpasted-image015.png)

<span style="vertical-align: inherit;"><span style="vertical-align: inherit;"> Dans les actions, sélectionnez la priorité et paramétrez sur très haute. </span></span>

[![pasted_image016.png](https://wiki.morbihan-energies.fr/uploads/images/gallery/2023-06/scaled-1680-/pasted-image016.png)](https://wiki.morbihan-energies.fr/uploads/images/gallery/2023-06/pasted-image016.png)

<span style="vertical-align: inherit;"><span style="vertical-align: inherit;"> Les mails contenant désormais urgents créeront des tickets en haute priorité. </span></span>

[![pasted_image017.png](https://wiki.morbihan-energies.fr/uploads/images/gallery/2023-06/scaled-1680-/pasted-image017.png)](https://wiki.morbihan-energies.fr/uploads/images/gallery/2023-06/pasted-image017.png)

### <span style="color: rgb(53, 152, 219);">**<span style="vertical-align: inherit;"><span style="vertical-align: inherit;">3. Règle pour assigner directement les tickets à leur création</span></span>** </span>

<span style="vertical-align: inherit;"><span style="vertical-align: inherit;"> Se rendre dans les règles métier pour les tickets </span></span>

[![pasted_image012.png](https://wiki.morbihan-energies.fr/uploads/images/gallery/2023-06/scaled-1680-/HDypasted-image012.png)](https://wiki.morbihan-energies.fr/uploads/images/gallery/2023-06/HDypasted-image012.png)

<span style="vertical-align: inherit;"><span style="vertical-align: inherit;"> Cliquez sur le "+" d'ajout </span></span>

[![pasted_image013.png](https://wiki.morbihan-energies.fr/uploads/images/gallery/2023-06/scaled-1680-/wMVpasted-image013.png)](https://wiki.morbihan-energies.fr/uploads/images/gallery/2023-06/wMVpasted-image013.png)

<span style="vertical-align: inherit;"><span style="vertical-align: inherit;"> Mettre oui pour les sous-entités, saisir un nom pour la règle, opérateur logique en et, actif oui et règle utilisée pour ajouter. </span><span style="vertical-align: inherit;">Sauvegarder</span></span>

[![pasted_image014.png](https://wiki.morbihan-energies.fr/uploads/images/gallery/2023-06/scaled-1680-/c83pasted-image014.png)](https://wiki.morbihan-energies.fr/uploads/images/gallery/2023-06/c83pasted-image014.png)

<span style="vertical-align: inherit;"><span style="vertical-align: inherit;"> Dans les critères, choisir comme valeur entité et l'entité correspondant à l'association souhaitée. </span></span>

[![pasted_image021.png](https://wiki.morbihan-energies.fr/uploads/images/gallery/2023-06/scaled-1680-/3Anpasted-image021.png)](https://wiki.morbihan-energies.fr/uploads/images/gallery/2023-06/3Anpasted-image021.png)

<span style="vertical-align: inherit;"><span style="vertical-align: inherit;"> Dans les actions, choisissez l'utilisateur ou les groupes de techniciens auxquels on souhaite assigner les tickets. </span></span>

[![pasted_image022.png](https://wiki.morbihan-energies.fr/uploads/images/gallery/2023-06/scaled-1680-/IO2pasted-image022.png)](https://wiki.morbihan-energies.fr/uploads/images/gallery/2023-06/IO2pasted-image022.png)

[![pasted_image023.png](https://wiki.morbihan-energies.fr/uploads/images/gallery/2023-06/scaled-1680-/lTapasted-image023.png)](https://wiki.morbihan-energies.fr/uploads/images/gallery/2023-06/lTapasted-image023.png)

<span style="vertical-align: inherit;"><span style="vertical-align: inherit;"> Lorsqu'un utilisateur de l'entité a créé un ticket, celui-ci est attribué directement au bon groupe de techniciens. </span></span>

[![pasted_image025.png](https://wiki.morbihan-energies.fr/uploads/images/gallery/2023-06/scaled-1680-/KMDpasted-image025.png)](https://wiki.morbihan-energies.fr/uploads/images/gallery/2023-06/KMDpasted-image025.png)

[![pasted_image024.png](https://wiki.morbihan-energies.fr/uploads/images/gallery/2023-06/scaled-1680-/rrzpasted-image024.png)](https://wiki.morbihan-energies.fr/uploads/images/gallery/2023-06/rrzpasted-image024.png)

# MKT-KeeWeb


# 01 - Description

## <span style="text-decoration: underline; color: rgb(45, 194, 107);">**A - Description :**</span>

Nom DNS interne :   
Nom DNS Externe :   
Type de serveur (Physique, VMware, LXC, Docker...) : Docker  
OS : Ubuntu 22.04  
CPU : 3  
RAM : 4Go  
Disque LVM : 50 Go  
 / :

#### <span style="color: rgb(35, 111, 161);">***Réseaux :***</span>

<span style="color: rgb(0, 0, 0);">Adresse IP : 192.168.56.194  
Masque : 255.255.255.0  
Passerelle : 192.168.56.254  
DNS : 192.168.56.1  
VLAN : </span>

#### <span style="color: rgb(35, 111, 161);">***Stockage :***</span>

### <span style="color: rgb(53, 152, 219);">**1. Rôle :**</span>

KeeWeb est un gestionnaire de mots de passe gratuit et open source compatible avec KeePass, disponible en version Web et en applications de bureau.

### <span style="color: rgb(53, 152, 219);">**1. Checklist - Création du serveur :**</span>

#### <span style="color: rgb(35, 111, 161);">***Sécurité :***</span>

\[\*\] Création compte adminme  
\[\*\] Changement mot de passe root   
\[\*\] Changement mot de passe adminme  
\[\*\] Sécurisation des mots de passe (20 caractères minimum et 3 types de caractères différents)  
\[\*\] Mise à jour du coffre fort de mot de passe  
\[\*\] Déploiement clé SSH  
\[ \] Paramétrage du SUDO NOPASSWORD  
Liste des Ports ouverts :

# 02 - Installation

## <span style="text-decoration: underline; color: rgb(45, 194, 107);">**A -Installez Docker CE sur Ubuntu 22.04** </span><span style="text-decoration: underline; color: rgb(45, 194, 107);">**:**</span>

### <span style="color: rgb(53, 152, 219);">**1. Installation des packages Docker :**</span>

Installez les packages de dépendances Docker sur Ubuntu 20.04 avec la commande ci-dessous.

```bash
sudo apt update
sudo apt install apt-transport-https ca-certificates curl software-properties-common
```

### <span style="color: rgb(53, 152, 219);">**2. Clé Docker GPG :**</span>

<span style="color: rgb(0, 0, 0);">Ajoutez ensuite la clé Docker GPG et le référentiel Docker à votre serveur Ubuntu comme ci-dessous :</span>

```
curl -fsSL https://download.docker.com/linux/ubuntu/gpg | sudo apt-key add -
sudo add-apt-repository "deb [arch=amd64] https://download.docker.com/linux/ubuntu focal stable"
```

###   


### <span style="color: rgb(53, 152, 219);">**3. Mise à jours des Packages :**</span>

<span style="color: rgb(0, 0, 0);">Mettez maintenant à jour les packages et installez Docker CE sur Ubuntu :</span>

```bash
sudo apt-get update
sudo apt install docker-ce
```

### <span style="color: rgb(53, 152, 219);">**4. Vérification :**</span>

<span style="color: rgb(0, 0, 0);">Une fois installé, le démon Docker devrait être automatiquement démarré. Vous pouvez confirmer le statut comme ci-dessous :</span>

```bash
$ systemctl status docker
● docker.service - Docker Application Container Engine 
    Loaded: loaded (/lib/systemd/system/docker.service; enabled; vendor preset: enabled) 
    Active: active (running) since Sat 2020-10-17 16:28:08 EAT; 57s ago 
TriggeredBy: ● docker.socket 
      Docs: https://docs.docker.com 
  Main PID: 2807 (dockerd)
```

### <span style="color: rgb(53, 152, 219);">**5. Ajout d'utilisateur :**</span>

<span style="color: rgb(0, 0, 0);">Vous pouvez ajouter votre utilisateur au groupe Docker afin de ne pas avoir à écrire sudo lors de l'exécution de commandes Docker.</span>

```
sudo usermod -aG docker {USER}
newgrp docker
```

## <span style="text-decoration: underline; color: rgb(45, 194, 107);">**B - Installation de KeeWeb sur Ubuntu :**</span>

### <span style="color: rgb(53, 152, 219);">**1. Construction de KeeWeb :**</span>

Nous allons construire Keeweb à partir des sources avec les commandes ci-dessous :

```
docker pull svenc56/keeweb
git clone https://github.com/SvenC56/docker-keeweb.git
cd docker-keeweb
docker build -t svenc56/keeweb .
```

### <span style="color: rgb(53, 152, 219);">**2. Exécution de l'image :**</span>

Exécutez maintenant l'image keeweb et exposez-la sur le port 80 comme indiqué ci-dessous :

```
docker run -d -p 80:80 keeweb 
```


## <span style="text-decoration: underline; color: rgb(45, 194, 107);">**C - Erreur :**</span>

Une fois KeeWeb installée, vous pouvez y accédé depuis le navigateur avec **https://&lt;your-host-ip&gt;**. Il est possible que vous ayez une page blanche, si c'est le cas, c'est tout simplement parce que vous essayez de vous connecter en http, pour une question de sécurité, la connexion ; http est bloquer par KeeWeb. Pour y remédier, vous devrez paramétrer le r-proxy.

# MK-Guacamole


# 01 - Description

## <span style="text-decoration: underline; color: rgb(45, 194, 107);">**<span style="vertical-align: inherit;"><span style="vertical-align: inherit;"><span style="vertical-align: inherit;"><span style="vertical-align: inherit;">Une description :</span></span></span></span>**</span>

<span style="vertical-align: inherit;"><span style="vertical-align: inherit;"><span style="vertical-align: inherit;"><span style="vertical-align: inherit;">Nom DNS interne : </span></span></span></span>  
<span style="vertical-align: inherit;"><span style="vertical-align: inherit;"><span style="vertical-align: inherit;"><span style="vertical-align: inherit;">Nom DNS Externe : </span></span></span></span>  
<span style="vertical-align: inherit;"><span style="vertical-align: inherit;"><span style="vertical-align: inherit;"><span style="vertical-align: inherit;">Type de serveur (Physique, VMware, LXC, Docker...) : Conteneur LXC </span></span></span></span>  
<span style="vertical-align: inherit;"><span style="vertical-align: inherit;"><span style="vertical-align: inherit;"><span style="vertical-align: inherit;">OS : Ubuntu 22.04 </span></span></span></span>  
<span style="vertical-align: inherit;"><span style="vertical-align: inherit;"><span style="vertical-align: inherit;"><span style="vertical-align: inherit;">CPU : </span></span></span></span>  
<span style="vertical-align: inherit;"><span style="vertical-align: inherit;"><span style="vertical-align: inherit;"><span style="vertical-align: inherit;">RAM : </span></span></span></span>  
<span style="vertical-align: inherit;"><span style="vertical-align: inherit;"><span style="vertical-align: inherit;"><span style="vertical-align: inherit;">Disque LVM : </span></span></span></span>  
<span style="vertical-align: inherit;"><span style="vertical-align: inherit;"><span style="vertical-align: inherit;"><span style="vertical-align: inherit;"> / : </span></span></span></span>

#### <span style="color: rgb(35, 111, 161);">***<span style="vertical-align: inherit;"><span style="vertical-align: inherit;"><span style="vertical-align: inherit;"><span style="vertical-align: inherit;">Réseaux :</span></span></span></span>***</span>

<span style="color: rgb(0, 0, 0);"><span style="vertical-align: inherit;"><span style="vertical-align: inherit;"><span style="vertical-align: inherit;"><span style="vertical-align: inherit;">Adresse IP : </span></span></span></span>  
<span style="vertical-align: inherit;"><span style="vertical-align: inherit;"><span style="vertical-align: inherit;"><span style="vertical-align: inherit;">Masque : 255.255.255.0 </span></span></span></span>  
<span style="vertical-align: inherit;"><span style="vertical-align: inherit;"><span style="vertical-align: inherit;"><span style="vertical-align: inherit;">Passerelle : </span></span></span></span>  
<span style="vertical-align: inherit;"><span style="vertical-align: inherit;"><span style="vertical-align: inherit;"><span style="vertical-align: inherit;">DNS : 192.168.1.50 </span></span></span></span>  
<span style="vertical-align: inherit;"><span style="vertical-align: inherit;"><span style="vertical-align: inherit;"><span style="vertical-align: inherit;">VLAN : </span></span></span></span></span>

### <span style="color: rgb(53, 152, 219);">**<span style="vertical-align: inherit;"><span style="vertical-align: inherit;"><span style="vertical-align: inherit;"><span style="vertical-align: inherit;">1. Checklist - Création du serveur :</span></span></span></span>**</span>

#### <span style="color: rgb(35, 111, 161);">***<span style="vertical-align: inherit;"><span style="vertical-align: inherit;"><span style="vertical-align: inherit;"><span style="vertical-align: inherit;">Domaine :</span></span></span></span>***</span>

<span style="vertical-align: inherit;"><span style="vertical-align: inherit;"><span style="vertical-align: inherit;"><span style="vertical-align: inherit;">\[\*\] Configuration de l'enregistrement A sur v.sdem.fr </span></span></span></span>  
<span style="vertical-align: inherit;"><span style="vertical-align: inherit;"><span style="vertical-align: inherit;"><span style="vertical-align: inherit;">\[\*\] Configuration de l'enregistrement PTR sur v.sdem.fr </span></span></span></span>  
<span style="vertical-align: inherit;"><span style="vertical-align: inherit;"><span style="vertical-align: inherit;"><span style="vertical-align: inherit;">\[\*\] Configuration de l'enregistrement A sur sdem.fr (interne) </span></span></span></span>  
<span style="vertical-align: inherit;"><span style="vertical-align: inherit;"><span style="vertical-align: inherit;"><span style="vertical-align: inherit;">\[x\] Configuration de l'enregistrement A sur sdem.fr (externe) </span></span></span></span>  
<span style="vertical-align: inherit;"><span style="vertical-align: inherit;"><span style="vertical-align: inherit;"><span style="vertical-align: inherit;">\[x\] Ajout du serveur dans la zone DNS morbihan-energies.fr avec un enregistrement CNAME</span></span></span></span>

#### <span style="color: rgb(35, 111, 161);">***<span style="vertical-align: inherit;"><span style="vertical-align: inherit;"><span style="vertical-align: inherit;"><span style="vertical-align: inherit;">Sécurité :</span></span></span></span>***</span>

<span style="vertical-align: inherit;"><span style="vertical-align: inherit;"><span style="vertical-align: inherit;"><span style="vertical-align: inherit;">\[\*\] Création compte adminme </span></span></span></span>  
<span style="vertical-align: inherit;"><span style="vertical-align: inherit;"><span style="vertical-align: inherit;"><span style="vertical-align: inherit;">\[\*\] Changement mot de passe root </span></span></span></span>  
<span style="vertical-align: inherit;"><span style="vertical-align: inherit;"><span style="vertical-align: inherit;"><span style="vertical-align: inherit;">\[\*\] Changement mot de passe adminme </span></span></span></span>  
<span style="vertical-align: inherit;"><span style="vertical-align: inherit;"><span style="vertical-align: inherit;"><span style="vertical-align: inherit;">\[\*\] Sécurisation des mots de passe (20 caractères minimum et 3 types de caractères différents) </span></span></span></span>  
<span style="vertical-align: inherit;"><span style="vertical-align: inherit;"><span style="vertical-align: inherit;"><span style="vertical-align: inherit;">\[\*\] Mise à jour du coffre fort de mot de passe </span></span></span></span>  
<span style="vertical-align: inherit;"><span style="vertical-align: inherit;"><span style="vertical-align: inherit;"><span style="vertical-align: inherit;">\[\*\] Déploiement clé SSH </span></span></span></span>  
<span style="vertical-align: inherit;"><span style="vertical-align: inherit;"><span style="vertical-align: inherit;"><span style="vertical-align: inherit;">\[\*\] Paramétrage du SUDO NOPASSWORD </span></span></span></span>  
<span style="vertical-align: inherit;"><span style="vertical-align: inherit;"><span style="vertical-align: inherit;"><span style="vertical-align: inherit;">Liste des Ports ouverts : </span></span></span></span>

#### <span style="color: rgb(35, 111, 161);">***<span style="vertical-align: inherit;"><span style="vertical-align: inherit;"><span style="vertical-align: inherit;"><span style="vertical-align: inherit;">Sauvegarde :</span></span></span></span>***</span>

<span style="vertical-align: inherit;"><span style="vertical-align: inherit;"><span style="vertical-align: inherit;"><span style="vertical-align: inherit;">\[\*\] Configurer la sauvegarde locale </span></span></span></span>  
<span style="vertical-align: inherit;"><span style="vertical-align: inherit;"><span style="vertical-align: inherit;"><span style="vertical-align: inherit;">\[\*\] Configurer la sauvegarde sur le PRA (si serveur critique) </span></span></span></span>  
<span style="vertical-align: inherit;"><span style="vertical-align: inherit;"><span style="vertical-align: inherit;"><span style="vertical-align: inherit;">\[ \] Configurer la sauvegarde de Base de données (Dump local)</span></span></span></span>

#### <span style="color: rgb(35, 111, 161);">***<span style="vertical-align: inherit;"><span style="vertical-align: inherit;"><span style="vertical-align: inherit;"><span style="vertical-align: inherit;">Autres :</span></span></span></span>***</span>

<span style="vertical-align: inherit;"><span style="vertical-align: inherit;"><span style="vertical-align: inherit;"><span style="vertical-align: inherit;">\[\*\] Ajout du serveur dans Guacamole </span></span></span></span>  
<span style="vertical-align: inherit;"><span style="vertical-align: inherit;"><span style="vertical-align: inherit;"><span style="vertical-align: inherit;">\[\*\] Ajout du serveur dans la supervision </span></span></span></span>  
<span style="vertical-align: inherit;"><span style="vertical-align: inherit;"><span style="vertical-align: inherit;"><span style="vertical-align: inherit;">\[\*\] Ajout de la documentation d'installation et de paramétrage de la VM dans ZIM </span></span></span></span>  
<span style="vertical-align: inherit;"><span style="vertical-align: inherit;"><span style="vertical-align: inherit;"><span style="vertical-align: inherit;">\[ \] Configuration du NTP</span></span></span></span>

## <span style="text-decoration: underline; color: rgb(45, 194, 107);">**A - Qu'est ce que Guacamole:**</span>

Le serveur Apache Guacamole sera utilisé comme point d'entrée unique pour accéder aux serveurs et équipements de l'infrastructure que ce soit via les protocoles RDP, SSH, VNC et Telnet, et même Kubernetes. Que l'on soit en externe ou en interne, les connexions aux serveurs vont passer obligatoirement par l'hôte Apache Guacamole.

Dans l'exemple ci-dessous, l'hôte Apache Guacamole est positionné en DMZ puisqu'il doit être accessible depuis l'extérieur. L'accès depuis l'extérieur n'est pas obligatoire puisque l'on pourrait imposer une connexion VPN au réseau de l'entreprise avant de permettre la connexion sur l'interface de Guacamole. De la même manière pour publier l'hôte Guacamole sur Internet, il est recommandé de s'appuyer sur un reverse proxy en frontal (le pare-feu pourrait très bien assurer cette fonction), ce qui permettra en même temps de passer les flux en HTTPS.

[![image.png](https://wiki.morbihan-energies.fr/uploads/images/gallery/2024-01/scaled-1680-/gIzimage.png)](https://wiki.morbihan-energies.fr/uploads/images/gallery/2024-01/gIzimage.png)

Apache Guacamole devient un élément central de l'infrastructure puisqu'il sert de **passerelle pour administrer les machines**. Rassurez-vous, il est possible d'avoir plusieurs hôtes Apache Guacamole pour **répartir la charge et assurer la haute disponibilité**.

Enfin, **les règles de pare-feu doivent aussi être adaptées** : l'hôte Apache Guacamole doit être le seul à pouvoir se connecter en RDP/SSH/VNC/Etc. sur les machines de l'infrastructure.

# 02 - Installation

## <span style="text-decoration: underline; color: rgb(45, 194, 107);">**<span style="vertical-align: inherit;"><span style="vertical-align: inherit;"><span style="vertical-align: inherit;"><span style="vertical-align: inherit;"><span style="vertical-align: inherit;"><span style="vertical-align: inherit;"><span style="vertical-align: inherit;"><span style="vertical-align: inherit;">A - Installation de Guacamole :</span></span></span></span></span></span></span></span>**</span>

### <span style="color: rgb(53, 152, 219);">**<span style="vertical-align: inherit;"><span style="vertical-align: inherit;"><span style="vertical-align: inherit;"><span style="vertical-align: inherit;"><span style="vertical-align: inherit;"><span style="vertical-align: inherit;"><span style="vertical-align: inherit;"><span style="vertical-align: inherit;">1. Installation des Dépendances :</span></span></span></span></span></span></span></span>**</span>

```
sudo apt-get install libcairo2-dev libjpeg-turbo8-dev libpng-dev libtool-bin uuid-dev libossp-uuid-dev libwebsockets-dev libssl-dev libavcodec-dev freerdp2-dev libpango1.0-dev libssh2-1-dev libtelnet-dev libwebsockets-dev libpulse-dev libvorbis-dev libwebp-dev libavcodec-dev libavformat-dev libavutil-dev libswscale-dev
```

### <span style="color: rgb(53, 152, 219);">**<span style="vertical-align: inherit;"><span style="vertical-align: inherit;"><span style="vertical-align: inherit;"><span style="vertical-align: inherit;"><span style="vertical-align: inherit;"><span style="vertical-align: inherit;"><span style="vertical-align: inherit;"><span style="vertical-align: inherit;">2. Télécharger Serveur Guacamole :</span></span></span></span></span></span></span></span>**</span>

```
wget https://downloads.apache.org/guacamole/1.5.3/source/guacamole-server-1.5.3.tar.gz
```

### <span style="color: rgb(53, 152, 219);"><span style="vertical-align: inherit;"><span style="vertical-align: inherit;"><span style="vertical-align: inherit;"><span style="vertical-align: inherit;">**<span style="vertical-align: inherit;"><span style="vertical-align: inherit;"><span style="vertical-align: inherit;"><span style="vertical-align: inherit;">3. </span></span></span></span>**<span style="color: #3598db;"><span style="font-size: 32.662px;">**<span style="vertical-align: inherit;"><span style="vertical-align: inherit;"><span style="vertical-align: inherit;"><span style="vertical-align: inherit;">Décompression</span></span></span></span>**</span></span>**<span style="vertical-align: inherit;"><span style="vertical-align: inherit;"><span style="vertical-align: inherit;"><span style="vertical-align: inherit;"> :</span></span></span></span>**</span></span></span></span></span>

```
tar -xvf guacamole-server-1.5.3.tar.gz
cd guacamole-server-1.5.3
autoreconf -fi
```

### <span style="color: rgb(53, 152, 219);"><span style="vertical-align: inherit;"><span style="vertical-align: inherit;"><span style="vertical-align: inherit;"><span style="vertical-align: inherit;">**<span style="vertical-align: inherit;"><span style="vertical-align: inherit;"><span style="vertical-align: inherit;"><span style="vertical-align: inherit;">4. Script de Configuration </span></span></span></span><span style="vertical-align: inherit;"><span style="vertical-align: inherit;"><span style="vertical-align: inherit;"><span style="vertical-align: inherit;"> :</span></span></span></span>**</span></span></span></span></span>

```
./configure --with-init-dir=/etc/init.d
```

### <span style="color: rgb(53, 152, 219);"><span style="vertical-align: inherit;"><span style="vertical-align: inherit;"><span style="vertical-align: inherit;"><span style="vertical-align: inherit;">**<span style="vertical-align: inherit;"><span style="vertical-align: inherit;"><span style="vertical-align: inherit;"><span style="vertical-align: inherit;">5. Compilation et installation </span></span></span></span><span style="vertical-align: inherit;"><span style="vertical-align: inherit;"><span style="vertical-align: inherit;"><span style="vertical-align: inherit;">:</span></span></span></span>**</span></span></span></span></span>

```
make
make install
```

### <span style="color: rgb(53, 152, 219);"><span style="vertical-align: inherit;"><span style="vertical-align: inherit;"><span style="vertical-align: inherit;"><span style="vertical-align: inherit;">**<span style="vertical-align: inherit;"><span style="vertical-align: inherit;"><span style="vertical-align: inherit;"><span style="vertical-align: inherit;">6. Liens </span></span></span></span><span style="vertical-align: inherit;"><span style="vertical-align: inherit;"><span style="vertical-align: inherit;"><span style="vertical-align: inherit;">:</span></span></span></span>**</span></span></span></span></span>

```
ldconfig
```

#### <span style="color: rgb(35, 111, 161);"><span style="color: #236fa1;"><span style="font-size: 23.324px;">***<span style="vertical-align: inherit;"><span style="vertical-align: inherit;"><span style="vertical-align: inherit;"><span style="vertical-align: inherit;">Redémarrage </span></span></span></span>***</span></span>***<span style="vertical-align: inherit;"><span style="vertical-align: inherit;"><span style="vertical-align: inherit;"><span style="vertical-align: inherit;"><span style="vertical-align: inherit;"><span style="vertical-align: inherit;"><span style="vertical-align: inherit;"><span style="vertical-align: inherit;"><span style="vertical-align: inherit;"><span style="vertical-align: inherit;"><span style="vertical-align: inherit;"><span style="vertical-align: inherit;"> des services 1</span></span></span></span></span></span></span></span></span></span></span></span>***</span>

```
systemctl restart guacd
```

## <span style="text-decoration: underline; color: rgb(45, 194, 107);">**<span style="vertical-align: inherit;"><span style="vertical-align: inherit;"><span style="vertical-align: inherit;"><span style="vertical-align: inherit;"><span style="vertical-align: inherit;"><span style="vertical-align: inherit;"><span style="vertical-align: inherit;"><span style="vertical-align: inherit;">B - Installation de Tomcat :</span></span></span></span></span></span></span></span>**</span>

### <span style="color: rgb(53, 152, 219);"><span style="vertical-align: inherit;"><span style="vertical-align: inherit;"><span style="vertical-align: inherit;"><span style="vertical-align: inherit;">**<span style="vertical-align: inherit;"><span style="vertical-align: inherit;"><span style="vertical-align: inherit;"><span style="vertical-align: inherit;">1. Installation de Tomcat </span></span></span></span><span style="vertical-align: inherit;"><span style="vertical-align: inherit;"><span style="vertical-align: inherit;"><span style="vertical-align: inherit;">:</span></span></span></span>**</span></span></span></span></span>

```
sudo apt-get install tomcat9 tomcat9-admin tomcat9-common tomcat9-user
sudo mkdir /etc/guacamole/
sudo wget https://downloads.apache.org/guacamole/1.5.3/binary/guacamole-1.5.3.war -O /etc/guacamole/guacamole.war
```

### <span style="color: rgb(53, 152, 219);"><span style="vertical-align: inherit;"><span style="vertical-align: inherit;"><span style="vertical-align: inherit;"><span style="vertical-align: inherit;">**<span style="vertical-align: inherit;"><span style="vertical-align: inherit;"><span style="vertical-align: inherit;"><span style="vertical-align: inherit;">2. Lien symbolique avec Tomcat </span></span></span></span><span style="vertical-align: inherit;"><span style="vertical-align: inherit;"><span style="vertical-align: inherit;"><span style="vertical-align: inherit;">:</span></span></span></span>**</span></span></span></span></span>

```
sudo wget https://downloads.apache.org/guacamole/1.5.3/binary/guacamole-1.5.3.war -O /etc/guacamole/guacamole.war
```

#### <span style="color: rgb(35, 111, 161);">***<span style="vertical-align: inherit;"><span style="vertical-align: inherit;"><span style="vertical-align: inherit;"><span style="vertical-align: inherit;"><span style="vertical-align: inherit;"><span style="vertical-align: inherit;"><span style="vertical-align: inherit;"><span style="vertical-align: inherit;"><span style="vertical-align: inherit;"><span style="vertical-align: inherit;"><span style="vertical-align: inherit;"><span style="vertical-align: inherit;">Redémarrer Guac Tomcat 1</span></span></span></span></span></span></span></span></span></span></span></span>***</span>

```
systemctl restart tomcat9
systemctl restart guacd
```

### <span style="color: rgb(53, 152, 219);"><span style="vertical-align: inherit;"><span style="vertical-align: inherit;"><span style="vertical-align: inherit;"><span style="vertical-align: inherit;">**<span style="vertical-align: inherit;"><span style="vertical-align: inherit;"><span style="vertical-align: inherit;"><span style="vertical-align: inherit;">3. Extension du répertoire </span></span></span></span><span style="vertical-align: inherit;"><span style="vertical-align: inherit;"><span style="vertical-align: inherit;"><span style="vertical-align: inherit;">:</span></span></span></span>**</span></span></span></span></span>

```
mkdir /etc/guacamole/{extensions,lib}
```

## <span style="text-decoration: underline; color: rgb(45, 194, 107);">**<span style="vertical-align: inherit;"><span style="vertical-align: inherit;"><span style="vertical-align: inherit;"><span style="vertical-align: inherit;"><span style="vertical-align: inherit;"><span style="vertical-align: inherit;"><span style="vertical-align: inherit;"><span style="vertical-align: inherit;">C-MYSQL :</span></span></span></span></span></span></span></span>**</span>

### <span style="color: rgb(53, 152, 219);"><span style="vertical-align: inherit;"><span style="vertical-align: inherit;"><span style="vertical-align: inherit;"><span style="vertical-align: inherit;">**<span style="vertical-align: inherit;"><span style="vertical-align: inherit;"><span style="vertical-align: inherit;"><span style="vertical-align: inherit;">1. Installation de MySQL </span></span></span></span><span style="vertical-align: inherit;"><span style="vertical-align: inherit;"><span style="vertical-align: inherit;"><span style="vertical-align: inherit;">:</span></span></span></span>**</span></span></span></span></span>

```
apt install mariadb-server
mysql_secure_installation
```

### <span style="color: rgb(53, 152, 219);"><span style="vertical-align: inherit;"><span style="vertical-align: inherit;"><span style="vertical-align: inherit;"><span style="vertical-align: inherit;">**<span style="vertical-align: inherit;"><span style="vertical-align: inherit;"><span style="vertical-align: inherit;"><span style="vertical-align: inherit;">2. Création d'une base de données Guacamole </span></span></span></span><span style="vertical-align: inherit;"><span style="vertical-align: inherit;"><span style="vertical-align: inherit;"><span style="vertical-align: inherit;">:</span></span></span></span>**</span></span></span></span></span>

```
mysql -u root -p
CREATE DATABASE guacamole_db;
CREATE USER 'guacamole_user'@'localhost' IDENTIFIED BY 'Testeur';
GRANT SELECT,INSERT,UPDATE,DELETE ON guacamole_db.* TO 'guacamole_user'@'localhost';
FLUSH PRIVILEGES;
quit;
```

### <span style="color: rgb(53, 152, 219);"><span style="vertical-align: inherit;"><span style="vertical-align: inherit;"><span style="vertical-align: inherit;"><span style="vertical-align: inherit;">**<span style="vertical-align: inherit;"><span style="vertical-align: inherit;"><span style="vertical-align: inherit;"><span style="vertical-align: inherit;">3. Module Mysql/Guacamole </span></span></span></span><span style="vertical-align: inherit;"><span style="vertical-align: inherit;"><span style="vertical-align: inherit;"><span style="vertical-align: inherit;">:</span></span></span></span>**</span></span></span></span></span>

```
wget https://downloads.apache.org/guacamole/1.5.3/binary/guacamole-auth-jdbc-1.5.3.tar.gz
tar -xvf guacamole-auth-jdbc-1.5.3.tar.gz
```

### <span style="color: rgb(53, 152, 219);"><span style="vertical-align: inherit;"><span style="vertical-align: inherit;"><span style="vertical-align: inherit;"><span style="vertical-align: inherit;">**<span style="vertical-align: inherit;"><span style="vertical-align: inherit;"><span style="vertical-align: inherit;"><span style="vertical-align: inherit;">4. Extension Mysql/Guacamole </span></span></span></span><span style="vertical-align: inherit;"><span style="vertical-align: inherit;"><span style="vertical-align: inherit;"><span style="vertical-align: inherit;">:</span></span></span></span>**</span></span></span></span></span>

```
cp guacamole-auth-jdbc-1.5.3/mysql/guacamole-auth-jdbc-mysql-1.5.3.jar /etc/guacamole/extensions/
```

### <span style="color: rgb(53, 152, 219);"><span style="vertical-align: inherit;"><span style="vertical-align: inherit;"><span style="vertical-align: inherit;"><span style="vertical-align: inherit;">**<span style="vertical-align: inherit;"><span style="vertical-align: inherit;"><span style="vertical-align: inherit;"><span style="vertical-align: inherit;">5. Importer le schéma dans la base de donné </span></span></span></span><span style="vertical-align: inherit;"><span style="vertical-align: inherit;"><span style="vertical-align: inherit;"><span style="vertical-align: inherit;">:</span></span></span></span>**</span></span></span></span></span>

```
cat guacamole-auth-jdbc-1.5.3/mysql/schema/*.sql | mysql -u root -p guacamole_db
```

### <span style="color: rgb(53, 152, 219);"><span style="vertical-align: inherit;"><span style="vertical-align: inherit;"><span style="vertical-align: inherit;"><span style="vertical-align: inherit;">**<span style="vertical-align: inherit;"><span style="vertical-align: inherit;"><span style="vertical-align: inherit;"><span style="vertical-align: inherit;">6. Pilote Mysql/Guacamole </span></span></span></span><span style="vertical-align: inherit;"><span style="vertical-align: inherit;"><span style="vertical-align: inherit;"><span style="vertical-align: inherit;">:</span></span></span></span>**</span></span></span></span></span>

```
wget https://cdn.mysql.com//Downloads/Connector-J/mysql-connector-j-8.0.33.tar.gz
tar -xvzf mysql-connector-j-8.0.33.tar.gz
cp mysql-connector-j-8.0.33/mysql-connector-j-8.0.33.jar /etc/guacamole/lib/
```

#### <span style="color: rgb(35, 111, 161);">*<span style="color: #236fa1;"><span style="font-size: 23.324px;">**<span style="vertical-align: inherit;"><span style="vertical-align: inherit;"><span style="vertical-align: inherit;"><span style="vertical-align: inherit;">Redémarrage Mysql </span></span></span></span>**</span></span>**<span style="vertical-align: inherit;"><span style="vertical-align: inherit;"><span style="vertical-align: inherit;"><span style="vertical-align: inherit;"><span style="vertical-align: inherit;"><span style="vertical-align: inherit;"><span style="vertical-align: inherit;"><span style="vertical-align: inherit;"><span style="vertical-align: inherit;"><span style="vertical-align: inherit;"><span style="vertical-align: inherit;"><span style="vertical-align: inherit;"> 1</span></span></span></span></span></span></span></span></span></span></span></span>***</span>

```
systemctl restart mariadb.service
```

### <span style="color: rgb(53, 152, 219);"><span style="vertical-align: inherit;"><span style="vertical-align: inherit;"><span style="vertical-align: inherit;"><span style="vertical-align: inherit;">**<span style="vertical-align: inherit;"><span style="vertical-align: inherit;"><span style="vertical-align: inherit;"><span style="vertical-align: inherit;">7. Fichier de propriété Guacamole </span></span></span></span><span style="vertical-align: inherit;"><span style="vertical-align: inherit;"><span style="vertical-align: inherit;"><span style="vertical-align: inherit;">:</span></span></span></span>**</span></span></span></span></span>

```
touch /etc/guacamole/guacamole.properties
nano /etc/guacamole/guacamole.properties

echo "
# Hostname and Guacamole server port
guacd-hostname: localhost
guacd-port: 4822

# MySQL properties
mysql-hostname: localhost
mysql-port: 3306
mysql-database: guacamole_db
mysql-username: guacamole_user
mysql-password: Testeur
" > /etc/guacamole/guacamole.properties
```

#### <span style="color: rgb(35, 111, 161);">***<span style="vertical-align: inherit;"><span style="vertical-align: inherit;"><span style="vertical-align: inherit;"><span style="vertical-align: inherit;"><span style="vertical-align: inherit;"><span style="vertical-align: inherit;"><span style="vertical-align: inherit;"><span style="vertical-align: inherit;"><span style="vertical-align: inherit;"><span style="vertical-align: inherit;"><span style="vertical-align: inherit;"><span style="vertical-align: inherit;">Redémarrer Guac Tomcat 2</span></span></span></span></span></span></span></span></span></span></span></span>***</span>

```
systemctl restart tomcat9
systemctl restart guacd
```

### <span style="color: rgb(53, 152, 219);"><span style="vertical-align: inherit;"><span style="vertical-align: inherit;"><span style="vertical-align: inherit;"><span style="vertical-align: inherit;">**<span style="vertical-align: inherit;"><span style="vertical-align: inherit;"><span style="vertical-align: inherit;"><span style="vertical-align: inherit;">8. Connexion via l'interface </span></span></span></span><span style="vertical-align: inherit;"><span style="vertical-align: inherit;"><span style="vertical-align: inherit;"><span style="vertical-align: inherit;">:</span></span></span></span>**</span></span></span></span></span>

<span style="vertical-align: inherit;"><span style="vertical-align: inherit;"><span style="vertical-align: inherit;"><span style="vertical-align: inherit;">http://adresseIP:8080/guacamole/</span></span></span></span>

## <span style="text-decoration: underline; color: rgb(45, 194, 107);">**<span style="vertical-align: inherit;"><span style="vertical-align: inherit;"><span style="vertical-align: inherit;"><span style="vertical-align: inherit;"><span style="vertical-align: inherit;"><span style="vertical-align: inherit;"><span style="vertical-align: inherit;"><span style="vertical-align: inherit;">D - Connexion LDAP :</span></span></span></span></span></span></span></span>**</span>

### <span style="color: rgb(53, 152, 219);"><span style="vertical-align: inherit;"><span style="vertical-align: inherit;"><span style="vertical-align: inherit;"><span style="vertical-align: inherit;">**<span style="vertical-align: inherit;"><span style="vertical-align: inherit;"><span style="vertical-align: inherit;"><span style="vertical-align: inherit;">1. Installation du LDAP </span></span></span></span><span style="vertical-align: inherit;"><span style="vertical-align: inherit;"><span style="vertical-align: inherit;"><span style="vertical-align: inherit;">:</span></span></span></span>**</span></span></span></span></span>

<span style="vertical-align: inherit;"><span style="vertical-align: inherit;">Tout d'abord, connectez-vous sur le serveur Guacamole en ligne de commande afin d'installer l'extension LDAP.</span></span>

<span style="vertical-align: inherit;"><span style="vertical-align: inherit;">Ensuite, positionnez-vous dans "/tmp" et téléchargez l'archive tar.gz de l'extension :</span></span>

```
cd /tmp
wget https://downloads.apache.org/guacamole/1.5.2/binary/guacamole-auth-ldap-1.5.2.tar.gz
```

<span style="vertical-align: inherit;"><span style="vertical-align: inherit;">Une fois que c'est fait, décompressez cette archive tar.gz :</span></span>

```
tar -xzf guacamole-auth-ldap-1.5.2.tar.gz
```

<span style="vertical-align: inherit;"><span style="vertical-align: inherit;">Puis, déplacez le fichier JAR de l'extension vers le répertoire "extensions" de Guacamole.</span></span>

```
sudo mv guacamole-auth-ldap-1.5.2/guacamole-auth-ldap-1.5.2.jar /etc/guacamole/extensions
```

<span style="vertical-align: inherit;"><span style="vertical-align: inherit;">Pour que cette extension soit prise en charge, il convient de redémarrer Tomcat9 :</span></span>

```
sudo systemctl restart tomcat9
```

### <span style="color: rgb(53, 152, 219);"><span style="vertical-align: inherit;"><span style="vertical-align: inherit;"><span style="vertical-align: inherit;"><span style="vertical-align: inherit;">**<span style="vertical-align: inherit;"><span style="vertical-align: inherit;"><span style="vertical-align: inherit;"><span style="vertical-align: inherit;">2. Connexion au LDAP </span></span></span></span><span style="vertical-align: inherit;"><span style="vertical-align: inherit;"><span style="vertical-align: inherit;"><span style="vertical-align: inherit;">:</span></span></span></span>**</span></span></span></span></span>

<span style="vertical-align: inherit;"><span style="vertical-align: inherit;">Toujours sur le serveur Apache Guacamole, ouvrez le fichier de configuration :</span></span>

```
sudo nano /etc/guacamole/guacamole.properties
```

<span style="vertical-align: inherit;"><span style="vertical-align: inherit;">Dans ce fichier, il y a déjà d'autres propriétés définies, notamment les informations de connexion à la base de données MySQL (MariaDB). </span><span style="vertical-align: inherit;">Vous devez configurer l'extension LDAP.</span></span>

<span style="vertical-align: inherit;"><span style="vertical-align: inherit;">Tout d'abord, vous devez indiquer le nom du contrôleur de domaine, le port LDAP ( </span></span>*<span style="vertical-align: inherit;"><span style="vertical-align: inherit;">389</span></span>*<span style="vertical-align: inherit;"><span style="vertical-align: inherit;"> par défaut) et la méthode de chiffrement ( </span></span>*<span style="vertical-align: inherit;"><span style="vertical-align: inherit;">none</span></span>*<span style="vertical-align: inherit;"><span style="vertical-align: inherit;"> avec du LDAP classique). </span><span style="vertical-align: inherit;">Ce qui donne les lignes suivantes à ajouter dans le fichier :</span></span>

```
### Active Directory
# Controleur de domaine
ldap-hostname: ldap.v.sdem.fr
ldap-port: 389
ldap-encryption-method: none
```

<span style="vertical-align: inherit;"><span style="vertical-align: inherit;">Deuxièmement, à la suite, vous devez ajouter les informations sur le compte à utiliser pour s'authentifier auprès de l'annuaire Active Directory. </span><span style="vertical-align: inherit;">Ce compte sert uniquement à lire le contenu de l'annuaire (utilisateurs, groupes et membre des groupes). </span><span style="vertical-align: inherit;">Dans l'exemple ci-dessous, le compte « </span></span>*<span style="vertical-align: inherit;"><span style="vertical-align: inherit;">Sync\_Guacamole@it-connect.local</span></span>*<span style="vertical-align: inherit;"><span style="vertical-align: inherit;"> » est utilisé.</span></span>

```
# Utilisateur pour connexion AD
ldap-search-bind-dn: cn=LDAP Administrator,ou=DIT Roles,dc=sdem,dc=fr
ldap-search-bind-password: PASSWORD
```

<span style="vertical-align: inherit;"><span style="vertical-align: inherit;">Troisièmement, vous devez indiquer </span></span>**<span style="vertical-align: inherit;"><span style="vertical-align: inherit;">comment rechercher les utilisateurs dans l'Active Directory</span></span>**<span style="vertical-align: inherit;"><span style="vertical-align: inherit;"> . </span><span style="vertical-align: inherit;">Comme base DN, c'est-à-dire comme </span></span>**<span style="vertical-align: inherit;"><span style="vertical-align: inherit;">base de recherche</span></span>**<span style="vertical-align: inherit;"><span style="vertical-align: inherit;"> , on évite de mettre la racine de l'annuaire Active Directory.</span></span>

<span style="vertical-align: inherit;"><span style="vertical-align: inherit;">Ici, l'OU " </span></span>*<span style="vertical-align: inherit;"><span style="vertical-align: inherit;">OU=Tiering,OU=IT,DC=it-connect,DC=local</span></span>*<span style="vertical-align: inherit;"><span style="vertical-align: inherit;"> " qui contient d'autres sous-OU ainsi que les comptes d'administration seront ciblés. </span><span style="vertical-align: inherit;">Tout ce qui est en dehors de cette racine " </span></span>*<span style="vertical-align: inherit;"><span style="vertical-align: inherit;">ne sera pas vu</span></span>*<span style="vertical-align: inherit;"><span style="vertical-align: inherit;"> " par Guacamole. </span><span style="vertical-align: inherit;">Ceci correspond au paramètre " </span></span>**<span style="vertical-align: inherit;"><span style="vertical-align: inherit;">ldap-user-base-dn</span></span>**<span style="vertical-align: inherit;"><span style="vertical-align: inherit;"> ". </span><span style="vertical-align: inherit;">Ensuite, le paramètre " </span></span>**<span style="vertical-align: inherit;"><span style="vertical-align: inherit;">ldap-username-attribute</span></span>**<span style="vertical-align: inherit;"><span style="vertical-align: inherit;"> " sert à préciser l'attribut AD utilisé pour les noms d'utilisateurs.</span></span>

<span style="vertical-align: inherit;"><span style="vertical-align: inherit;">Enfin, le paramètre « </span></span>**<span style="vertical-align: inherit;"><span style="vertical-align: inherit;">ldap-user-search-filter</span></span>**<span style="vertical-align: inherit;"><span style="vertical-align: inherit;"> » permet de déclarer le filtre de recherche. </span><span style="vertical-align: inherit;">Ici, on prend tous les utilisateurs qui sont membres du groupe de sécurité Active Directory « </span></span>**<span style="vertical-align: inherit;"><span style="vertical-align: inherit;">GDL-Guacamole-Access</span></span>**<span style="vertical-align: inherit;"><span style="vertical-align: inherit;"> ».</span></span>

```
# Recherche des utilisateurs
ldap-user-base-dn: ou=People,dc=sdem,dc=fr
ldap-username-attribute: uid
#ldap-user-search-filter: (&(objectClass=User)(sAMAccountName=*)(memberOf:1.2.840.113556.1.4.1941:=CN=GDL-Guacamole-A>
```

<span style="vertical-align: inherit;"><span style="vertical-align: inherit;">Quatrièmement, vous devez </span></span>**<span style="vertical-align: inherit;"><span style="vertical-align: inherit;">ajouter des paramètres de recherche pour les groupes</span></span>**<span style="vertical-align: inherit;"><span style="vertical-align: inherit;"> . </span><span style="vertical-align: inherit;">Si vous souhaitez rechercher uniquement les utilisateurs, cette partie n'est pas obligatoire. </span><span style="vertical-align: inherit;">Sur le même principe, on indique la base de recherche et le filtre. </span><span style="vertical-align: inherit;">Ici, on prend tous les groupes situés sous la base DN.</span></span>

```
# Recherche des groupes
#ldap-group-base-dn: OU=Tiering,OU=IT,DC=it-connect,DC=local
#ldap-group-search-filter: (objectClass=Group)
```

**<span style="vertical-align: inherit;"><span style="vertical-align: inherit;">Le fichier de configuration est prêt ! </span></span>**<span style="vertical-align: inherit;"><span style="vertical-align: inherit;"> Sauvegardez et fermez le fichier. </span><span style="vertical-align: inherit;">Il ne reste plus qu'à relancer Tomcat9 :</span></span>

```
sudo systemctl restart tomcat9
```

# Grafana


# 01 - Description

## <span style="color: rgb(53, 152, 219);">**A - Description**</span>

Hyper-V : Debian

Distribution : Debian 12.5

### <span style="color: rgb(35, 111, 161);">**1 Version**</span>

**<span class="_fadeIn_m1hgl_8">Installation </span><span class="_fadeIn_m1hgl_8">de </span><span class="_fadeIn_m1hgl_8">Grafana </span><span class="_fadeIn_m1hgl_8">en </span><span class="_fadeIn_m1hgl_8">utilisant </span><span class="_fadeIn_m1hgl_8">la </span><span class="_fadeIn_m1hgl_8">dernière </span><span class="_fadeIn_m1hgl_8">version </span><span class="_fadeIn_m1hgl_8">stable </span><span class="_fadeIn_m1hgl_8">disponible (</span><span class="_fadeIn_m1hgl_8">12.0) </span><span class="_fadeIn_m1hgl_8">au </span><span class="_fadeIn_m1hgl_8">moment </span><span class="_fadeIn_m1hgl_8">de </span><span class="_fadeIn_m1hgl_8">la </span><span class="_fadeIn_m1hgl_8">rédaction.</span>**  
<span class="_fadeIn_m1hgl_8">L'utilisation </span><span class="_fadeIn_m1hgl_8">de </span><span class="_fadeIn_m1hgl_8">cette </span><span class="_fadeIn_m1hgl_8">version </span><span class="_fadeIn_m1hgl_8">garantit </span><span class="_fadeIn_m1hgl_8">non </span><span class="_fadeIn_m1hgl_8">seulement </span><span class="_fadeIn_m1hgl_8">l'accès </span><span class="_fadeIn_m1hgl_8">aux </span><span class="_fadeIn_m1hgl_8">dernières </span><span class="_fadeIn_m1hgl_8">fonctionnalités, </span><span class="_fadeIn_m1hgl_8">aux </span><span class="_fadeIn_m1hgl_8">améliorations </span><span class="_fadeIn_m1hgl_8">de </span><span class="_fadeIn_m1hgl_8">performance </span><span class="_fadeIn_m1hgl_8">et </span><span class="_fadeIn_m1hgl_8">aux </span><span class="_fadeIn_m1hgl_8">correctifs </span><span class="_fadeIn_m1hgl_8">de </span><span class="_fadeIn_m1hgl_8">sécurité, </span><span class="_fadeIn_m1hgl_8">mais </span><span class="_fadeIn_m1hgl_8">représente </span><span class="_fadeIn_m1hgl_8">également </span><span class="_fadeIn_m1hgl_8">une </span><span class="_fadeIn_m1hgl_8">nette </span><span class="_fadeIn_m1hgl_8">évolution </span><span class="_fadeIn_m1hgl_8">par </span><span class="_fadeIn_m1hgl_8">rapport </span><span class="_fadeIn_m1hgl_8">à </span><span class="_fadeIn_m1hgl_8">la </span><span class="_fadeIn_m1hgl_8">version </span><span class="_fadeIn_m1hgl_8">9.1.5 </span><span class="_fadeIn_m1hgl_8">précédemment </span><span class="_fadeIn_m1hgl_8">utilisée. </span><span class="_fadeIn_m1hgl_8">En </span><span class="_fadeIn_m1hgl_8">effet, </span><span class="_fadeIn_m1hgl_8">cette </span><span class="_fadeIn_m1hgl_8">ancienne </span><span class="_fadeIn_m1hgl_8">version </span><span class="_fadeIn_m1hgl_8">offre </span><span class="_fadeIn_m1hgl_8">significativement </span><span class="_fadeIn_m1hgl_8">moins </span><span class="_fadeIn_m1hgl_8">d'avantages </span><span class="_fadeIn_m1hgl_8">en </span><span class="_fadeIn_m1hgl_8">termes </span><span class="_fadeIn_m1hgl_8">de </span><span class="_fadeIn_m1hgl_8">compatibilité </span><span class="_fadeIn_m1hgl_8">avec </span><span class="_fadeIn_m1hgl_8">les </span><span class="_fadeIn_m1hgl_8">sources </span><span class="_fadeIn_m1hgl_8">de </span><span class="_fadeIn_m1hgl_8">données </span><span class="_fadeIn_m1hgl_8">modernes, </span><span class="_fadeIn_m1hgl_8">de </span><span class="_fadeIn_m1hgl_8">capacités </span><span class="_fadeIn_m1hgl_8">d'alerte </span><span class="_fadeIn_m1hgl_8">unifiées, </span><span class="_fadeIn_m1hgl_8">de </span><span class="_fadeIn_m1hgl_8">personnalisation </span><span class="_fadeIn_m1hgl_8">de </span><span class="_fadeIn_m1hgl_8">l'interface, </span><span class="_fadeIn_m1hgl_8">et </span><span class="_fadeIn_m1hgl_8">de </span><span class="_fadeIn_m1hgl_8">prise </span><span class="_fadeIn_m1hgl_8">en </span><span class="_fadeIn_m1hgl_8">charge </span><span class="_fadeIn_m1hgl_8">des </span><span class="_fadeIn_m1hgl_8">tableaux </span><span class="_fadeIn_m1hgl_8">de </span><span class="_fadeIn_m1hgl_8">bord </span><span class="_fadeIn_m1hgl_8">avancés.</span>

#### <span style="color: rgb(52, 73, 94);">***Différence entre les version***</span>

<span class="_fadeIn_m1hgl_8">- </span><span class="_fadeIn_m1hgl_8">Navigation </span><span class="_fadeIn_m1hgl_8">et </span><span class="_fadeIn_m1hgl_8">interface </span><span class="_fadeIn_m1hgl_8">utilisateur</span>

- **<span class="_fadeIn_m1hgl_8">Nouvelle </span><span class="_fadeIn_m1hgl_8">navigation</span>**<span class="_fadeIn_m1hgl_8"> : </span><span class="relative -mx-px my-[-0.2rem] rounded px-px py-[0.2rem] transition-colors duration-100 ease-in-out"><span class="_fadeIn_m1hgl_8">Refonte </span><span class="_fadeIn_m1hgl_8">complète </span><span class="_fadeIn_m1hgl_8">de </span><span class="_fadeIn_m1hgl_8">la </span><span class="_fadeIn_m1hgl_8">barre </span><span class="_fadeIn_m1hgl_8">latérale, </span><span class="_fadeIn_m1hgl_8">ajout </span><span class="_fadeIn_m1hgl_8">d'une </span><span class="_fadeIn_m1hgl_8">palette </span><span class="_fadeIn_m1hgl_8">de </span><span class="_fadeIn_m1hgl_8">commandes, </span><span class="_fadeIn_m1hgl_8">d'un </span><span class="_fadeIn_m1hgl_8">en-</span><span class="_fadeIn_m1hgl_8">tête </span><span class="_fadeIn_m1hgl_8">commun </span><span class="_fadeIn_m1hgl_8">et </span><span class="_fadeIn_m1hgl_8">de </span><span class="_fadeIn_m1hgl_8">nouveaux </span><span class="_fadeIn_m1hgl_8">menus </span><span class="_fadeIn_m1hgl_8">pour </span><span class="_fadeIn_m1hgl_8">une </span><span class="_fadeIn_m1hgl_8">navigation </span><span class="_fadeIn_m1hgl_8">plus </span><span class="_fadeIn_m1hgl_8">fluide </span><span class="_fadeIn_m1hgl_8">et </span><span class="_fadeIn_m1hgl_8">accessible.</span></span> <span class="" data-state="closed"><span class="ms-1 inline-flex max-w-full items-center relative top-[-0.094rem] animate-[show_150ms_ease-in]">[<span class="relative start-0 bottom-0 flex h-full w-full items-center"><span class="flex h-4 w-full items-center justify-between overflow-hidden"><span class="max-w-full grow truncate overflow-hidden text-center">Grafana Labs</span></span></span>](https://grafana.com/docs/grafana/latest/whatsnew/whats-new-in-v9-5/?utm_source=chatgpt.com)</span></span>
- **<span class="_fadeIn_m1hgl_8">Tableaux </span><span class="_fadeIn_m1hgl_8">de </span><span class="_fadeIn_m1hgl_8">bord</span>**<span class="_fadeIn_m1hgl_8"> : </span><span class="relative -mx-px my-[-0.2rem] rounded px-px py-[0.2rem] transition-colors duration-100 ease-in-out"><span class="_fadeIn_m1hgl_8">État </span><span class="_fadeIn_m1hgl_8">amélioré </span><span class="_fadeIn_m1hgl_8">des </span><span class="_fadeIn_m1hgl_8">tableaux </span><span class="_fadeIn_m1hgl_8">de </span><span class="_fadeIn_m1hgl_8">bord </span><span class="_fadeIn_m1hgl_8">vides </span><span class="_fadeIn_m1hgl_8">et </span><span class="_fadeIn_m1hgl_8">des </span><span class="_fadeIn_m1hgl_8">panneaux, </span><span class="_fadeIn_m1hgl_8">avec </span><span class="_fadeIn_m1hgl_8">une </span><span class="_fadeIn_m1hgl_8">meilleure </span><span class="_fadeIn_m1hgl_8">accessibilité </span><span class="_fadeIn_m1hgl_8">et </span><span class="_fadeIn_m1hgl_8">une </span><span class="_fadeIn_m1hgl_8">disposition </span><span class="_fadeIn_m1hgl_8">repensée.</span></span>

---

<span class="_fadeIn_m1hgl_8">- </span><span class="_fadeIn_m1hgl_8">Alertes </span><span class="_fadeIn_m1hgl_8">et </span><span class="_fadeIn_m1hgl_8">notifications</span>

- **<span class="_fadeIn_m1hgl_8">Alerting </span><span class="_fadeIn_m1hgl_8">unifié</span>**<span class="_fadeIn_m1hgl_8"> : </span><span class="relative -mx-px my-[-0.2rem] rounded px-px py-[0.2rem] transition-colors duration-100 ease-in-out"><span class="_fadeIn_m1hgl_8">Introduction </span><span class="_fadeIn_m1hgl_8">d'un </span><span class="_fadeIn_m1hgl_8">système </span><span class="_fadeIn_m1hgl_8">d'alertes </span><span class="_fadeIn_m1hgl_8">unifié </span><span class="_fadeIn_m1hgl_8">avec </span><span class="_fadeIn_m1hgl_8">une </span><span class="_fadeIn_m1hgl_8">interface </span><span class="_fadeIn_m1hgl_8">utilisateur </span><span class="_fadeIn_m1hgl_8">améliorée, </span><span class="_fadeIn_m1hgl_8">remplaçant </span><span class="_fadeIn_m1hgl_8">les </span><span class="_fadeIn_m1hgl_8">anciens </span><span class="_fadeIn_m1hgl_8">systèmes </span><span class="_fadeIn_m1hgl_8">d'alertes.</span></span> <span class="" data-state="closed"><span class="ms-1 inline-flex max-w-full items-center relative top-[-0.094rem] animate-[show_150ms_ease-in]">[<span class="relative start-0 bottom-0 flex h-full w-full items-center"><span class="flex h-4 w-full items-center justify-between overflow-hidden"><span class="max-w-full grow truncate overflow-hidden text-center">AWS Documentation</span></span></span>](https://docs.aws.amazon.com/fr_fr/grafana/latest/userguide/version-differences.html?utm_source=chatgpt.com)</span></span>
- **<span class="_fadeIn_m1hgl_8">Opsgenie</span>**<span class="_fadeIn_m1hgl_8"> : </span><span class="relative -mx-px my-[-0.2rem] rounded px-px py-[0.2rem] transition-colors duration-100 ease-in-out"><span class="_fadeIn_m1hgl_8">Ajout </span><span class="_fadeIn_m1hgl_8">du </span><span class="_fadeIn_m1hgl_8">support </span><span class="_fadeIn_m1hgl_8">des </span><span class="_fadeIn_m1hgl_8">répondants </span><span class="_fadeIn_m1hgl_8">dans </span><span class="_fadeIn_m1hgl_8">l'intégration </span><span class="_fadeIn_m1hgl_8">Opsgenie.</span></span><span class="" data-state="closed"><span class="ms-1 inline-flex max-w-full items-center relative top-[-0.094rem] animate-[show_150ms_ease-in]">[<span class="relative start-0 bottom-0 flex h-full w-full items-center"><span class="flex h-4 w-full items-center justify-between overflow-hidden"><span class="max-w-full grow truncate overflow-hidden text-center">GitHub</span></span></span>](https://github.com/tigrisdata/grafana/blob/main/CHANGELOG.md?utm_source=chatgpt.com)</span></span>

---

<span class="_fadeIn_m1hgl_8">- </span><span class="_fadeIn_m1hgl_8">Sécurité </span><span class="_fadeIn_m1hgl_8">et </span><span class="_fadeIn_m1hgl_8">authentification</span>

- **<span class="_fadeIn_m1hgl_8">Comptes </span><span class="_fadeIn_m1hgl_8">de </span><span class="_fadeIn_m1hgl_8">service</span>**<span class="_fadeIn_m1hgl_8"> : </span><span class="relative -mx-px my-[-0.2rem] rounded px-px py-[0.2rem] transition-colors duration-100 ease-in-out"><span class="_fadeIn_m1hgl_8">Remplacement </span><span class="_fadeIn_m1hgl_8">des </span><span class="_fadeIn_m1hgl_8">clés </span><span class="_fadeIn_m1hgl_8">API </span><span class="_fadeIn_m1hgl_8">par </span><span class="_fadeIn_m1hgl_8">des </span><span class="_fadeIn_m1hgl_8">comptes </span><span class="_fadeIn_m1hgl_8">de </span><span class="_fadeIn_m1hgl_8">service </span><span class="_fadeIn_m1hgl_8">pour </span><span class="_fadeIn_m1hgl_8">une </span><span class="_fadeIn_m1hgl_8">gestion </span><span class="_fadeIn_m1hgl_8">plus </span><span class="_fadeIn_m1hgl_8">sécurisée </span><span class="_fadeIn_m1hgl_8">de </span><span class="_fadeIn_m1hgl_8">l'accès </span><span class="_fadeIn_m1hgl_8">à </span><span class="_fadeIn_m1hgl_8">Grafana.</span></span> <span class="" data-state="closed"><span class="ms-1 inline-flex max-w-full items-center relative top-[-0.094rem] animate-[show_150ms_ease-in]">[<span class="relative start-0 bottom-0 flex h-full w-full items-center"><span class="flex h-4 w-full items-center justify-between overflow-hidden"><span class="max-w-full grow truncate overflow-hidden text-center">AWS Documentation</span></span></span>](https://docs.aws.amazon.com/fr_fr/grafana/latest/userguide/version-differences.html?utm_source=chatgpt.com)</span></span>
- **<span class="_fadeIn_m1hgl_8">Authentification </span><span class="_fadeIn_m1hgl_8">externe</span>**<span class="_fadeIn_m1hgl_8"> : </span><span class="relative -mx-px my-[-0.2rem] rounded px-px py-[0.2rem] transition-colors duration-100 ease-in-out"><span class="_fadeIn_m1hgl_8">Verrouillage </span><span class="_fadeIn_m1hgl_8">des </span><span class="_fadeIn_m1hgl_8">rôles </span><span class="_fadeIn_m1hgl_8">d'organisation </span><span class="_fadeIn_m1hgl_8">synchronisés </span><span class="_fadeIn_m1hgl_8">depuis </span><span class="_fadeIn_m1hgl_8">les </span><span class="_fadeIn_m1hgl_8">fournisseurs </span><span class="_fadeIn_m1hgl_8">d'authentification </span><span class="_fadeIn_m1hgl_8">externes.</span></span>

---

<span class="_fadeIn_m1hgl_8">- </span><span class="_fadeIn_m1hgl_8">Visualisations </span><span class="_fadeIn_m1hgl_8">et </span><span class="_fadeIn_m1hgl_8">transformations</span>

- **<span class="_fadeIn_m1hgl_8">Transformations</span>**<span class="_fadeIn_m1hgl_8"> : </span><span class="relative -mx-px my-[-0.2rem] rounded px-px py-[0.2rem] transition-colors duration-100 ease-in-out"><span class="_fadeIn_m1hgl_8">Refonte </span><span class="_fadeIn_m1hgl_8">de </span><span class="_fadeIn_m1hgl_8">l'onglet </span><span class="_fadeIn_m1hgl_8">Transformations </span><span class="_fadeIn_m1hgl_8">avec </span><span class="_fadeIn_m1hgl_8">une </span><span class="_fadeIn_m1hgl_8">expérience </span><span class="_fadeIn_m1hgl_8">utilisateur </span><span class="_fadeIn_m1hgl_8">et </span><span class="_fadeIn_m1hgl_8">une </span><span class="_fadeIn_m1hgl_8">conception </span><span class="_fadeIn_m1hgl_8">visuelle </span><span class="_fadeIn_m1hgl_8">améliorées.</span></span> <span class="ms-1 inline-flex max-w-full items-center relative top-[-0.094rem] animate-[show_150ms_ease-in]">[<span class="relative start-0 bottom-0 flex h-full w-full items-center"><span class="flex h-4 w-full items-center justify-between overflow-hidden"><span class="max-w-full grow truncate overflow-hidden text-center">AWS Documentation</span></span></span>](https://docs.aws.amazon.com/fr_fr/grafana/latest/userguide/version-differences.html?utm_source=chatgpt.com)</span>
- **<span class="_fadeIn_m1hgl_8">Canvas</span>**<span class="_fadeIn_m1hgl_8"> : </span><span class="relative -mx-px my-[-0.2rem] rounded px-px py-[0.2rem] transition-colors duration-100 ease-in-out"><span class="_fadeIn_m1hgl_8">Ajout </span><span class="_fadeIn_m1hgl_8">de </span><span class="_fadeIn_m1hgl_8">la </span><span class="_fadeIn_m1hgl_8">fonctionnalité </span><span class="_fadeIn_m1hgl_8">de </span><span class="_fadeIn_m1hgl_8">zoom </span><span class="_fadeIn_m1hgl_8">et </span><span class="_fadeIn_m1hgl_8">de </span><span class="_fadeIn_m1hgl_8">panoramique </span><span class="_fadeIn_m1hgl_8">pour </span><span class="_fadeIn_m1hgl_8">une </span><span class="_fadeIn_m1hgl_8">meilleure </span><span class="_fadeIn_m1hgl_8">interactivité.</span></span>

---

<span class="_fadeIn_m1hgl_8">- </span><span class="_fadeIn_m1hgl_8">Sources </span><span class="_fadeIn_m1hgl_8">de </span><span class="_fadeIn_m1hgl_8">données </span><span class="_fadeIn_m1hgl_8">et </span><span class="_fadeIn_m1hgl_8">intégrations</span>

- **<span class="_fadeIn_m1hgl_8">Prometheus</span>**<span class="_fadeIn_m1hgl_8"> : </span><span class="relative -mx-px my-[-0.2rem] rounded px-px py-[0.2rem] transition-colors duration-100 ease-in-out"><span class="_fadeIn_m1hgl_8">Amélioration </span><span class="_fadeIn_m1hgl_8">des </span><span class="_fadeIn_m1hgl_8">performances </span><span class="_fadeIn_m1hgl_8">et </span><span class="_fadeIn_m1hgl_8">de </span><span class="_fadeIn_m1hgl_8">l'utilisabilité, </span><span class="_fadeIn_m1hgl_8">avec </span><span class="_fadeIn_m1hgl_8">l'introduction </span><span class="_fadeIn_m1hgl_8">d'une </span><span class="_fadeIn_m1hgl_8">encyclopédie </span><span class="_fadeIn_m1hgl_8">des </span><span class="_fadeIn_m1hgl_8">métriques </span><span class="_fadeIn_m1hgl_8">et </span><span class="_fadeIn_m1hgl_8">d'un </span><span class="_fadeIn_m1hgl_8">cache </span><span class="_fadeIn_m1hgl_8">du </span><span class="_fadeIn_m1hgl_8">navigateur </span><span class="_fadeIn_m1hgl_8">Prometheus.</span></span> <span class="ms-1 inline-flex max-w-full items-center relative top-[-0.094rem] animate-[show_150ms_ease-in]">[<span class="relative start-0 bottom-0 flex h-full w-full items-center"><span class="flex h-4 w-full items-center justify-between overflow-hidden"><span class="max-w-full grow truncate overflow-hidden text-center">AWS Documentation</span></span></span>](https://docs.aws.amazon.com/fr_fr/grafana/latest/userguide/version-differences.html?utm_source=chatgpt.com)</span>
- **<span class="_fadeIn_m1hgl_8">InfluxDB</span>**<span class="_fadeIn_m1hgl_8"> : </span><span class="relative -mx-px my-[-0.2rem] rounded px-px py-[0.2rem] transition-colors duration-100 ease-in-out"><span class="_fadeIn_m1hgl_8">Utilisation </span><span class="_fadeIn_m1hgl_8">de </span><span class="_fadeIn_m1hgl_8">la </span><span class="_fadeIn_m1hgl_8">configuration </span><span class="_fadeIn_m1hgl_8">SQL </span><span class="_fadeIn_m1hgl_8">par </span><span class="_fadeIn_m1hgl_8">défaut </span><span class="_fadeIn_m1hgl_8">pour </span><span class="_fadeIn_m1hgl_8">une </span><span class="_fadeIn_m1hgl_8">meilleure </span><span class="_fadeIn_m1hgl_8">compatibilité.</span></span>

---

<span class="_fadeIn_m1hgl_8">- </span><span class="_fadeIn_m1hgl_8">Développement </span><span class="_fadeIn_m1hgl_8">et </span><span class="_fadeIn_m1hgl_8">plugins</span>

- **<span class="_fadeIn_m1hgl_8">React </span><span class="_fadeIn_m1hgl_8">18</span>**<span class="_fadeIn_m1hgl_8"> : </span><span class="relative -mx-px my-[-0.2rem] rounded px-px py-[0.2rem] transition-colors duration-100 ease-in-out"><span class="_fadeIn_m1hgl_8">Mise </span><span class="_fadeIn_m1hgl_8">à </span><span class="_fadeIn_m1hgl_8">jour </span><span class="_fadeIn_m1hgl_8">vers </span><span class="_fadeIn_m1hgl_8">React </span><span class="_fadeIn_m1hgl_8">18, </span><span class="_fadeIn_m1hgl_8">apportant </span><span class="_fadeIn_m1hgl_8">des </span><span class="_fadeIn_m1hgl_8">améliorations </span><span class="_fadeIn_m1hgl_8">de </span><span class="_fadeIn_m1hgl_8">performance </span><span class="_fadeIn_m1hgl_8">et </span><span class="_fadeIn_m1hgl_8">de </span><span class="_fadeIn_m1hgl_8">sécurité.</span></span> <span class="ms-1 inline-flex max-w-full items-center relative top-[-0.094rem] animate-[show_150ms_ease-in]">[<span class="relative start-0 bottom-0 flex h-full w-full items-center"><span class="flex h-4 w-full items-center justify-between"><span class="max-w-full grow truncate overflow-hidden text-center">Grafana Labs</span><span class="-me-1 flex h-full items-center rounded-full px-1 text-[#8F8F8F]">+1</span></span><span class="flex h-4 w-full items-center justify-between absolute"><span class="max-w-full grow truncate overflow-hidden text-center">GitHub</span><span class="-me-1 flex h-full items-center rounded-full px-1 text-[#8F8F8F]">+1</span></span></span>](https://grafana.com/docs/grafana/latest/whatsnew/whats-new-in-v9-5/?utm_source=chatgpt.com)</span>
- **<span class="_fadeIn_m1hgl_8">Plugins</span>**<span class="_fadeIn_m1hgl_8"> : </span><span class="relative -mx-px my-[-0.2rem] rounded px-px py-[0.2rem] transition-colors duration-100 ease-in-out"><span class="_fadeIn_m1hgl_8">Amélioration </span><span class="_fadeIn_m1hgl_8">de </span><span class="_fadeIn_m1hgl_8">la </span><span class="_fadeIn_m1hgl_8">gestion </span><span class="_fadeIn_m1hgl_8">des </span><span class="_fadeIn_m1hgl_8">plugins, </span><span class="_fadeIn_m1hgl_8">avec </span><span class="_fadeIn_m1hgl_8">des </span><span class="_fadeIn_m1hgl_8">options </span><span class="_fadeIn_m1hgl_8">pour </span><span class="_fadeIn_m1hgl_8">désactiver </span><span class="_fadeIn_m1hgl_8">l'interface </span><span class="_fadeIn_m1hgl_8">de </span><span class="_fadeIn_m1hgl_8">dépréciation </span><span class="_fadeIn_m1hgl_8">Angular </span><span class="_fadeIn_m1hgl_8">pour </span><span class="_fadeIn_m1hgl_8">des </span><span class="_fadeIn_m1hgl_8">plugins </span><span class="_fadeIn_m1hgl_8">spécifiques.</span></span>

---

<span class="_fadeIn_m1hgl_8">- </span><span class="_fadeIn_m1hgl_8">Rapports </span><span class="_fadeIn_m1hgl_8">et </span><span class="_fadeIn_m1hgl_8">personnalisation</span>

- **<span class="_fadeIn_m1hgl_8">Rapports</span>**<span class="_fadeIn_m1hgl_8"> : </span><span class="relative -mx-px my-[-0.2rem] rounded px-px py-[0.2rem] transition-colors duration-100 ease-in-out"><span class="_fadeIn_m1hgl_8">Amélioration </span><span class="_fadeIn_m1hgl_8">de </span><span class="_fadeIn_m1hgl_8">l'interface </span><span class="_fadeIn_m1hgl_8">utilisateur </span><span class="_fadeIn_m1hgl_8">des </span><span class="_fadeIn_m1hgl_8">rapports </span><span class="_fadeIn_m1hgl_8">pour </span><span class="_fadeIn_m1hgl_8">une </span><span class="_fadeIn_m1hgl_8">meilleure </span><span class="_fadeIn_m1hgl_8">correspondance </span><span class="_fadeIn_m1hgl_8">avec </span><span class="_fadeIn_m1hgl_8">le </span><span class="_fadeIn_m1hgl_8">nouveau </span><span class="_fadeIn_m1hgl_8">style </span><span class="_fadeIn_m1hgl_8">de </span><span class="_fadeIn_m1hgl_8">navigation.</span></span> <span class="ms-1 inline-flex max-w-full items-center relative top-[-0.094rem] animate-[show_150ms_ease-in]">[<span class="relative start-0 bottom-0 flex h-full w-full items-center"><span class="flex h-4 w-full items-center justify-between overflow-hidden"><span class="max-w-full grow truncate overflow-hidden text-center">Grafana Labs</span></span></span>](https://grafana.com/docs/grafana/latest/whatsnew/whats-new-in-v9-5/?utm_source=chatgpt.com)</span>
- **<span class="_fadeIn_m1hgl_8">Personnalisation</span>**<span class="_fadeIn_m1hgl_8"> : </span><span class="relative -mx-px my-[-0.2rem] rounded px-px py-[0.2rem] transition-colors duration-100 ease-in-out"><span class="_fadeIn_m1hgl_8">Amélioration </span><span class="_fadeIn_m1hgl_8">de </span><span class="_fadeIn_m1hgl_8">la </span><span class="_fadeIn_m1hgl_8">personnalisation </span><span class="_fadeIn_m1hgl_8">de </span><span class="_fadeIn_m1hgl_8">l'interface </span><span class="_fadeIn_m1hgl_8">utilisateur </span><span class="_fadeIn_m1hgl_8">pour </span><span class="_fadeIn_m1hgl_8">une </span><span class="_fadeIn_m1hgl_8">meilleure </span><span class="_fadeIn_m1hgl_8">adaptation </span><span class="_fadeIn_m1hgl_8">aux </span><span class="_fadeIn_m1hgl_8">besoins </span><span class="_fadeIn_m1hgl_8">spécifiques.</span></span>

### <span style="color: rgb(35, 111, 161);">**2 Sources**</span>

[https://grafana.com/docs/grafana/latest/setup-grafana/installation/debian/](https://chrtophe.developpez.com/tutoriels/deploiement-fogproject/)

# 02 - Installation

## <span style="color: rgb(53, 152, 219);">**A - Installation à partir du référentiel APT**</span>

### <span style="color: rgb(53, 152, 219);">**<span style="color: rgb(35, 111, 161);">1 Paquet</span>**</span>

<span style="color: rgb(53, 152, 219);">**<span style="color: rgb(35, 111, 161);"><span style="color: rgb(53, 152, 219);"><span id="bkmrk-param%C3%A9trage-de-la-la-1" style="font-size: 10.5pt; font-family: Calibri,sans-serif; color: #000000; background-color: transparent; font-weight: 400; font-style: normal; font-variant: normal; text-decoration: none; vertical-align: baseline; white-space: pre-wrap;">Installez les packages prérequis.</span></span></span>**</span>

```bash
sudo apt-get install -y apt-transport-https software-properties-common wget
```


### <span style="color: rgb(53, 152, 219);">**<span style="color: rgb(35, 111, 161);">2 Clé GPG</span>**</span>

Importer la clé GPG.

```go
sudo mkdir -p /etc/apt/keyrings/
wget -q -O - https://apt.grafana.com/gpg.key | gpg --dearmor | sudo tee /etc/apt/keyrings/grafana.gpg > /dev/null
```

### <span style="color: rgb(53, 152, 219);">**<span style="color: rgb(35, 111, 161);">3 Référentiel Stable</span>**</span>

Pour ajouter un référentiel pour les versions stables, exécutez la commande suivante.

```bash
echo "deb [signed-by=/etc/apt/keyrings/grafana.gpg] https://apt.grafana.com stable main" | sudo tee -a /etc/apt/sources.list.d/grafana.list
```

### <span style="color: rgb(53, 152, 219);">**<span style="color: rgb(35, 111, 161);">4 Référentiel Bêta</span>**</span>

Pour ajouter un référentiel pour les versions bêta, exécutez la commande suivante.

```bash
echo "deb [signed-by=/etc/apt/keyrings/grafana.gpg] https://apt.grafana.com beta main" | sudo tee -a /etc/apt/sources.list.d/grafana.list
```

### <span style="color: rgb(53, 152, 219);">**<span style="color: rgb(35, 111, 161);">5 Mise à jour</span>**</span>

Exécutez la commande suivante pour mettre à jour la liste des packages disponibles.

```bash
sudo apt-get update
```

### <span style="color: rgb(53, 152, 219);">**<span style="color: rgb(35, 111, 161);">6 Installation Grafana OSS</span>**</span>

Pour installer Grafana OSS, exécutez la commande suivante.

```bash
sudo apt-get install grafana
```

### <span style="color: rgb(53, 152, 219);">**<span style="color: rgb(35, 111, 161);">7 Installation Grafana Entreprise</span>**</span>

Pour installer Grafana Enterprise, exécutez la commande suivante.

```bash
sudo apt-get install grafana-enterprise
```

# 03 - Maintenance

## <span style="background-color: rgb(255, 255, 255); color: rgb(53, 152, 219);">**A - Sauvegarde**</span>

### <span style="color: rgb(35, 111, 161);">**1 Sauvegarde de la base de donné Grafana**</span>

<span class="_fadeIn_m1hgl_8">C’est </span><span class="_fadeIn_m1hgl_8">là </span><span class="_fadeIn_m1hgl_8">où </span><span class="_fadeIn_m1hgl_8">sont </span><span class="_fadeIn_m1hgl_8">stockés </span><span class="_fadeIn_m1hgl_8">les </span><span class="_fadeIn_m1hgl_8">dashboards, </span><span class="_fadeIn_m1hgl_8">datasources, </span><span class="_fadeIn_m1hgl_8">utilisateurs, </span><span class="_fadeIn_m1hgl_8">organisations, </span><span class="_fadeIn_m1hgl_8">etc.</span>  
<span class="_fadeIn_m1hgl_8">Par </span><span class="_fadeIn_m1hgl_8">défaut, </span><span class="_fadeIn_m1hgl_8">Grafana </span><span class="_fadeIn_m1hgl_8">utilise </span>**<span class="_fadeIn_m1hgl_8">SQLite</span>**<span class="_fadeIn_m1hgl_8">, </span><span class="_fadeIn_m1hgl_8">mais </span><span class="_fadeIn_m1hgl_8">il </span><span class="_fadeIn_m1hgl_8">peut </span><span class="_fadeIn_m1hgl_8">aussi </span><span class="_fadeIn_m1hgl_8">utiliser </span><span class="_fadeIn_m1hgl_8">MySQL </span><span class="_fadeIn_m1hgl_8">ou </span><span class="_fadeIn_m1hgl_8">PostgreSQL.</span>

```bash
sudo cp /var/lib/grafana/grafana.db /chemin/vers/ta/sauvegarde/
```


### <span style="color: rgb(35, 111, 161);">**2 Sauvegarde de la configuration**</span>

<span class="_fadeIn_m1hgl_8">Le </span><span class="_fadeIn_m1hgl_8">fichier </span><span class="_fadeIn_m1hgl_8">de </span><span class="_fadeIn_m1hgl_8">configuration </span><span class="_fadeIn_m1hgl_8">principal </span><span class="_fadeIn_m1hgl_8">contient </span><span class="_fadeIn_m1hgl_8">les </span><span class="_fadeIn_m1hgl_8">paramètres </span><span class="_fadeIn_m1hgl_8">d’accès, </span><span class="_fadeIn_m1hgl_8">de </span><span class="_fadeIn_m1hgl_8">stockage, </span><span class="_fadeIn_m1hgl_8">etc.</span>

```bash
sudo cp /etc/grafana/grafana.ini /chemin/vers/ta/sauvegarde/
```

<span class="_fadeIn_m1hgl_8">Vous pouvez </span><span class="_fadeIn_m1hgl_8">aussi </span><span class="_fadeIn_m1hgl_8">sauvegarder </span><span class="_fadeIn_m1hgl_8">tout </span><span class="_fadeIn_m1hgl_8">le </span><span class="_fadeIn_m1hgl_8">dossier </span><span class="_fadeIn_m1hgl_8">si </span><span class="_fadeIn_m1hgl_8">tu </span><span class="_fadeIn_m1hgl_8">as </span><span class="_fadeIn_m1hgl_8">plusieurs </span><span class="_fadeIn_m1hgl_8">fichiers.</span>

```bash
sudo cp -r /etc/grafana/ /chemin/vers/ta/sauvegarde/etc-grafana/
```

### <span style="color: rgb(35, 111, 161);">**3 Sauvegarde des plugins (si personnalisés)**</span>

<span class="_fadeIn_m1hgl_8">Si vous avez</span><span class="_fadeIn_m1hgl_8"> </span><span class="_fadeIn_m1hgl_8">installé </span><span class="_fadeIn_m1hgl_8">des </span><span class="_fadeIn_m1hgl_8">plugins </span><span class="_fadeIn_m1hgl_8">manuellement </span><span class="_fadeIn_m1hgl_8">ou </span><span class="_fadeIn_m1hgl_8">via </span><span class="_fadeIn_m1hgl_8">l’interface.</span>

```bash
sudo cp -r /var/lib/grafana/plugins/ /chemin/vers/ta/sauvegarde/plugins/
```

### <span style="color: rgb(35, 111, 161);">**4 Sauvegarde de la base InfluxDB**</span>

<span class="_fadeIn_m1hgl_8"><span style="color: rgb(0, 0, 0);">InfluxDB contient **les métriques**, pas les dashboards.</span></span>

```bash
#Pour connaitre sa version InfluxDB
influxd version

#InfluxDB v1.x
influxd backup -portable /chemin/vers/ta/sauvegarde/influx-backup/

#InfluxDB v2.x
influx backup /chemin/vers/ta/sauvegarde/influx-backup/
```

### <span style="color: rgb(35, 111, 161);">**5 Script**</span>

Création d’un script bash qui permet de sauvegarder la base de données de Grafana ainsi que les fichiers de configuration puis les plugins et pour finir la base de données Influxdb qu’il va transférer du docker sur la machine locale.

```bash
##############################################################
# Auteur : mkermorvant                                       #
# Date de modification : 20250515                            #
#                                                            #
# Description : Script de Sauvegarde de la config Grafana    #
# 
##############################################################
#! /bin/bash                                                 #
#                                                            #
##############################################################
# Variables :
echo ""
read -p "Entrez le chemin de Sauvegarde de la bdd Grafana: " BDDGRAFANA
read -p "Entrez le chemin de Sauvegarde des fichiers de configuration de Grafana: " CONF
read -p "Entrez le chemin de Sauvegarde des plugins: " PLUGINS
read -p "Entrez le nom de votre conteneur docker Influxdb: " NOM
read -p "Entrez le chemin de Sauvegarde de Influxdb dans votre conteneur: " CONTENEUR
read -p "Entrez le chemin de Sauvegarde de Influxdb dans votre machine: " INFLUXDB
read -p "Entrez votre token Influxdb: " TOKEN
echo ""
##############################################################
# 1 - Sauvegarde de la Base de Données de Grafana
sudo cp /var/lib/grafana/grafana.db ${BDDGRAFANA}
echo "La base de données de Grafana a été sauvegardé."

# 2 - Sauvegarde des Fichiers de configurations
read -r -p "Voulez-vous sauvegarder tout le dossier ? [y/N] " response

case "$response" in
    [yY][eE][sS]|[yY])
        echo "Sauvegarde du dossier."
        sudo cp -r /etc/grafana/ ${CONF}
        echo "Le dossier de configuration a bien été sauvegardé !"
        ;;
    *)
        sudo cp /etc/grafana/grafana.ini ${CONF}
        echo "Le fichié de configuration a bien été sauvegardé !"
        ;;
esac

# 3 - Sauvegarde des plugins
sudo cp -r /var/lib/grafana/plugins/ ${PLUGINS}
echo "Les plugins ont bien été sauvegardé !"
echo ""

# 4 - Sauvegarde de la base de données InfluxDB
influx_version=$(sudo docker exec ${NOM} influxd version)
echo "Version détecté : $influx_version"
read -r -p "Votre version est-elle en InfluxDB v2.x ? [y/N] " version

case "$version" in
    [yY][eE][sS]|[yY])
        sudo docker exec ${NOM} influx backup -t ${TOKEN} ${CONTENEUR}
        echo "La base de données Influxdb a bien été sauvegardé !"
        ;;
    *)
        sudo docker exec ${NOM} influxd backup -portable -t ${TOKEN} ${CONTENEUR}
        echo "Le fichié de configuration a bien été sauvegardé !"
        ;;
esac

sudo docker cp ${NOM}:${CONTENEUR} ${INFLUXDB}
echo "Votre base de données Influxdb à bien été copié dans vos réperoire."
echo ""
```

## <span style="color: rgb(53, 152, 219);">**B - Mise à niveau Grafana**</span>

Pour mettre à niveau Grafana installé à partir du référentiel APT Grafana Labs, procédez comme suit :

### <span style="color: rgb(35, 111, 161);">**1 Dépôt officiel**</span>


#### <span style="color: rgb(52, 73, 94);">***Mise à jour des paquet*** </span>

```bash
sudo apt update
sudo apt upgrade grafana
```


Grafana se met à jour automatiquement lorsque vous exécutez `apt-get upgrade`.

```bash
##############################################################
# Auteur : mkermorvant                                       #
# Date de modification : 20250515                            #
#                                                            #
# Description : Script de mise à jour Grafana                #
#                                                            #
##############################################################
#! /bin/bash                                                 #
#                                                            #
##############################################################
# 1 - Ajout des dépôt
curl https://packages.grafana.com/gpg.key | sudo tee /usr/share/keyrings/grafana.asc
echo "Ajout du dépôt de Grafana à la liste des sources APT."
echo "deb [signed-by=/usr/share/keyrings/grafana.asc] https://packages.grafana.com/oss/deb stable main" | sudo tee />
echo ""

# 2 - Mise à jour des sources APT
echo "Mise à jour des sources APT."
sudo apt update
echo ""

# 3 - Vérification des versions disponible
echo "Vérification des versions disponible."
sudo apt-cache show grafana | grep Version
echo ""

# 4 - Mise à jour de Grafana
echo "Mise à jour de votre Grafana"
sudo apt-get install --only-upgrade grafana
echo ""

# 5 - Redémmarage du service
echo "Votre service Grafana va se redémmarer."
sudo systemctl restart grafana-server
echo ""
echo "Votre Grafana est maintenant à jour !"
echo ""

```

# Zabbix


# 00 - Comparatif Zabbic Vs Grafana

## **1) Objectif des outils**

#### **Zabbix - Solution de supervision complète**

- Outil tout en un : collecte, stockage, alertes, découverte réseau, dashboards.
- SNMP natif, agentless ou via agent
- Très adapté aux infrastructures réseau (switchs, routeur, UPS, firewalls, serveurs ...)
- Pensé pour la supervision IT classique (CPU, RAM, interfaces ...)

#### **Grafana - Plateforme de visualisation**

- Outil centré sur les dashboards et la visualisation des données.
- Ne collecte pas les données SNMP par lui même (obligé de passer par Télégraf)
- Exelente ergonomie, très visuel.

## **2) Supervision SNMP : Comparaison détaillé**

<div id="bkmrk-" style="font-family: 'Segoe UI'; font-size: 14px; font-style: normal; font-weight: 400; line-height: 20px;"></div><table border="1" id="bkmrk-crit%C3%A8re-snmp-zabbix-" style="border-collapse: collapse; width: 100%; height: 494.8px; background-color: #ecf0f1; border: 1px solid #000000;"><colgroup><col style="width: 33.3745%;"></col><col style="width: 33.3745%;"></col><col style="width: 33.3745%;"></col></colgroup><tbody><tr style="height: 41.8px;"><td style="height: 41.8px; border-color: rgb(0, 0, 0);">**Critère SNMP**</td><td style="height: 41.8px; border-color: rgb(0, 0, 0);">**Zabbix**</td><td style="height: 41.8px; border-color: rgb(0, 0, 0);">**Grafana**</td></tr><tr style="height: 63.4px;"><td style="height: 63.4px; border-color: rgb(0, 0, 0);">**Support SNMP natif**</td><td style="height: 63.4px; border-color: rgb(0, 0, 0);">Oui, support complet intégré (SNMP v1/v2c/v3)</td><td style="height: 63.4px; border-color: rgb(0, 0, 0);">Non. Nécessite un collecteur externe (ex : Prometheus + snmp\_exporter ou Telegraf + InfluxDB)</td></tr><tr style="height: 80.2px;"><td style="height: 80.2px; border-color: rgb(0, 0, 0);">**Poller SNMP intégré**</td><td style="height: 80.2px; border-color: rgb(0, 0, 0);">Oui, polling interne via Zabbix server/proxy (bulk requests, retry). \[zabbix.com\]</td><td style="height: 80.2px; border-color: rgb(0, 0, 0);">Non. SNMP Exporter ou Telegraf doivent interroger les équipements et exporter les données vers une base compatible. \[grafana.com\]</td></tr><tr style="height: 63.4px;"><td style="height: 63.4px; border-color: rgb(0, 0, 0);">**SNMP Traps**</td><td style="height: 63.4px; border-color: rgb(0, 0, 0);">Support natif des traps via snmptrapd + intégration directe dans Zabbix. \[thezabbixbook.com\]</td><td style="height: 63.4px; border-color: rgb(0, 0, 0);">Reçoit les traps uniquement via Telegraf SNMP Trap plugin → base → dashboard. Pas de traitement natif des traps.</td></tr><tr style="height: 63.4px;"><td style="height: 63.4px; border-color: rgb(0, 0, 0);">**Alertes basées sur SNMP**</td><td style="height: 63.4px; border-color: rgb(0, 0, 0);">Oui, alerting avancé, triggers, escalades.</td><td style="height: 63.4px; border-color: rgb(0, 0, 0);">Limité : alerting possible via Prometheus Alertmanager ou alertes Grafana, moins puissantes.</td></tr><tr style="height: 63.4px;"><td style="height: 63.4px; border-color: rgb(0, 0, 0);">**Performances SNMP**</td><td style="height: 63.4px; border-color: rgb(0, 0, 0);">Optimisé pour le polling à grande échelle (bulk requests).</td><td style="height: 63.4px; border-color: rgb(0, 0, 0);">Dépend totalement de Prometheus/Telegraf, pas optimisé nativement pour SNMP.</td></tr></tbody></table>

## **3) Installation &amp; maintenance**

#### **Zabbix**

- Installation plus complexe
- Paramétrage parfois lourd mais complet
- Solution centralisée

#### **Grafana**

- Installation simple
- Peut tourner en conteneur docker en quelque lignes
- Nécessite d'installer la "stack SNMP" complète

# 01 - Description

## **Matériels**

**VM Proxmox**

OS : Debian 13

RAM : 4Go

Processeur : 2

Stockage : 50Go

## **Identifiants**

Proxmox

- IRS-admin
- ieufdL

Debian-Zabbix

- root
- ieufdl
- real name (zabbix)
- [Z@bB/\*](mailto:Z@bB/*)

Asterisck

- Debian-Asterisck
- asterisck
- stjolorient

# 02 - Installation Zabbix

#### **Source :**

[https://www.libra-linux.com/blog/15-supervision-avec-zabbix-7-0-lts-sur-debian-ubuntu](https://www.libra-linux.com/blog/15-supervision-avec-zabbix-7-0-lts-sur-debian-ubuntu)

### **1) Installation du serveur Zabbix**

#### **Prérequis**

- OS : Debian 12
- 2 Go de RAM , 1 CPU
- Accès root / sudo

#### **Ajout du dépôt Zabbix**

##### Pour Debian 12

```bash
wget https://repo.zabbix.com/zabbix/7.0/debian/pool/main/z/zabbix-release/zabbix-release_7.0-1+debian12_all.deb
sudo dpkg -i zabbix-release_7.0-1+debian12_all.deb
sudo apt update
```

##### Pour Ubuntu 22.04

```
wget https://repo.zabbix.com/zabbix/7.0/ubuntu/pool/main/z/zabbix-release/zabbix-release_7.0-1+ubuntu22.04_all.deb
sudo dpkg -i zabbix-release_7.0-1+ubuntu22.04_all.deb
sudo apt update
```

#### **Installer le serveur Zabbix + frontend + BDD**

```
sudo apt install zabbix-server-mysql zabbix-frontend-php zabbix-apache-conf \
zabbix-sql-scripts zabbix-agent mariadb-server
```

#### **Configurer MariaDB**

```
sudo mysql_secure_installation
```

Puis :

```
CREATE DATABASE zabbix CHARACTER SET utf8mb4 COLLATE utf8mb4_bin;
CREATE USER zabbix@localhost IDENTIFIED BY 'ieufdl';
GRANT ALL PRIVILEGES ON zabbix.* TO zabbix@localhost;
FLUSH PRIVILEGES;
```

Importer le schéma :

```
zcat /usr/share/zabbix-sql-scripts/mysql/server.sql.gz | mysql -uzabbix -p zabbix
```

#### **Configurer Zabbix**

Fichier /etc/zabbix/zabbix\_server.conf :

```
DBPassword=ieufdl
```

Ne pas oubliez de démarrer le service :)

```
sudo systemctl restart zabbix-server zabbix-agent apache2
sudo systemctl enable zabbix-server zabbix-agent apache2
```

#### **Accéder à l’interface web**

Accéder à : http://&lt;IP\_serveur&gt;/zabbix

Identifiants initiaux :

 Login : Admin

 Mot de passe : zabbix

[![zabbix.png](https://wiki-matheo.kermorvant.fr/uploads/images/gallery/2026-03/scaled-1680-/zabbix.png)](https://wiki-matheo.kermorvant.fr/uploads/images/gallery/2026-03/zabbix.png)

# 03 - Configuration

### **1) Configuration**

#### **Langue**

Une fois sur l'interface web, la configuration de Zabbix commence. Vous commencerez par simplement choisir votre langue.

[![zabbix.png](https://wiki-matheo.kermorvant.fr/uploads/images/gallery/2026-03/scaled-1680-/zabbix.png)](https://wiki-matheo.kermorvant.fr/uploads/images/gallery/2026-03/zabbix.png)

#### **Vérification des Prérequis**

A cette étape, vous n'aurez besoin que de vérifié que tous les prérequis sont bien "OK".

[![1.png](https://wiki-matheo.kermorvant.fr/uploads/images/gallery/2026-03/scaled-1680-/1.png)](https://wiki-matheo.kermorvant.fr/uploads/images/gallery/2026-03/1.png)

#### **Configuration de la connexion à la BDD**

A cette étapes, vous devrez remplir les différentes informations pour que la connexion entre Zabbix et la base de données se déroule correctement.


<p class="callout warning">Pensé a bien noté ces identifiant dans un gestionnaire de mot de passe !!!</p>


[![2.png](https://wiki-matheo.kermorvant.fr/uploads/images/gallery/2026-03/scaled-1680-/2.png)
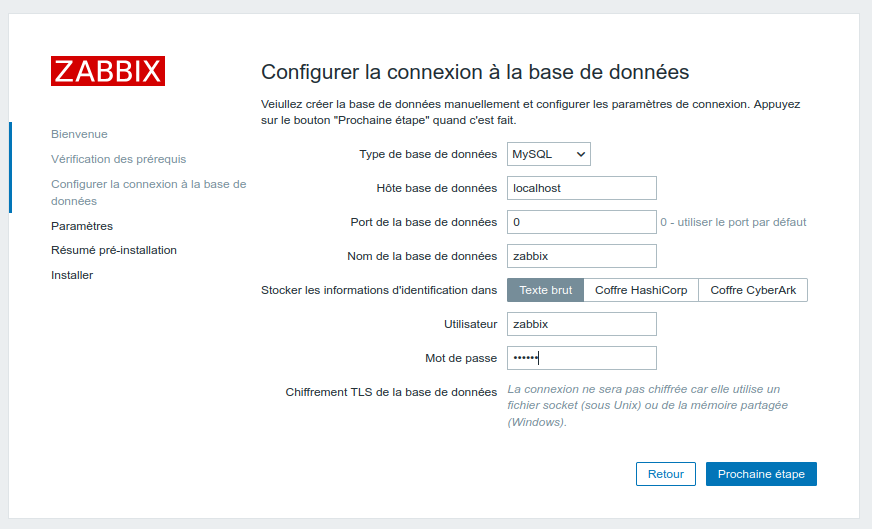
](https://wiki-matheo.kermorvant.fr/uploads/images/gallery/2026-03/2.png)

#### **Paramétrage**

Ici vous n'aurez cas remplir le nom de votre serveur, son fuseau horaire par defaut (pourras être changé plus tard) et si vous le souhaitez un thème.

[![3.png](https://wiki-matheo.kermorvant.fr/uploads/images/gallery/2026-03/scaled-1680-/3.png)
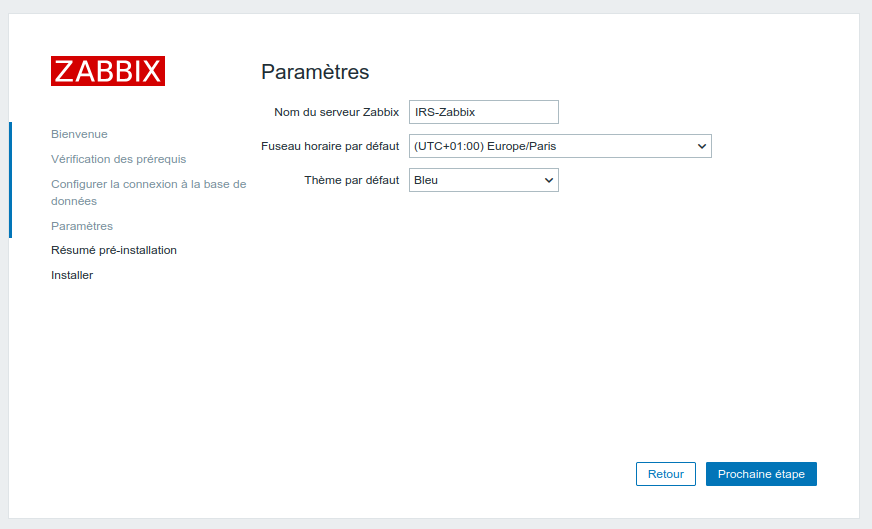
](https://wiki-matheo.kermorvant.fr/uploads/images/gallery/2026-03/3.png)

#### **Résumé**

Pour finir, vous aurez un résumé de pré-installation, n'hésitez pas à stocker les informations qui pourraient être utilisées plus tard.

[![4.png](https://wiki-matheo.kermorvant.fr/uploads/images/gallery/2026-03/scaled-1680-/4.png)
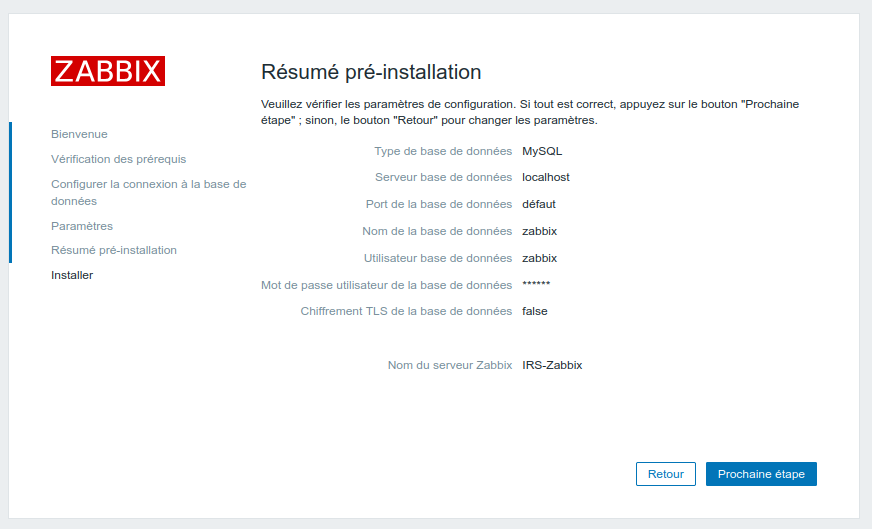
](https://wiki-matheo.kermorvant.fr/uploads/images/gallery/2026-03/4.png)

#### **Connexion**

Une fois ces étapes réalisées, vous aurez accès à l'interface web de Zabbix.

Identifiant par défaut :

- Login : Admin
- Mdp : zabbix

- [![6.png](https://wiki-matheo.kermorvant.fr/uploads/images/gallery/2026-03/scaled-1680-/6.png)
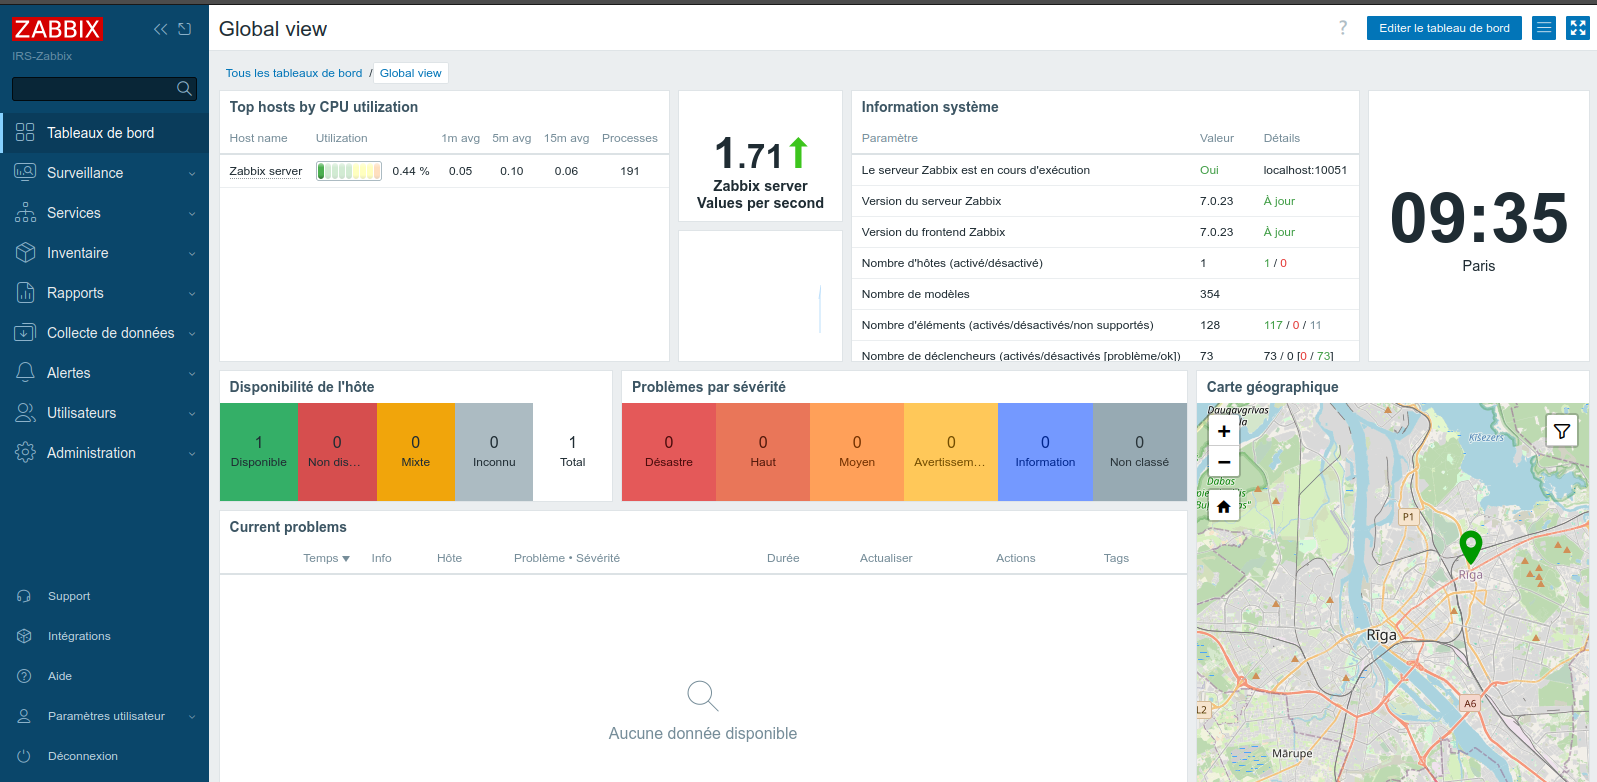
](https://wiki-matheo.kermorvant.fr/uploads/images/gallery/2026-03/6.png)

# Projet Zomboid